background image


5.


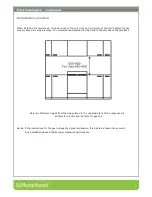
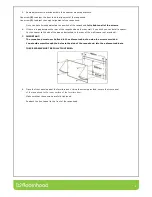
Some adjustment is provided within the extractor mounting brackets.  


o


Use screw 

(E) 

to adjust the front to back alignment of the rangehood. 


o


Use screw 

(F) 

to adjust the height alignment of the rangehood.


Once you have finished adjusting the position of the rangehood, 

fully tighten


all of the screws


6.


If there is a gap between the rear of the rangehood and the rear wall, if you wish you can install a spacer.   

Cut the spacer to the size of the gap and attached to the rear of the wall (spacer not provided). 


7.


IMPORTANT:  

The rangehood must now be fixed to the adjacent cabinets, using the screws provided.  


You should screw through the holes in the side of the rangehood, into the adjacent cabinets.  


THESE SCREWS MUST BE FULLY TIGHTENED. 


8.


Place the front panel against the furniture door. Using the screws provided, secure the front panel  

of the rangehood to the inner surface of the furniture door.  


Make sure that these screws are fully tightened. 


Reattach the front panel to the front of the rangehood.


Summary of Contents for RTA3CI6WH

Page 1: ...1 Description ROBINHOOD TILTERHOOD RANGEHOOD Model Numbers RTA3CI6WH Model pictured RTA3CI6WH RTA Issue A ...

Page 2: ...uct must be earthed o A power outlet should be within 1500mm of the power cord exit from the rangehood o The power socket must be accessible and enable the end user to isolate the rangehood from the power for the purpose of internal cleaning or maintenance o All ducting accessories are not supplied and all ducting must comply with local requirements and building codes o See Ducting options next pa...

Page 3: ...UHRS150 USSR150 It is recommended that Ø150mm ducting is to be used however a reducer from Ø150mm to Ø125mm is included with the rangehood should Ø125mm ducting be required Extra lengths and or bends may be required depending on the length required and whether there is any structural material in the run e g rafters For best performance the maximum distance between coupling and discharge outlet sho...

Page 4: ...cooking range The recommended position for the hood is 650mm above the hotplates Pictured Minimum height from the hob surface to the underside face of the rangehood is 600mm for electric hob 650mm for gas hob Notes If the instructions for the gas hob specify a greater distance this has to be taken into account Any installation above 800mm will compromise performance ...

Page 5: ...wn and remove the front panel from its guide rails 3 Secure the extractor mounting brackets D onto the top of the hood using the screws and washers E supplied Check that the adjustment screw F is fitted 4 Measure a distance of 1050 mm between the highest point on the hob top and the wall that you will be fixing the hood to You should also measure and record the distance between the top of the extr...

Page 6: ...tall a spacer Cut the spacer to the size of the gap and attached to the rear of the wall spacer not provided 7 IMPORTANT The rangehood must now be fixed to the adjacent cabinets using the screws provided You should screw through the holes in the side of the rangehood into the adjacent cabinets THESE SCREWS MUST BE FULLY TIGHTENED 8 Place the front panel against the furniture door Using the screws ...

Page 7: ...the surfaces of the appliance use mild detergent and warm water In areas of high humidity and coastal environments cleaning should be carried out frequently Warning a build up of oil may occur if the rangehood is not cleaned regularly Filter Maintenance To maintain efficiency the filters should be removed regularly approximately monthly and washed using hot soapy water or the dishwasher o To remov...

Page 8: ... removing the filters by lifting the filter handles and then pull the filters upwards away from the main body of the rangehood If you are replacing the existing charcoal filters then you need to remove them by twisting the filters anti clockwise To fit the new charcoal filter hook the filter over the central fixing ring on the motor and turn the filter clockwise until you feel it click into place ...

Page 9: ...burning gas or other fuels o You must read the details concerning the method and frequency of cleaning o There is a fire risk if cleaning is not carried out in accordance with the instructions o Do not flambé under the Rangehood o Exhaust air must not be discharged into an existing flue which is used for exhausting fumes from appliances burning gas or other fuels o The minimum distance between the...

Page 10: ...d Conditions The following conditions apply in respect of the warranty given in this certificate 1 Parbury Pty Limited Parbury warrants the following Robinhood products against manufacturing defects and faulty materials under normal use and subject to the exclusions in this certificate for a period of Uniduct 12 months from date of original purchase for domestic use Supertub 5 years on stainless b...

Reviews: