ROBINHOOD RIE3CL9SS Installation And Operation Instructoins Download Page 5


       Before drilling any holes check that the area behind the surface to be drilled is clear of any 

       electrical cables, pipes etc. The ceiling must take a weight bearing of at least 40kgs weight

.


Whenever possible protect the Rangehood with a fabric sheet or similar.


1. Before commencement unpack the rangehood plug it in and check that it functions correctly. 

2. Use a plumb line to mark the centre of the cooking surface on the ceiling. 

3. Ensure that the support frame front edge is parallel with the bench top and that the plumb line 

mark is central to the mounting screw holes. 

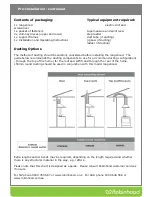
4. Drill 1*170mm round hole in the ceiling for the if you are ducting the Island Rangehood 

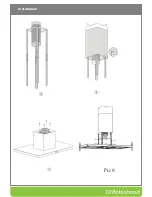
5. In accordance with the hanging board, drill 12 holes in the ceiling, see pic 2, 12pcs of 

ST6*40mm big flat screws will be used to fix the hanging board on the ceiling, and then 8pcs 

of M4*10 screws and M4 nut with gasket will be used to connect the angle iron into the 

hanging board, see pic 1, calculated the length of the angle iron, and 16pcs M4*10 big flat 

screws and M4 nut with gasket will be used to connect the angle iron and another angle iron   

    (the overlap length of angle iron can not less 100MM) 

1. Let the one side of the ducting (not supplied) go outside through the hole of 170MM, see pic 3.  

     4pcs ST4*8 big flat screws will be used to connect the internal chimney into the hanging board, 

then put one the external chimney, two hooks will be used to put up the external chimney in 

order to the next installation, see pic 4. 

1. 4pcs ST4*8 big flat screws will be used to install the outlet, see pic 5. 

2. Hold up the hood, 16pcs M4*10 big flat screws will be used to connect the hood body into 

angle iron, see pic 6. 

3. Put the ducting pipe on the outlet; after ensure all the things ok, put down the hook, take from 

the external chimney, all the installation is finished, see pic 7 & 8. 


Installation


Summary of Contents for RIE3CL9SS

Page 1: ...Description ROBINHOOD ISLAND CANOPY 90CM Model Numbers RIE3CL9SS Product may vary slightly from the picture Issue 1 ...

Page 2: ...e same time as appliances burning gas or other fuels There is a fire risk if cleaning is not carried out in accordance with the instructions You must read the details concerning the method and frequency of cleaning Do not flambé under the rangehood Exhaust air must not be discharged into an existing flue which is used for exhausting fumes from appliances burning gas or other fuels The minimum dist...

Page 3: ...od Any installation above 750mm will compromise the extraction performance The air outlet from the motor requires 150mm round ducting which requires 170mm diameter hole in the ceiling Minimum height from the hob top surface to the underside face of the rangehood 600mm electric hob 650mm gas hob Notes If the instructions for the gas hob specify a greater distance this has to be taken into account A...

Page 4: ...alling the rangehood The guide below recommends the ducting components to use for all common ducting configurations through the top of the home for the roof and soffit and through the rear of the home 150mm round ducting should be used in conjunction with this model rangehood Extra lengths and or bends may be required depending on the length required and whether there is any structural material in...

Page 5: ...iling and then 8pcs of M4 10 screws and M4 nut with gasket will be used to connect the angle iron into the hanging board see pic 1 calculated the length of the angle iron and 16pcs M4 10 big flat screws and M4 nut with gasket will be used to connect the angle iron and another angle iron the overlap length of angle iron can not less 100MM 1 Let the one side of the ducting not supplied go outside th...

Page 6: ...Installation ...

Page 7: ...Installation ...

Page 8: ...ve the filters and pop out complete assembly See A B 3 Replace led light assembly by attaching the wiring clips See C 5 Push the light assembly back into place See A Optional accessories For other accessories parts and service please contact your local supplier Refer to the Warranty Certificate 1 Plug the Rangehood to power 2 Push the first button low speed the motor runs at low speed Push it agai...

Page 9: ...sting flue which is used for exhausting fumes from appliances burning gas or other fuels The minimum distance between the hob surface and the lowest part of the rangehood is 600mm This distance shall be at least 650mm if the rangehood is installed over a gas hob If the instructions for the gas hob specify a greater distance this has to be taken into account Attention should be given to ensure that...

Page 10: ...aking a claim under this warranty This warranty is given by Robinhood Australia Pty Limited ABN 83 004 568 138 Telephone 1800 648 556 Facsimile 1800 628 577 Email enquiries robinhood com au www robinhood com au Warranty exclusions 1 The warranty does not apply where in Robinhoods opinion The defect is caused by misuse wear and tear dirt fire or accidental damage The product has been repaired or se...

Page 11: ...indirectly arise from or are due to Exposing the product to acidic or corrosive materials or chemicals such as dyes solvents denture cleaner or acetone Using inappropriate household cleaning products such as abrasive cream or powder cleansers furniture polish bleach mentholated spirits drain cleaners sugar soap metal pads and strongly alkaline or acidic cleaners Heat damage including from washing ...

Reviews: