Robertshaw RS5110 User Manual Download Page 3

3

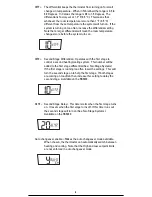
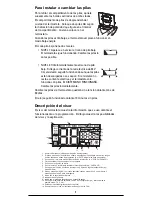
Installing or Changing the Batteries

To remove the battery compartment gently
squeeze the ribbed edges on both sides.

The battery compartment will pull down from
the thermostat body and will detach.  Install
two AA batteries following the polarity as
shown inside the compartment.  Place
compartment back into the thermostat.

When the batteries are low the thermostat
will enter a low battery mode.

Low battery mode has two levels.

• LEVEL 1: The low battery icon will be displayed.  The

thermostat will continue to operate.  Replace the
batteries as soon as possible

• LEVEL 2: The low battery icon will flash.  If 24V AC is

present the thermostat will continue to operate if
the batteries are discharged or removed.  If 24V AC
is not present the thermostat runs on batteries only
and THE SYSTEM WILL NOT OPERATE.  Replace
batteries immediately. 

Replace batteries if leaving thermostat unattended for more than
30 days.

The clock will continue to run for 10 minutes when the batteries
are removed.

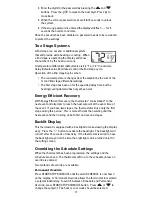
Display Description

The thermostat display will show information that is being used during
operation or programming. This illustration shows all of the display’s
possibilities with an explanation.

2

1.  Event Names (used for editing schedule).
2.  Day is displayed on Idle screen. Also used to display day ranges 

when editing the schedule (e.g., SAT SUN for weekend).

3.  Used with clock to display hold duration (e.g., FOR 2h).
4.  On when running a schedule.
5.  Used with setpoint.
6.  Used along with clock for service reminders (e.g., CHECK HP).
7.  Used for time, current setpoint, and some configuration data (e.g., 

filter hours).

8.  HVAC mode and status. Icons blink when active. A is for Auto, 2 is 

for second stage, E is for emergency.

9.  Indicates when security is active.
10.  Low battery indicator.
11.  Displayed when in vacation hold.
12.  Used for ambient temperature and configuration data (e.g., first 

stage differential, F or C, etc.).

13.  Fan status (rotates when active).
14.  Fan mode selected by pressing FAN button.

5

3

4

1

6

7

8

9

10

12

11

13

14

Summary of Contents for RS5110

Page 1: ...ard Automatic changeover Circulating Fan Worry Free memory retention Easy change battery Large back lit display Filter change reminder Low battery indicator Fahrenheit and Celsius displays EnergyStar...

Page 2: ...l and national building and electrical codes and ordinances Do not short jumper across terminals on the gas valve or at the system control to test installation This will damage the thermostat and void...

Page 3: ...han 30 days The clock will continue to run for 10 minutes when the batteries are removed Display Description The thermostat display will show information that is being used during operation or program...

Page 4: ...over deadband is 3 F Filter reminder length is off Temperature offset is 0 degrees The HI heat limit is 90 F 32 C The LO cool limit is 45 F 7 C The vacation temperature settings are set at heating 60...

Page 5: ...emperature will vary Operating the Thermostat Any setting can be changed when it is flashing by pushing or If a button is not pushed for 10 seconds the thermostat returns to operation The following bu...

Page 6: ...le for each day of the week on a separate piece of paper and refer to it while programming Press START STOP SCHEDULE at any time to exit and save your settings Push START STOP SCHEDULE The display wil...

Page 7: ...play the current settings in order To change any setting When the setting is visible and flashing press the or arrows to adjust the number on the screen To exit the changes and save Press START STOP S...

Page 8: ...to control a second heating cooling system This number will be added to the first stage differential See Two Stage Systems If the first stage is running too often lower the settings This will turn th...

Page 9: ...override temperature higher than this value NOTE High Heat Limit is not enforced in auto changover mode LO Low Cool Limit This is the lowest allowed cooling setpoint The user will not be allowed to se...

Page 10: ...to 3 degrees in one degree increments Increasing the offset by 2 will cause the thermostat to display a temperature that is 2 degrees higher than the actual room temperature Creating a Password Protec...

Page 11: ...cient Recovery the thermostat Looks Ahead to the next event and attempts to reach the next setpoint at the exact time of the event If you have two stages the thermostat will use only the first stage d...

Page 12: ...ime expires Cancel the override by pressing START STOP SCHEDULE Vacation Override This override is programmed by pressing VACATION The number of days will flash Use and to change the number of days Af...

Page 13: ...ooling and will resume the display of real time information when the room temperature is back inside the display s range Setting the Fan To ON AUTO or CIRC The fan has 3 settings On Auto or Circ Press...

Page 14: ...temperature differential See To Make Changes to the Settings section System fan does not operate properly Move fan option switch to either gas or electric to match system See Setting the Fan to ON AU...

Page 15: ...Repair or replacement as provided under this warranty is the exclusive remedy of the consumer Invensys Controls shall not be liable for any incidental or consequential damages for breach of any expres...

Page 16: ...Retenedor de memoria Worry Free F cil cambio de pilas Visor grande con iluminaci n posterior Recordatorio de cambio de filtro Indicador de pilas bajas Visor en grados Fahrenheit y Celsius Cumple con...

Page 17: ...nacionales que rigen en materia de construcci n y electricidad No deben puentearse los terminales de la v lvula de gas ni el control del sistema para probar la instalaci n Esa pr ctica perjudicar el t...

Page 18: ...ci n del visor El visor del termostato muestra la informaci n que se usa durante el funcionamiento o la programaci n El dibujo muestra las posibilidades del visor y la explicaci n 2 1 Nombres del even...

Page 19: ...ecordatorio de duraci n del filtro est apagado La compensaci n de temperaturas es cero grado El l mite superior de calefacci n HI es 90 F 32 C El l mite inferior de refrigeraci n LO es 45 F 7 C Los va...

Page 20: ...do los valores programados titilan se pueden modificar presionando las teclas o Si no se pulsa ninguna tecla en 10 segundos el termostato vuelve a ponerse en funcionamiento Puede acceder a las siguien...

Page 21: ...de un d a Para que la programaci n de su termostato sea m s r pida y f cil complete la tabla para cada d a de la semana en un papel separado y cons ltelo mientras escribe la programaci n Pulse el STA...

Page 22: ...iento habitual C mo cambiar los ajustes del usuario Cuando se pulsas las teclas and al mismo tiempo el visor mostrar los valores programados en ese momento Para cambiar los valores programados Cuando...

Page 23: ...que el sistema se ponga en funcionamiento DIF2 Differencial de segunda etapa funciona con la primera etapa para controlar un segundo sistema de calefacci n refrigeraci n Este n mero se incorporar al...

Page 24: ...sea el margen de oscilaci n m s variar la temperatura ambiente Esto funciona de calefacci n a refrigeraci n y viceversa HI L mite superior de temperatura es el valor m s elevado de ajuste de calefacc...

Page 25: ...el filtro Por defecto este control est desactivado El temporizador funciona cuando el sistema se enciende y se puede fijar en 0 apagado o en un valor de hasta 9900 horas Cuando finaliza el tiempo apar...

Page 26: ...rase a Si pulsa cualquier tecla aparecer el cono Para destrabar las teclas 1 Pulse y mantenga oprimidas las teclas y 5 segundos hasta que el sistema le solicite la contrase a 2 Entre los d gitos para...

Page 27: ...luz nocturna se puede prender y apagar desde el men C mo sobrecontrolar los ajustes del programa Cuando se programa el termostato se guardan los valores y el programa El termostato cumplir el programa...

Page 28: ...termostato empezar a funcionar en el modo sobrecontrol por vacaciones El visor mostrar la temperatura ambiente y el valor deseado aparecer intermitentemente con la cantidad de horas de funcionamiento...

Page 29: ...ores se encuentren entre 32 F 0 C y 99 F 37 C Para fijar el ventilador en ON AUTO o CIRC El ventilador tiene tres modos On Auto y Circ Pulse la tecla para cambiar de modo del ventilador ON el ventilad...

Page 30: ...iento muy pronto Aumente el diferencial de temperatura Ver secci n Para cambiar la programaci n El ventilador no funciona correcta mente Cambie la opci n del ventilador a gas o electricidad para adecu...

Page 31: ...en la garant a constituyen el nico recurso del consumidor Invensys Controls no ser responsable de los da os incidentales o emergentes por la violaci n de cualquier garant a expresa o impl cita de este...

Reviews: