3
Controls
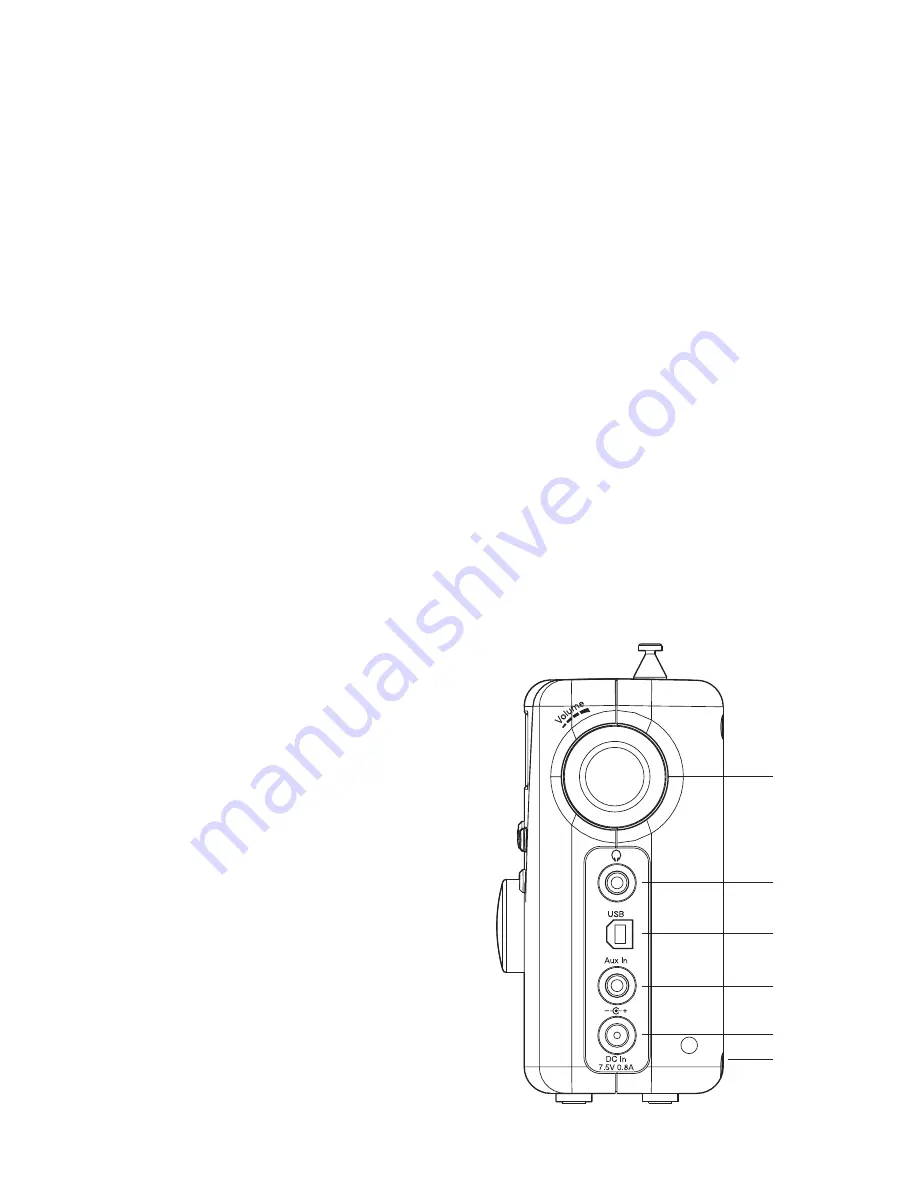
13. Volume control
14. Headphone socket
15. USB socket
16. Auxiliary input socket
17. DC input socket
18. Battery compartment
13
14
15
16
17
18
Page 1: ...DAB FM RDS digital portable radio Please read this manual before use ROBERTSEnjoy Listening ...
Page 2: ...display DAB 11 Dynamic range control DRC settings DAB 12 Operating your radio Search tuning FM 13 Manual tuning FM 14 Display modes FM 15 Favourite button 16 Recalling your favourite station 16 Preset stations DAB and FM 17 FM stereo mono Headphones only 18 Scan sensitivity FM 19 Contents Software version 20 System reset 21 Headphone socket 22 Auxiliary input socket 22 A few words about batteries ...
Page 3: ...lpline on 2 Controls 1 Tuning control 2 DAB FM button 3 On Off button 4 Telescopic aerial Front 1 2 3 6 7 8 9 10 11 4 12 5 Charge indicator 6 Low battery indicator 7 LCD display 8 Info button 9 Auto Tune button 10 Preset button 11 Favourite button 12 Speaker 5 ...
Page 4: ...3 Controls 13 Volume control 14 Headphone socket 15 USB socket 16 Auxiliary input socket 17 DC input socket 18 Battery compartment 13 14 15 16 17 18 ...
Page 5: ...lkaline batteries the battery switch must be placed in the alkaline position Failure to do so could result in serious damage to the batteries or radio When the batteries are exhausted the battery light will show red for a short while The radio will then switch itself off It may not be possible to switch the radio back on until the batteries are replaced or until the radio is connected to the mains...
Page 6: ...ies will be fully charged in around 7 hours The battery light shows a steady green light when the battery charging is complete Important when using rechargeable batteries the battery switch must be placed in the NiMH NiCad position Batteries will only be charged when the radio is switched off and connected to the AC adaptor When the batteries are exhausted the battery light will show red for a sho...
Page 7: ...omatically disconnected If the adaptor is plugged in to the radio but not switched on then the radio will run from the batteries if fitted The AC adaptor should be disconnected from the mains supply and the radio when not in use IMPORTANT The mains adaptor is used as the means of connecting the radio to the mains supply The mains socket used for the radio must remain accessible during normal use In...
Page 8: ...ll be selected 4 During the scanning process the lower line of the display shows a bar graph indicating progress of the scan 5 When the scanning is completed the first station in numeric alpha order 0 9 A Z will be selected 6 If the station list is still empty after the scan your radio will display No stations available 7 If no signals are found it may be necessary to relocate your radio to a posit...
Page 9: ...he Tuning control when you find the station that you wish to hear 3 PressandreleasetheTuningcontroltoselectthestation Thedisplay may show Now tuning while your radio finds the new station 4 Adjust the Volume control to the required setting Note If after selecting a station the display shows Not Available it may be necessary to relocate your radio to a position giving better reception The use of radi...
Page 10: ...g listened to e g Pop Classic News etc c Multiplex Name Displays the name of DAB multiplex to which the current station belongs d Time and date Displays the current time and date e Frequency Displays the frequency of the DAB multiplex for the station listened to f Bit rate audio type Displays the digital bit rate audio type for the station being listened to g Signal Strength Displays a graph showi...
Page 11: ...r more than 2 seconds and then release The display will show Full Scanning As new radio stations are found the station counter on the right hand side of the display will increase and the radio stations will be added to the list stored in the radio 1 2 Secondary services DAB 1 Certainradiostationshaveoneormoresecondaryservicesassociated with them If a radio station has a secondary service associate...
Page 12: ...d the lower line will show the name of the DAB Multiplex group of radio stations Any stations found will be added to the stored list in the radio 4 Press and release the Tuning control to return to the normal tuning mode Signal strength display DAB 1 Repeatedly press and release the Info button until the lower line of the display shows signal strength 2 Position your radio and try moving the aeria...
Page 13: ...isplay shows DRC value 4 Press and release the Tuning control to enter the adjustment mode 5 Rotate the Tuning control to select the required DRC setting the default is 0 DRC 0 DRC is switched off Broadcast DRC will be ignored DRC 1 2 DRC level is set to 1 2 that sent by broadcaster DRC 1 DRC level is used as sent by broadcaster 6 Press and release the Tuning control to confirm the setting The disp...
Page 14: ...pdate The display will show the frequency of the signal found If the signal is strong enough and there is RDS data present then the radio will display the station name 6 To find other stations press and release the Auto tune button as before 7 To scan the FM band in a downwards direction high frequency to low frequency press and hold down the Auto tune button for 0 5 seconds and then release 8 When...
Page 15: ...fully extend the telescopic aerial fully for FM reception 3 Rotate the Tuning control to tune to a station With each click of the control the frequency will change up or down by 50 kHz 4 When the waveband end is reached the radio will recommence tuning from the opposite waveband end 5 Set the Volume control to the desired settings 6 To switch off your radio press the On Off button 2 5 6 3 1 ...
Page 16: ...k name phone in number etc b Program type Displays type of station being listened to e g Pop Classic News etc c Time and date Displays the current time and date d Frequency Displays frequency of the station being listened to e Audio mode Display shows Auto stereo or Mono Note Your radio will display NO RT on the lower line of the display if there is no scrolling text available and NO PTY if there ...
Page 17: ...witch on your radio 2 Select the desired waveband DAB or FM and tune into the required radio station as described on the preceding pages 3 Press and hold down the Favourite button for 5 seconds until the display shows My Fav saved Recalling your favourite station 1 Carefully extend the telescopic aerial and switch on your radio If your radio is inAuxiliary Input mode press and release the DAB FM b...
Page 18: ...old down the Preset button until the displays shows a tick symbol next to the radio station name or frequency This indicates that the radio station is marked as a preset To cancel the preset mark press and hold the Preset button again 3 Repeat steps 1 and 2 as needed for any other stations that you want as presets 4 To view only the preset stations for the currently selected waveband when tuning p...
Page 19: ... listening using headphones To reduce this press and release the Tuning control so that the display shows Switch to Mono Your radio will switch to mono mode 2 To return to stereo mode press and release the Tuning control so that the display shows Switch toAuto Your radio will switch to stereo mode Note Stereo listening is only available when listening via headphones 1 2 ...
Page 20: ...Info button until the display shows FM Scan Zone then press the Tuning control to enter the scan zone selection menu 4 RotatetheTuningcontroltoswitchbetweenLocalandDistantoptions on the lower line of the display The Distant option will allow the radio to find weaker signals when scanning 5 Press and release the Tuning control to confirm your selection The radio will then revert to the normal informa...
Page 21: ... is just for your reference 1 To view the software version on the display ensure your radio is in DAB mode and press and hold the Info button for 2 seconds 2 Rotate the Tuning control until SW Version together with the version number appears on the display 3 After a few seconds the display will revert to the normal display mode 1 2 ...
Page 22: ...ons available at your current location when it restarts 1 Press and hold down the Info button for 2 seconds 2 Rotate the Tuning control until the display shows Factory reset then press and release the Tuning control 3 Ifyouwishtoperformtheresetoperation pressandreleasetheTuning control one more time A full reset of your radio will be performed All presets and station lists will be erased 4 After a...
Page 23: ...aring loss Auxiliary input socket 1 Connect a stereo or mono audio source i e CD player MP3 player etc to the Auxiliary input socket 2 Press the On Off button to switch on the radio Press and release the DAB FM button until the display shows AUX IN Note that the Auxiliary Input mode can only be selected when a plug is inserted in the socket 3 Adjust the Volume control on your player and on the rad...
Page 24: ... methods to ensure correct and safe charging of Rechargeable Nickel Metal Hydride or Nickel Cadmium batteries These work to protect your batteries from excessive charge and discharge These protections can only work properly if the advice above is followed In particular the radio will not be able to correctly charge batteries if they are a mixture of different brands or different ages or different ...
Page 25: ...away from moisture and such that no metal object can contact the battery terminals With care rechargeable batteries can last a long time and can operate for many hundreds of charge and discharge cycles When your rechargeable batteries can no longer power your radio adequately please dispose of them thoughtfully To avoid danger and risk of injury please follow these guide lines Improper use of batt...
Page 26: ...splay backlight will always be on whenever the radio is switched on USB socket for software upgrade Software updates for your unologic may be available in the future If you register your product at www robertsradio co uk register and include a valid e mail address you will receive notification of software updates As software updates become available software and information on how to update your ra...
Page 27: ...ded that the DAB band be used wherever possible as better results in terms of quality and freedom from interference will usually be obtained than on the FM band The name plate is located on the rear of your radio Your radio should not be exposed to dripping or splashing and that no objects filled with liquids such as vases shall be placed on the radio It is recommended to operate the product such t...
Page 28: ...uential damage 3 Receivers with removed or defaced serial numbers N B Damaged or broken telescopic aerials will not be replaced under guarantee Procedure Any claim under this guarantee should be made through the dealer from whom the instrument was purchased It is likely that your Roberts dealer will be able to attend to any defect quickly and efficiently but should it be necessary the dealer will r...