background image

If.you.need.any.further.advice,.please.call.our.Technical.Helpline.on.:-

020 8758 0338 (Mon-Fri)

6

Selecting a station - DAB

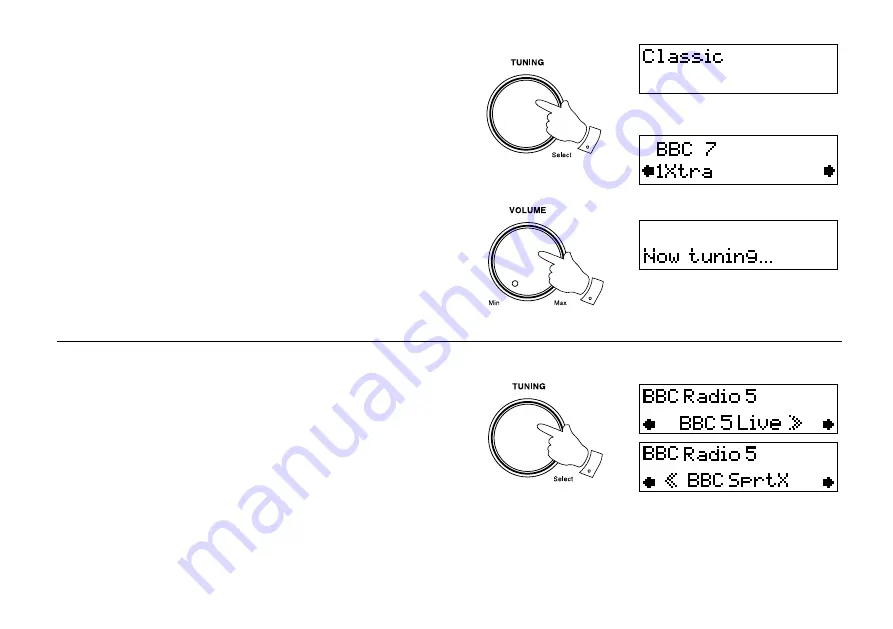
1.  The top line of the display shows the name of the station currently 

selected.

2.   Rotate the 

Tuning/Select control

 to step through the list of available 

stations.

3.  Press and release the 

Tuning/Select control

 to select the station. 

The display may show "Now tuning" while your radio finds the new 

station.

4.  Adjust the 

Volume control  

to the required setting.


Note: If after selecting a station the display shows "Not Available" it 

may be necessary to relocate your radio to a position giving better 

reception.

4

Secondary services - DAB

1.  Certain radio stations have one or more secondary services associated 

with them. If a station has a secondary service associated with it the 

display will show ">>" next to the station name on the station list. The 

secondary  service  will  then  appear  immediately  after  the  primary 

service as you move through the tuning list.

2.  Press and release the 

Tuning/Select control

 to select the station.

2,3

2

Summary of Contents for SOUND 78

Page 1: ...RD 78 FM RDS DAB digital radio with 3 way speaker system Please read this manual before use ROBERTSSound for Generations ...

Page 2: ...3 Operating your radio FM 14 Manual tuning FM 15 Display modes FM 16 Presetting stations 17 Recalling a preset station 17 Favourite button 18 Contents Recalling your favourite station 18 Setting the alarm time 19 21 Switch alarm on or off 22 To view alarm s time 22 Cancelling alarms 23 Snooze function 23 To set snooze time 23 Sleep function 24 System reset 25 Software version 26 Clock display 26 C...

Page 3: ...338 Mon Fri 2 Controls front 1 Volume control 2 On Off button 3 Band button 4 Speakers 5 Info Menu button 1 2 5 10 6 Autotune button 7 Alarm button 8 Sleep button 9 Snooze button 10 Preset buttons 1 5 11 Favourite button 12 Tuning Select control 13 LCD display 6 7 8 9 12 3 4 11 13 ...

Page 4: ...3 14 Telescopic aerial 15 DC jack socket 16 Optical output socket Toslink 17 Aux In socket 18 Line out socket 19 Headphone socket 20 Subwoofer 14 15 Controls Rear 16 17 18 19 20 ...

Page 5: ...ed on the rear of your radio The aerial should be fully extended and positioned for optimum recep tion 4 Plug the adaptor into a standard 13 amp mains socket outlet 5 When your radio is first switched on the display will show Setting Clock and a station search will be performed automatically 6 When stations have been found the clock information will appear on the display When the unit is in standb...

Page 6: ... The first station in the list of stations found will be played The display will show the station name in the first line of the display and other information in the second line 4 If no signals are found No stations available will be displayed and it may be necessary to relocate your radio to a position giving better reception You should then carry out an autoscan to find stations as described on p...

Page 7: ...ation 4 Adjust the Volume control to the required setting Note If after selecting a station the display shows Not Available it may be necessary to relocate your radio to a position giving better reception 4 Secondary services DAB 1 Certainradiostationshaveoneormoresecondaryservicesassociated with them If a station has a secondary service associated with it the display will show next to the station...

Page 8: ... type Displays type of station being listened to e g Pop Classic News etc c Multiplex Name Displays name of multiplex to which current station belongs d Time and date Displays current time and date e Channel and frequency Displays channel number and frequency f Bit rate and audio type Displays the digital bit rate and audio mode g Signal strength Displays the signal strength for station being list...

Page 9: ...ions are found the station counter on the right hand side of the display will increase and stations will be added to the list 3 Alternatively press and hold the Info Menu button and rotate the Tuning Select control until Autoscan local shows on the display 4 Press and release the Tuning Select control Your radio will perform a scan of the UK DAB frequencies As new stations are found the station co...

Page 10: ...l show Alarm settings 2 Rotate the Tuning Select control until the display shows Manual tune 3 Press and release the Tuning Select control 4 Rotate the Tuning Select control to select the required DAB channel 5 Press and release the Tuning Select control the open bar in the middle shows you the minimum signal strength needed for good DAB reception The signal strength bars will go up and down showi...

Page 11: ...lay The clear unfilled rectangle indicates minimum signal level required for satisfactory reception 3 Press the Tuning Select control to exit signal strength display 1 3 Station order setup DAB only Your radio has 3 station order settings from which you can choose The station order settings are favourite station alphanumeric and active station Note Your radio default station order is alphanumeric ...

Page 12: ... time the most listened to stations will move to the top of the station list and will be marked with the heart symbol Alphanumeric Rotate the Tuning Select control until Alphanumeric appears on the display Your radio will now select stations in alphanumeric order A Z 0 9 Active station Rotate the Tuning Select control until Active station appears on the display The display will show only those tha...

Page 13: ...DAB stations from your station list that can no longer be received 1 Press and hold the Info Menu button until Alarm settings appears on the display 2 Rotate the Tuning Select control until Station order appears on the display Press and release the Tuning Select control to enter setup 3 Rotate the Tuning Select control until Prune stations appears on the display 4 Press and release the Tuning Sele...

Page 14: ...until DRC value appears on the display Press and release the Tuning Select control The display will show the current DRC value on the top line 4 Rotate the Tuning Select control to select the required DRC setting Default is 1 DRC 0 DRC is switched off Broadcast DRC will be ignored DRC 1 2 DRC level is set to 1 2 that sent by broadcaster DRC 1 DRC is set as sent by broadcaster 5 Press and release t...

Page 15: ...o high frequency and stop automatically when it finds a station of sufficient strength 5 After a few seconds the display will update and show station name 6 To find other stations press and release the Auto Tune button as before 7 To scan the FM band in a downwards direction high frequency to low frequency rotate the Tuning Select control anti clockwise then press and release the Auto Tune button ...

Page 16: ... Tel escopic aerial 3 Rotate the Tuning Select control to tune to a station The frequency will change in steps of 50kHz 4 When the waveband end is reached the radio will recommence tuning from the opposite waveband end 5 Set the Volume control to the required setting 6 To switch off your radio press the On Off button 2 1 3 5 6 15 ...

Page 17: ... scrolling text messages such as artist track name phone in number etc b Program Type Displays type of station being listened to e g Pop Classic News etc c Time and date Displays current time and date d Frequency Displays frequency of the station being audio mode listened to and displays the audio mode Auto stereo or mono Note When tuned to the FM band information display is only available when th...

Page 18: ...play shows e g Preset 1 saved The station will be stored under the chosen preset button Repeat this procedure for the remaining presets 4 Stations stored in preset memories may be overwritten by following the above procedure 1 3 Recalling a preset station 1 Press the On Off button to switch on the radio 2 Select the required waveband 3 Momentarily press the required Preset button your radio will t...

Page 19: ...tion This will allow you to store one station from either the FM or DAB waveband 1 To setup your favourite station tune into the required station 2 Press and hold down the Favourite button 10 sec until the display shows Favourite stored Recalling your favourite station 1 Press the On Off button to switch on the radio 2 Momentarily press the Favourite button your radio will tune to the station stor...

Page 20: ...radio will exit the alarm setup 1 The alarms can be set with the radio in the on or standby position 2 Press the Alarm button and Set alarm will appear on the display 3 Press and release the Tuning Select control to enter the alarm setup If there are no alarms set the display will show Alarm not in use 4 Rotate the Tuning Select control to select the desired alarm 1 4 5 Press the Tuning Select con...

Page 21: ...d every day Weekdays Will sound only on weekdays Weekends Will sound only on weekends 10 RotatetheTuning Selectcontroltoselecteitheronce daily weekdays or weekends If setting alarms to daily weekdays or weekends proceed to point 18 Setting alarm mode 11 If selecting the alarm to once you will need to set the year month and day options as described below 12 Press and release the Tuning Select contr...

Page 22: ...itherDAB FMor BUZZER alarm mode option 20 Press and release the Tuning Select control to confirm alarm set tings The display will show the alarm settings Note The alarm s will not sound if the alarms have not been activated and set to the On position see page 22 When the alarm is set to wake by FM or DAB radio your radio will switch on to the last used station at the previously set volume level Wh...

Page 23: ...e Tuning Select control until the required alarm is reached 1 4 5 Press and release the Tuning Select control to switch the required alarm on The display will show a bell symbol when the alarm is set to on 6 To switch off the alarm permanently press the Tuning Select control to switch the required alarm off The bell symbol will disappear from the display 7 The alarm s will sound at the selected ti...

Page 24: ... 15 20 minutes 4 PresstheTuning Selectcontrol toselectdesiredtime Theradiowillexit the menu options 1 Snooze function When the radio or beep alarm sounds pressing the Snooze button will silence the alarm for the selected number of minutes The Snooze setting can be adjusted between 5 and 20 minutes in 5 minute increments The radio or buzzer alarms can be silenced for a set time by pressing the Snoo...

Page 25: ...ired sleep time press the Sleep button to enter the sleep setup Sleep will appear on the display 3 Rotate the Tuning Select control to select desired sleep time 5 10 15 20 25 30 35 40 45 50 55 60 65 70 75 80 85 90 minutes or to OFF to permanently cancel the sleep function 4 PresstheTuning Selectcontrol Thedisplaywillshow SleepActivated and then exit the sleep options 5 Your radio will switch off a...

Page 26: ... the display shows Select factory reset Press and release the Tuning Select control 3 The display shows Press SELECT to confirm reset Press and release the Tuning Select control to select system reset 4 A full reset will be performed and the station list together with any preset stations will be erased If a problem persists our technical staff would be pleased to help offer any assistance on opera...

Page 27: ... hold the Info Menu button to enter the menu setup 2 Rotate the Tuning Select control until SW Version appears on the display The Version number is displayed on the top line 1 2 Clock display When in Standby your radio has two display modes time or time and date combined 1 If your radio is switched on press the On Off button to switch your radio to the standby mode 2 To toggle between the two disp...

Page 28: ...alarms Note The timer record function is for personal use only Digital connection A programme station can be recorded to an external device via the optical toslink connector located on the rear of your radio Connect the optical toslink connector to the optical input socket s on your recorder using a suitable cable Analogue Line out socket A 3 5mm Line out socket located on the rear of your radio i...

Page 29: ...0338 Mon Fri 28 Auxiliary in socket 3 5mm Jack 1 Press the Band button to select the Auxiliary line in mode 2 Connect a stereo or mono audio source ie iPod MP3 or CD player to the Aux in socket 3 Adjust the Volume control on your iPod MP3 or CD player for com fortable listening 1 ...

Page 30: ...29 Headphone socket A3 5mm Headphone Socket located on the rear of your radio is provided for use with either headphones or an earpiece Inserting a plug automati cally mutes the internal loudspeaker ...

Page 31: ...MHz DAB 174 928 239 200MHz Circuit features Loudspeaker Tweeter 2 x 34mm Subwoofer 1 x 76mm Output Power Tweeter 2 5W into 4 ohms Subwoofer 5W into 6 ohms Headphone socket 3 5mm dia Line out socket 3 5mm dia Auxiliary in socket 3 5mm dia Digital optical output socket Toslink Aerial System FM Telescopic aerial DAB Telescopic aerial The Company reserves the right to amend the specification without n...

Page 32: ...m the sun can build up even though the outside temperature may not seem too high It is recommended that the DAB band beusedwhereverpossilbleasbetterresultsintermsofqualityandfreedom from interference will usually be obtained than on the FM band No objects filled with liquids such as vases shall be placed on the apparatus The rating information is located on the back of the unit ...

Page 33: ...If you need any further advice please call our Technical Helpline on 020 8758 0338 Mon Fri 32 Notes ...

Page 34: ...33 Notes ...

Page 35: ...moved or defaced serial numbers Procedure Any claim under this guarantee should be made through the dealer from whom the instrument was purchased It is likely that your Roberts dealer will be able to attend to any defect quickly and efficiently but should it be necessary the dealer will return the instrument to the Company s service department for attention In the event that it is not possible to ...

Page 36: ...ROBERTS RADIO TECHNICAL SERVICES 97 99 Worton Road Isleworth Middlesex TW7 6EG Technical Helpline 020 8758 0338 Mon Fri during office hours Website http www robertsradio co uk Issue 1 ...

Reviews: