background image

23

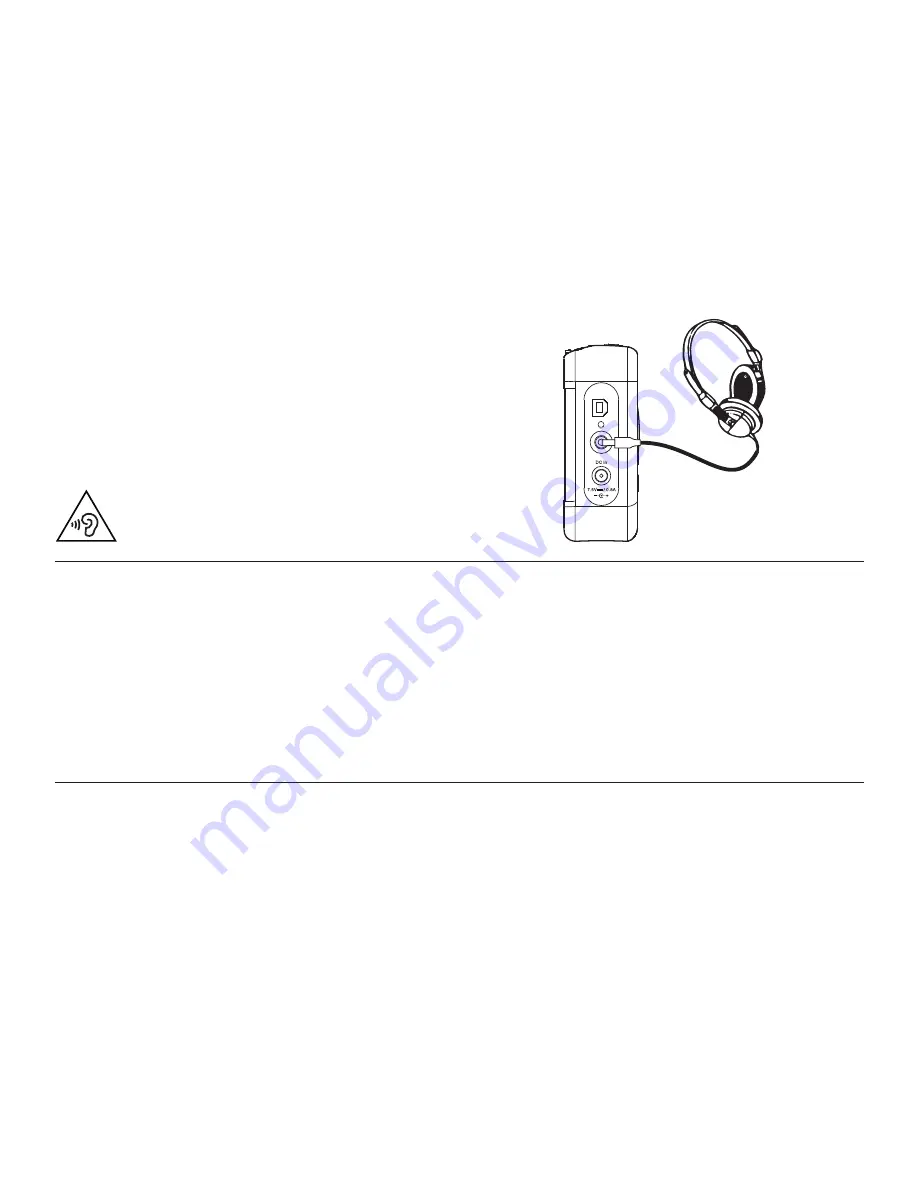
Headphone socket 

A 3.5mm

 Headphone Socket 

located on the left hand side of your radio 

is provided for use with either headphones or an earpiece. Inserting a plug 
automatically mutes the internal loudspeaker.
Please be aware that the sensitivity of headphones can vary widely. We 
therefore recommend setting the volume to a low level before connecting 
headphones to the radio.

IMPORTANT:

 Excessive sound pressure from earphones and headphones 

can cause hearing loss.

Display backlight

1.  When using the radio on batteries, the display backlight will be switched 

on for approximately 12 seconds when any button is pressed.

2.  When your radio is powered by AC mains the display backlight will 

always be on when the radio is switched on.

3.  The display backlight will also be on when a battery message is 

displayed (see page 5).

Service

USB socket for software upgrade 

In the event that any software update is made available for your radio 
information on how to update your radio will be made available via our 
website at 

http://www.robertsradio.com

To prevent possible hearing damage, do not listen at high 
volume levels for long periods.

Summary of Contents for PlayDuo

Page 1: ...DAB DAB FM RDS stereo radio with built in battery charger Please read this manual before use ROBERTS ...

Page 2: ...12 Prune stations DAB 13 Operating your radio FM 14 Manual tuning FM 15 Display options FM 16 Stereo Mono setting FM 17 Scan sensitivity setting FM 18 Presetting stations DAB and FM 19 Recalling a preset DAB and FM 19 Contents Software version 20 Language function 20 Display contrast 21 System reset 22 Headphone socket 23 Display backlight 23 USB socket for software upgrade 23 Battery information ...

Page 3: ...on 3 Tuning Down button 4 Volume Up button 5 Volume Down button Front 10 Charge Low battery indicator 11 On Off button 12 Preset buttons 13 LCD display 1 6 Speakers x 2 7 Band button 8 Info button 9 Auto Tune button 2 3 4 5 6 7 8 9 10 11 12 6 13 ...

Page 4: ...3 Controls 14 Battery compartment 15 Lock switch 16 Telescopic aerial 17 USB socket for service use only 16 14 18 Headphone socket 19 DC jack socket Back 17 15 18 19 ...

Page 5: ... could result in serious damage to the batteries or radio When the batteries are exhausted the charge low battery indicator will show red for a short while The radio will then switch itself off It may not be possible to switch the radio back on until the batteries are replaced or until the radio is connected to the mains adaptor If the radio is not to be used for any extended period of time it is ...

Page 6: ... these cases the charging will be stopped If the charge process stops after only a short while this may be due to a faulty battery In this case the display will show Battery Fail and the battery number 1 4 corresponding to the numbering printed inside the battery cover If this happens try charging the batteries a second time by removing and reconnecting the AC power adaptor If the message is repea...

Page 7: ...eft hand side of your radio 3 Plug the adaptor into a standard mains socket outlet Whenever the adaptor is plugged in to the radio and switched on at the mains the batteries are automatically disconnected If the adaptor is plugged in to the radio but not switched on then the radio will run from the batteries if fitted The AC adaptor should be disconnected from the mains supply and the radio when n...

Page 8: ...as new stations are detected the station counter on the right hand side of the display will increase and stations will be added to the list The lower line of the display shows a bar graph indicating progress of the autotune 5 When the scanning is completed the first station in numeric alpha order 0 9 A Z will be selected 6 If the station list is still empty after the scan your radio will display S...

Page 9: ...rviceNotAvailable it may be necessary to relocate your radio to a position giving better reception The use of the station presets for selecting radio stations is described on page 19 Secondary services DAB 1 Certainradiostationshaveoneormoresecondaryservicesassociated with them If a station has a secondary service associated with it the display will show next to the station name on the station lis...

Page 10: ...d date e Channel Frequency Displays the channel number and frequency for the currently tuned DAB station f Bit rate audio type Displaysthedigitalbitrate audiotype for the station being listened to g Signal strength Displaysthesignalstrengthforthecurrently tuned DAB station The open block in the signal strength graph shows the minimum signal strength needed for good DAB reception The signal blocks ...

Page 11: ...ernative to pressing the Select button to select a station your radio can be set so as to automatically select a station 1 Press and release either the Tuning Up or Down buttons then immediately press and hold down the Select button until the display shows Autoselect ON 2 Press and release the Tuning buttons until the station you require is visible on the display After a few seconds your radio wil...

Page 12: ... tune menu 4 Press and release the Tuning Up or Down buttons to select the required DAB channel 5 Press and release the Select button to select the required DAB channel The clear unfilled rectangle indicates the minimum signal level required for satisfactory reception The signal strength bar will go up and down showing the changing signal strength as you adjust the telescopic aerial or your radio ...

Page 13: ...4 Press and release the Select button to enter adjustment mode 5 Press and release the Tuning Up or Down buttons to select the required DRC setting the default is 0 DRC 0 DRC is switched off Broadcast DRC will be ignored DRC 1 2 DRC level is set to 1 2 that sent by broadcaster DRC 1 DRC is set as sent by broadcaster 6 Press and release the Select button to confirm the setting The display will retu...

Page 14: ...B menu is displayed and then release the Info button 3 Press and release the Tuning Up or Down buttons until the display shows Prune Press and release the Select button 4 To cause the stations list to be pruned eliminating unavailable stations press and release the Tuning Up or Down buttons until Yes is highlighted on the display 5 Press and release the Select button to cause the invalid station n...

Page 15: ...eceived with stereo and RDS information 6 Press and hold down the Auto Tune button for 2 3 seconds This will cause your radio to search from high frequency to low frequency and to stop automatically when it finds a station of sufficient strength 7 When the end of the waveband is reached your radio will recommence tuning from the opposite end of the waveband 8 Adjust the Volume buttons to the requi...

Page 16: ...each second 5 When the end of the waveband is reached the radio will recommence tuning from the opposite end of the waveband 6 Adjust the Volume buttons to the required setting 7 To switch off your radio press and release the On Off button Note If you find that FM reception is poor try repositioning the Telescopic aerial Fully extend and position vertically for optimum reception If you find that a...

Page 17: ...adio text Displays scrolling text messages such as artist track name phone in number etc b Program Type Displays the programme information for the station being listened to e g Pop Classic News etc c Time and date Displays the current time and date d Frequency Displays the frequency of the station being listened to Note These FM mode information displays are only available when the radio is able t...

Page 18: ...rder to reduce the level of audio noise 1 Press and release the On Off button to switch on your radio 2 Tune to the required FM radio station as previously described 3 If a station being received is weak some hiss may be audible To reduce this press and release the Select button so that the display shows Force mono Your radio will switch to mono mode 4 To return to stereo mono mode press and relea...

Page 19: ...elease the Info button 4 Press and release the Tuning Up or Down buttons until the display shows FM Scan Zone Press and release the Select button to enter the scan zone selection menu 5 Press and release the Tuning Up or Down buttons to switch between Local and Distant options on the lower line of the display The Distant option will allow the radio to find weaker signals when scanning The current ...

Page 20: ...ress and hold the required Preset button until the display shows for example Preset 1 stored The station will be stored under the chosen preset button Repeat this procedure for the remaining presets 4 Stations stored in the presets may be overwritten by following the above procedure Recalling a preset DAB and FM 1 Press and release the On Off button to switch on your radio 2 Select the required wa...

Page 21: ...age function Your radio can be configured to a different language Ensure your radio is switched on 1 Press and hold the Info button until the Advanced DAB or FM menu shows on the display and then release the Info button 2 Press and release the Tuning Up or Down buttons until Language appears on the display 3 Press and release the Select button to enter the language adjustment menu 4 Pressandreleas...

Page 22: ...et Contrast appears on the display 3 Press and release the Select button to enter the contrast adjustment mode 4 Press and release the Tuning Up or Down buttons to adjust the contrast level between 0 and 10 The contrast level indication on the screen will change at the same time 5 Whenyoufindthesettingthatgivesyouthebestlegibilityforthelocation in which the radio is used press and release the Sele...

Page 23: ...se the Select button one more time A full reset of your radio will be performed All presets and station lists will be erased 4 After a system reset a scan of the DAB band will be performed In the event of a malfunction due to electrostatic discharge mains power supply transients or short interruptions reset the product as above to resume normal operation If you are not able to perform the reset op...

Page 24: ... loss Display backlight 1 Whenusingtheradioonbatteries thedisplaybacklightwillbeswitched on for approximately 12 seconds when any button is pressed 2 When your radio is powered by AC mains the display backlight will always be on when the radio is switched on 3 The display backlight will also be on when a battery message is displayed see page 5 Service USB socket for software upgrade In the event t...

Page 25: ...from excessive charge and discharge These protections can only work properly if the advice above is followed In particular the radio will not be able to correctly charge batteries if they are a mixture of different brands or different ages or different capacities We recommend that all the rechargeable batteries used in your radio are bought together as a set They should always be charged together ...

Page 26: ...t the batteries are fully charged charge light shows steady green before the radio is put to one side If you intend not to use your radio for some months then we recommend that the batteries are removed and put away keeping them in a cool place out of reach of children away from moisture and such that no metal object can contact the battery terminals With care rechargeable batteries can last a lon...

Page 27: ... used wherever possible as better results in terms of quality and freedom from interference will usually be obtained than on the FM band The name plate is located on the back of your radio The Company reserves the right to amend the specification without notice Your radio should not be exposed to dripping or splashing and that no objects filled with liquids such as vases shall be placed on the rad...

Page 28: ... B Damaged or broken telescopic aerials will not be replaced under guarantee Procedure Any claim under this guarantee should be made through the dealer from whom the product was purchased It is likely that your Roberts dealer will be able to attend to any defect quickly and efficiently but should it be necessary the dealer will return the product to the company s service department for attention I...

Reviews: