5
0.8A
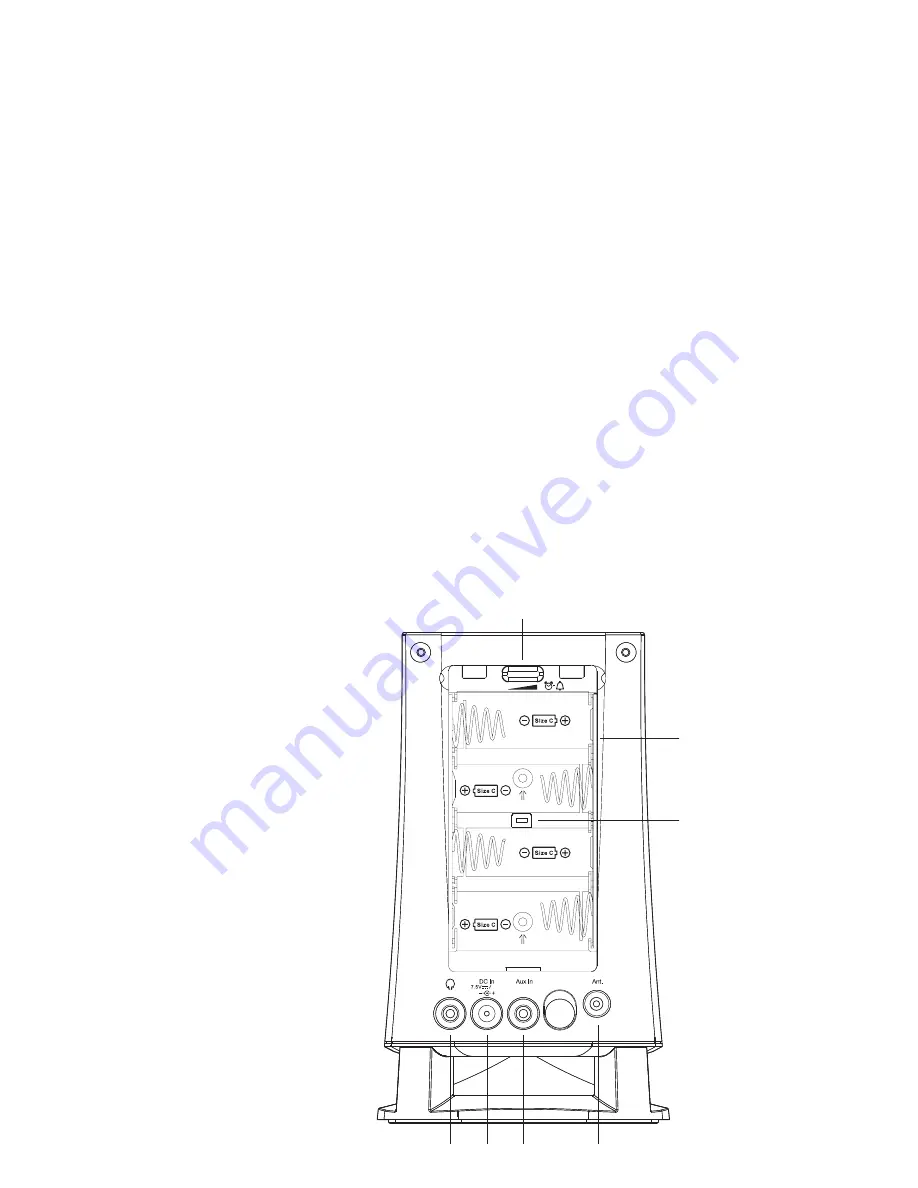
Controls (rear)
19. Buzzer volume control20. Battery compartment 21. USB socket (for software upgrades) 22. Wire DAB / FM aerial socket 23. Auxiliary input socket 24. DC input socket 25. Headphone socket
21
19
20
25
24
23
22
Page 1: ...Please read this manual before use ROBERTS DAB FM RDS Digital Clock Radio Enjoy Listening...
Page 2: ...etting FM headphones only 18 Presetting stations 19 Recalling a preset station 20 Favourite stations 21 Recording a voice message 22 Playing back a voice message 22 Contents Setting the alarm times 23...
Page 3: ...to either buzzer radio alarm or voice message Nap timer to set your radio to wake you after a predetermined interval up to 2 hours Adjustable sleep timer which can be set to turn the radio off after b...
Page 4: ...n 3 Alarm Menu button 4 On Off button 5 DAB FM button 6 Auto Tune button 7 Favourite station buttons 1 4 8 Nap timer button 9 Message 2 button with LED 10 Message 1 button with LED 11 Advanced Info bu...
Page 5: ...you need any further advice please call our Technical Helpline on Controls front 13 Microphone 14 LCD display 15 Tuning Select control 16 Volume control 17 Loudspeaker 18 Moon light 4 13 14 15 16 17...
Page 6: ...trols rear 19 Buzzer volume control 20 Battery compartment 21 USB socket for software upgrades 22 Wire DAB FM aerial socket 23 Auxiliary input socket 24 DC input socket 25 Headphone socket 21 19 20 25...
Page 7: ...attery indicator flashing reduced power distortion and a stuttering sound are all signs that the batteries may need replacing 4 If the radio is not to be used for any extended period of time it is rec...
Page 8: ...e During this time the radio is scanning to find a DAB radio signal After a short time the current time will appear on the display Note that during this time the display will not show any scanning mes...
Page 9: ...t During the scanning process the display will show the progress of the station search The number on the right of the display is the number of stations that have been found 4 When the scan is complete...
Page 10: ...ntrol to step through the list of available stations 4 When the desired station name appears on the display press and release the Tuning Select control to select the station The display will show TUNI...
Page 11: ...the Tuning Select control Most secondary services do not broadcast continually and if the selected service is not available the radio will re tune to the associated primary service Display options DA...
Page 12: ...the type of station being listened to e g Pop Classic News etc d Multiplex Name Displays the name of the DAB multiplex to which the current station belongs e Time Displays the current time f Date Disp...
Page 13: ...the currently tuned DAB station g h i Finding new stations DAB From time to time new DAB radio stations may become available Or you may have moved to a different part of the country In this case you...
Page 14: ...to the chosen frequency 3 If a signal is present this will be indicated on a signal strength display The minimum signal marker shows the minimum signal strength needed for good DAB reception The sign...
Page 15: ...M button until the DAB band is selected 3 Press and hold the Advanced Info button 4 Rotate the Tuning Select control until DRC VAL appears on the display Press and release the Tuning Select control Th...
Page 16: ...release the Auto Tune button as before 7 Press and hold down the Auto Tune button for 2 3 seconds to cause your radio to search from high frequency to low frequency and to stop automatically when it f...
Page 17: ...mation present then the display may change to show the station name 5 When the waveband end is reached the radio will recommence tuning from the opposite waveband end 6 Set the Volume to the desired s...
Page 18: ...s and release the Info button to cycle through the various options All display options except the text display will revert to the clock display after about 10 seconds a Frequency Displays the frequenc...
Page 19: ...eaker the audio signal will become poorer It may be preferable to force the radio to play the station in mono in order to reduce the level of background hiss 1 Press the On Off button to switch on you...
Page 20: ...button to select the desired waveband DAB or FM 3 Tune to the required station as previously described 4 Press and hold the Memo button The display will show for example Empty 01 if no station has be...
Page 21: ...theMemobutton Thedisplaywillshow forexample Empty 01 if no station has been stored to that preset If a preset has been stored then the display will show either the station name for DAB stations or the...
Page 22: ...o select the desired waveband DAB or FM 3 Tune to the required station as previously described 4 Press and hold the desired Favourite button 1 4 The display will show for example 1 SAVED The station w...
Page 23: ...peak clearly into the microphone The LED will light during the recording 2 Press and release the Message 1 or 2 buttons when you have finished recording your message The LED on the button will flash i...
Page 24: ...alarm setup 1 Press and hold the Alarm button Alarm 1 flashes on the display 2 Rotate the Tuning Select control to select the desired alarm number 1 or 2 3 Press and release the Tuning Select control...
Page 25: ...recorded message 2 BACK will go back to the previous step Note Tousethemessageoptionamessagemusthavebeenpreviously recorded see Recording a voice message page 22 11 Press and release the Tuning Selec...
Page 26: ...battery compartment has been set to the desired level Note The alarm volume used for radio alarm or voice message will be the volume previously listened to The volume must not be set at the lowest lev...
Page 27: ...alarms 1 or 2 3 Press and release the Tuning Select control to cycle through each of the settings for the chosen alarm Snooze function 1 When the alarm sounds press any button other than the On Off bu...
Page 28: ...on the display 3 Press and release the Tuning Select control to enter the clock format menu 4 Rotate the Tuning Select control to select either 12 or 24 hour format Press the control to confirm your c...
Page 29: ...le 1 Press and hold the Menu button to enter the setup menu 2 Rotate the Tuning Select control until DATE FMT appears on the display 3 Press and release the Tuning Select control to enter the date for...
Page 30: ...ll cause the sleep timer to be set to OFF which will cancel the sleep function 3 Press and release the Tuning Select control to confirm the sleep setting The display will exit the sleep options The sl...
Page 31: ...minutes 3 Press and release the Tuning Select control or press the Timer button to confirm the nap setting The display will exit the nap options The nap timer symbol will show on the display 4 To view...
Page 32: ...nt room lighting press the Backlight button to select the dimmer and moon light LED brightness The backlight level will change at the same time so that you can see the effect of each setting Moon ligh...
Page 33: ...the Tuning Select control to enter the menu 4 Rotate the Tuning Select control to select either ON or OFF 5 Press and release the Tuning Select control to confirm the setting Note thebuzzervolumecontr...
Page 34: ...itched on 1 Ensure your radio is in DAB or FM mode 2 Press and hold the Advanced Info button 3 Rotate the Tuning Select control until SW VER appears on the display 4 Press and release the Tuning Selec...
Page 35: ...control again 4 A full reset will be performed The station list and presets will be erased Alarms will be cancelled and sleep timer settings will be set to their default values The display will show R...
Page 36: ...earpiece Insertingaplugautomatically mutes the internal loudspeaker Please be aware that the sensitivity of headphones can vary widely We therefore recommend setting the volume to a low level before c...
Page 37: ...o or mono audio source for example iPod MP3 or CD player to the Auxiliary Input socket marked Aux In 2 Press and release the DAB FM button until AUX IN is selected on the display 3 Adjust the Volume c...
Page 38: ...nt objects in order to ensure good ventilation The ventilation of the product should not be restricted by covering it or its ventilation openings with items such as newspapers tablecloths curtains etc...
Page 39: ...e 2 Consequential damage 3 Receivers with removed or defaced serial numbers Procedure Any claim under this guarantee should be made through the dealer from whom the instrument was purchased It is like...
Page 40: ...TS RADIO TECHNICAL SERVICES 97 99 Worton Road Isleworth Middlesex TW7 6EG Technical Helpline 020 8758 0338 Mon Fri during office hours Website http www robertsradio co uk 2011 Roberts Radio Limited Is...