background image

CRV-S

ERIES

 I

NSTALLATION

, O

PERATION


AND

 S

ERVICE

 M

ANUAL

44 

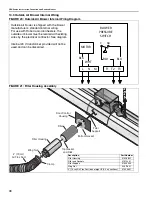
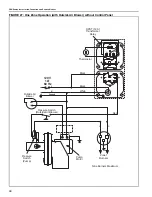
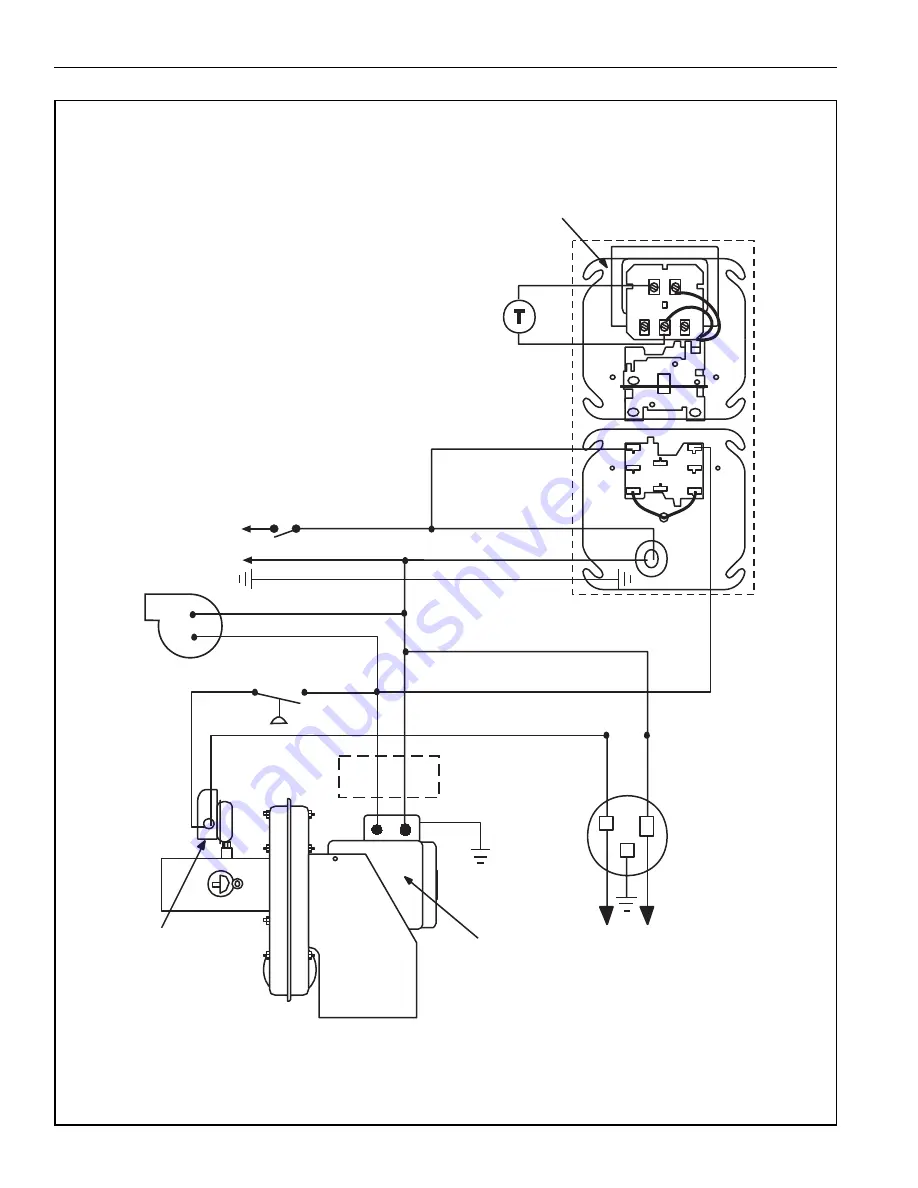
FIGURE 27: One Zone Operation (with Outside Air Blower) without Control Panel

1

2

3

4

5

6

COIL

COIL

R C

W G

Y

Thermostat

Pump

Motor

Pressure

Switch

(Pump)

SPST (12 A)

Transformer

Relay

Zone 1

Burners

N

L

L

N

Nine Burners Maximum

Black

White

Red

Black

L

120 V

1 Ø

60 Hz

N

Ground

Pressure Switch

(Outside Air Blower)

N

L

Outside Air

Blower

Summary of Contents for CoRayVac CRV-B-10

Page 1: ...ineered Low Intensity Infrared Heating Systems Installation Operation Service Manual WARNING FOR YOUR SAFETY If you smell gas 1 Open windows 2 DO NOT try to light any appliance 3 DO NOT use electrical switches 4 DO NOT use any telephone in your building 5 Leave the building 6 Immediately call your local gas supplier after leaving the building Follow the gas supplier s instructions 7 If you cannot ...

Page 2: ......

Page 3: ...ield 24 8 6 Two Foot Decorative Grille Installation 25 8 7 One Foot Decorative Grille Installation 26 8 8 Protective Grille Installation 29 8 9 Classic Cast Iron Components 30 SECTION 9 Pump Installation and Venting 31 9 1 Pump Installation 31 9 2 General Venting Requirements Model EP 100 EP 200 and EP 300 Series Pumps 32 9 3 Horizontal Venting 4 10 cm Pipe 34 SECTION 10 Outside Air Supply 37 10 1...

Page 4: ......

Page 5: ...0 Series Horizontal Venting Configurations 36 Figure 19 Duct Sizing 37 Figure 20 Outside Air Blower Internal Wiring Diagram 38 Figure 21 Filter Housing Assembly 38 Figure 22 Air Supply Blower Support 39 Figure 23 Pressurized Outside Air Supply 39 Figure 24 Non Pressurized Outside Air Supply 40 Figure 25 Gas Connection with Flexible Gas Hose 41 Figure 26 One Zone Operation without Control Panel 43 ...

Page 6: ......

Page 7: ...ll in residential spaces These instructions the layout drawing local codes and ordinances and applicable standards that apply to gas piping electrical wiring venting etc must be thoroughly understood before proceeding with the installation Thin sheet metal parts the aluminum reflector portion of the heater and the various venting components have sharp edges To prevent injury the use of work gloves...

Page 8: ...ler A copy of the wall tag P N 91037912 is illustrated on the back cover For an immediate solution you may affix this copy on the wall near the heater Know your model number and installed configuration Model number and installed configuration are found on the burner and in the Installation Operation and Service Manual See Page 4 Figure 1 through Page 6 Figure 9 Write the proper clearance dimension...

Page 9: ...d below the heater Maintain clearances from swinging and overhead doors overhead cranes vehicle lifts partitions storage racks hoists building construction etc In locations used for the storage of combustible materials signs must be posted to specify the maximum permissible stacking height to maintain required clearances from the heater to the combustibles Signs must be posted adjacent to the heat...

Page 10: ... 10 4 36 60 36 11 92 153 92 CRV B 12 4 36 60 36 11 92 153 92 CRV B 12A 4 36 60 36 11 92 153 92 B C D A FIGURE 2 ONE SIDE REFLECTOR inches centimeters Model A B C D A B C D CRV B 2 4 12 56 20 11 31 143 51 CRV B 4 4 12 56 20 11 31 143 51 CRV B 6 4 12 56 20 11 31 143 51 CRV B 8 4 12 56 20 11 31 143 51 CRV B 9 4 12 60 42 11 31 153 107 CRV B 10 4 12 60 42 11 31 153 107 CRV B 12 4 12 60 42 11 31 153 107...

Page 11: ...21 46 61 46 CRV B 12A 8 18 24 18 21 46 61 46 C A B D FIGURE 5 UNIVERSAL SHIELD POSITION 2 inches centimeters Model A B C D A B C D CRV B 2 4 24 48 24 11 61 122 61 CRV B 4 4 24 48 24 11 61 122 61 CRV B 6 4 24 48 24 11 61 122 61 CRV B 8 4 24 48 24 11 61 122 61 CRV B 9 4 36 48 36 11 92 122 92 CRV B 10 4 36 48 36 11 92 122 92 CRV B 12 4 36 48 36 11 92 122 92 CRV B 12A 4 36 48 36 11 92 122 92 C A B D F...

Page 12: ...43 46 CRV B 12 4 18 56 18 11 46 143 46 CRV B 12A 4 18 56 18 11 46 143 46 A B C D FIGURE 8 BARRIER SHIELD inches centimeters Model A B C D A B C D CRV B 2 4 12 12 12 11 31 31 31 CRV B 4 4 12 12 12 11 31 31 31 CRV B 6 4 12 12 12 11 31 31 31 CRV B 8 4 12 12 12 11 31 31 31 CRV B 9 UNAPPROVED UNAPPROVED CRV B 10 UNAPPROVED UNAPPROVED CRV B 12 UNAPPROVED UNAPPROVED CRV B 12A UNAPPROVED UNAPPROVED C A B ...

Page 13: ... objects Provisions shall be made to assure accessibility to suspended heaters for recurrent maintenance purposes 4 3 Public Garages Installation in garages must be in accordance with the following codes United States Standard for Parking Structures NFPA 88A latest revision or the Code for Motor Fuel Dispensing Facilities and Repair Garages NFPA 30A latest revision Canada Refer to CAN CGA B149 1 a...

Page 14: ...e 9 Install appropriate suspension hardware beam clamps chain or rod at predetermined locations Adjustments of chain length will provide uniform pitch FIGURE 10 Major Component Descriptions Burner Tube Hot rolled heat treated or coated aluminized tube supplied in 10 3 m lengths 45 Elbow 90 Elbow End Vent Coupling Assembly with Lock Flex Gas Line with shut off cock Combustion Chamber Tee Reflector ...

Page 15: ...Assembly Reflector End Cap Aluminum or Stainless Steel Punch out center section to accommodate heat exchanger tube when necessary S Hook Deco Grille Turnbuckle Protective Grille Universal Shield Tube and Reflector Hanger with Clamp Package Position this hanger no more than 4 10 cm away from the burner Tube and Reflector Hanger Suspend system from these hangers Reflector Support Strap Wire Form Bra...

Page 16: ... 58SB Serial Number No de Série Ratings Input 120V AC 25A Outputs 120V AC 3A 8 total EP 100 Pump Package 4 dia For more information refer to the EP 100 Installation Operation and Service Manual P N 127201NA EP 201 Pump Package 4 dia EP 203 Pump Package 4 dia For more information refer to the EP 200 Series Installation Operation and Service Manual P N 127200NA EP 301 Pump Package 4 dia EP 301 Pump ...

Page 17: ...cm Coated 45 91409300 Tube Hot Rolled Steel 4 10 cm dia 10 3 m 91409403 Tube Non Heat Treated Aluminized 4 10 cm dia 10 3 m 91409408 Tube Heat Treated Aluminized 4 10 cm dia 10 3 m 91409420 Tube Non Heat Treated Aluminized 6 15 cm dia 10 3 m 9141030D Tube Coated 4 10 cm dia 10 3 m E0009105 Tube Heat Treated Aluminized 6 15 cm dia 10 3 m 91418200 Tube Adapter Aluminized 6 15 cm dia x 4 10 cm dia 02...

Page 18: ...V Low Voltage Thermostat Marked 1 5 90424300 Thermostat Guard Deco Grille 1 x 8 3 m x 2 4 m 01363003 Bracket 01365901 End Piece 01326801 Reinforcement 01365903 Joint Piece 91406700 1 3 m x 8 2 4 m Protective Grille Deco Grille 2 x 4 6 m x 1 2 m 01365900 Shield Frame 01370408 Reflector Side Extension 8 x 48 20 3 cm x 122 cm 01370412 Reflector Side Extension 12 x 48 30 5 cm x 122 cm 01370416 Reflect...

Page 19: ...eration and performance required by the building being heated Every effort should be made to follow the dimensions on the layout drawing If deviations are necessary either contact the company responsible for the layout design your ROBERTS GORDON independent distributor or consult the CRV Series Design Manual P N 127500NA ...

Page 20: ...utside Pressure Switch S Zone 1 Sensor or Thermostat Relay System Control or ROBERTS GORDON ULTRAVAC Controller U Clips May not be needed with certain pumps and controllers Refer to wiring diagram in the appropriate controller s Installation Operation and Service Manual for details System Control requires thermostats ROBERTS GORDON ULTRAVAC requires zone sensors and additional control equipment Se...

Page 21: ...l installation configurations are shown in Figure 12 Expansion and contraction of the tube dictates that the minimum suspension lengths in the table on Figure 12 be maintained FIGURE 12 Critical Hanger Placement WARNING Suspension Hazard Hang heater with materials with a minimum working load of 75 lbs 33 kg Failure of the supports can result in death injury or property damage Side View Towards Pum...

Page 22: ...am Bottom of Tube Hanger Turnbuckles Tube Description Part Number Tube 91409XXX Turnbuckle 91903201 Tube Reflector Hanger 03090100 Tube Tube Orient coupling so that the impact block is in the 2 00 or 10 00 o clock positions Closed Open Tab 3 8 cm to 4 10 cm Slide Bar Coupling Lock Coupling Wide End Coupling Tube Slide Bar Coupling Lock A Close coupling with tab B Start slide bar coupling lock onto...

Page 23: ... Step 7 2 A D until all tubes are assembled NOTE If coupling is not tight loss of vacuum can occur Tighten slide bar as shown below Tube 90 Elbow Coupling Description Part Number Elbow Package 02718702 90 Elbow 01335801 Coupling 01312700 Reflector End Cap 02750800 Reflector Joint Piece 02750900 U Clip Package 91107720 Minimum Distance Required Between Burner and Elbow Model MinimumDistance CRVB 2 ...

Page 24: ...ugh hanger Unhook combustion chamber from chain and insert through hole Reconnect chain Reflector with Hole Description Part Number Tube Reflector Hanger 03090100 Tube 91409XXX Reflector with Hole 02750304 Reflector Wire Form Tube Reflector Support Strap Sheet Metal Screw U Clip 2 Clips per Alternate Overlaps per Side Description Part Number Reflector Support Package 03050010 U Clip Package 911077...

Page 25: ...or support with loose screws at the reflector overlap 3 The remaining reflector overlaps require a non slip overlap connection To affix the reflectors together in a non slip overlap either a use reflector support and tight screws b if both reflectors lay inside a hanger u clips or sheet metal screws may be used This section of three reflectors joined together must be affixed to the tube with at le...

Page 26: ...tion Gasket Burner Combustion Chamber End Vent NOTE Install end vent at end combustion chamber position only Burner Combustion Chamber End Vent End Vent Clips Rating Number Description Part Number Bolt 94273914 Burner 0270XXXX Lock Washer 96411600 Gasket 01367800 End Vent 013676XX ...

Page 27: ... Step 8 1 Tee Installation Step 8 2 Reflector Joint Step 8 2 1 Reflector Joint Installation Tee Tube Coupling Description Part Number Tee 01330XXX Tube Reflector Hanger 03090100 Tube 91409XXX Coupling 01312700 Reflector Reflector Joint Flatten Edge 1 2 5 cm Maximum Scribe Contour ...

Page 28: ...2 Reflector Joint Installation Step 8 2 3 Reflector Joint Detail FIGURE 13 Reflector Joint Detail Cut away contour with tin snips Punch drill six 3 32 2 mm holes Install reflector end cap Attach reflector joint with six 8 sheet metal screws Reflector Reflector Joint ...

Page 29: ...r movement applications Tube and Reflector Hanger Reflector Tube Reflector Support Description Part Number Reflector Side Extension Package 02712700 Reflector Side Extension 01368000 Retainer Clips 02751200 Sheet Metal Screws 94118106 Order Separately Reflector Side Extension Bracket 01329910 Retainer Clip 2 per Side Cut relief notches for supports and hangers Reflector Side Extension 8 x 3 8 3 9 ...

Page 30: ...t Assembly 02721400 Stud 02790900 Hex Nut 92114800 Universal shields are adjustable aluminum reflectors whose angle and height can be adjusted to direct heat to or away from a desired area See Page 5 Figure 4 through Page 5 Figure 6 for positions Reflector Support Strap Cut Relief Notch Flatten Reflector Edges Attach U Clips Tube and Reflector Hanger Standard Reflector Barrier Shield Description P...

Page 31: ...ille Installation Step 8 6 2 Frame Shield Installation Suspended Ceiling Frame Heat Exchanger Tube 2 x 4 60 cm x 120 cm Aluminum Grille Reflector Tube and Reflector Hanger Description Part Number Aluminum Grille 2 x 4 60 cm x 120 cm 91407000 Shield Description Part Number Deco Grille Shield 01365900 ...

Page 32: ...nt it from blowing over Allow 6 15 cm minimum clearance between burner box and overhead obstructions for service 6 15 cm Minimum Insert screw here see note Distance A Extension Minimum Maximum Part No Width 2 4 cm 6 15 cm 01370408 8 20 cm 6 15 cm 10 26 cm 01370412 12 30 cm 10 26 cm 14 37 cm 01370416 16 40 cm Description Part Number Reflector Side Extension 01370412 8 Sheet Metal Screws Cut relief ...

Page 33: ... brackets and install decorative grille Description Part Number Decorative Grille 8 x 1 2 4 m x 3 m 91406700 8 Sheet Metal Screws Joint Piece Reinforcement Slip joint piece into support bracket and fasten to bracket on one side of the joint only Joint Piece Description Part Number Joint Piece 01365903 Reinforcement 01365902 ...

Page 34: ...s using two 8 sheet metal screws and replace reflector end cap Insert end piece between grille and brackets End Piece Reflector End Cap Description Part Number End Piece 01365901 Insert end piece between grille and brackets Joint Piece Cut grille bracket at reflector joint piece Grille Brackets Inside Corner Decorative Grille Brackets Joint Piece ...

Page 35: ...n Step 8 8 2 Grille End Cap Installation Step 8 8 3 Grille Installation Silicone Cap Grille Finger Description Part Number Grille Section 08050001 Grille End Cap 08050002 Silicone Cap 91915951 6P Bend up 90 Pull outward Grille Grille End Cap A B C D Grille Grille End Cap Reflector Final Grille Section 40 101 cm ...

Page 36: ...Tube 7 2 13 m Maximum Cast Iron Combustion Chamber with Schedule 40 Steel Pipe The total weight of each burner and combustion chamber is 40 25 lbs 18 kg 4 Schedule 40 pipe weighs 10 9 lbs 5 kg per foot Cast Iron Combustion Chamber with Standard 4 O D Infrared Tubing The total weight of each burner and combustion chamber is 40 25 lbs 18 kg 4 O D 16 Ga tubing weighs 2 8 lbs 1 3 kg per foot ROBERTS G...

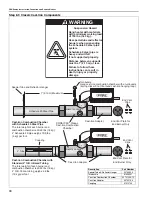
Page 37: ...ice Manuals FIGURE 14 EP 200 Condensate Valve Assembly Wall 1 NPT threaded hole Use 1 x reducer not supplied Must be connected to a drain system in accordance with local codes flow Condensate Valve Assembly 3 4 female 3 4 female 36 9 m Minimum vertical drop between pump and condensate valve assembly Copper or galvanized pipe between pump and condensate valve Description Part Number Condensate Valv...

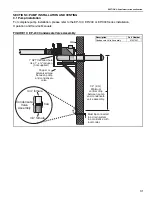
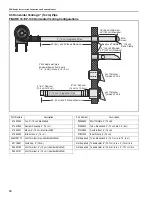
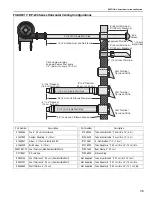
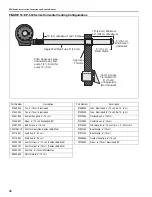
Page 38: ...nting options 9 2 2 Horizontal Venting See Page 34 Figure 16 through Page 36 Figure 18 for recommended horizontal venting options 9 2 3 United States Requirements Vent must terminate at least 3 9 m above any forced air inlet located within 10 3 1 m Vent must terminate at least 4 1 2 m below 4 1 2 m horizontally from or 1 3 m above any door operable window or gravity air inlet into any building 9 2...

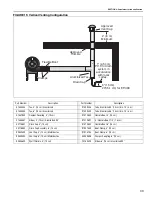
Page 39: ...luminized 4 10 cm dia 10 3 m 01330204 Tee 6 15 cm Aluminized 91409420 Tube Aluminized 6 15 cm dia 10 3 m 01331900 Damper Coupling 4 10 cm 91412800 Flexible Boot 4 10 cm 01335801 Elbow 4 10 cm Aluminized 90 91412801 4 Flexible Boot 1 2 1 3 cm 02718851 Drain Cap 4 10 cm 91412802 Flexible Boot 6 15 cm 02718852 Drain Cap Assembly 6 15 cm 91901300 Boot Clamp 4 10 cm 90502300 Vent Cap 4 10 cm Metalbesto...

Page 40: ...ard away from pump 1 4 6 mm for every 10 3 m 4 10 cm Band Clamp Part Number Description Part Number Description 01330203 Tee 4 10 cm Aluminized 90505600 Wall Thimble 4 10 cm 01331900 Damper Coupling 4 10 cm 91409403 Tube Aluminized 4 10 cm dia 10 3 m 01335801 Elbow 4 10 cm Aluminized 90 91412800 Flexible Boot 4 10 cm 01365400 Bird Screen 4 10 cm 91901300 Boot Clamp 4 10 cm 02537801 1P Vent Termina...

Page 41: ...rom pump 1 4 6 mm for every 10 3 m 4 10 cm Band Clam Part Number Description Part Number Description 01330203 Tee 4 10 cm Aluminized 91409403 Tube Aluminized 4 10 cm dia 10 3 m 01331900 Damper Coupling 4 10 cm 91409420 Tube Aluminized 6 15 cm dia 10 3 m 01335801 Elbow 4 10 cm Aluminized 90 91412801 4 Flexible Boot 1 2 1 3 cm 01365400 Bird Screen 4 10 cm 91418200 Tube Adapter 6 15 2 cm dia x 4 10 c...

Page 42: ...09403 Tube Aluminized 4 10 cm dia 10 3 m 01330204 Tee 6 15 cm Aluminized 91409420 Tube Aluminized 6 15 cm dia 10 3 m 01331900 Damper Coupling 4 10 cm 91412800 Flexible Boot 4 10 cm 01335801 Elbow 4 10 cm Aluminized 90 91412802 Flexible Boot 6 15 cm 01397400 Bird Screen 6 15 cm 91418200 Tube Adapter 6 15 2 cm dia x 4 10 cm dia 02537801 1P Vent Terminal Non Combustible Wall 91901300 Boot Clamp 4 10 ...

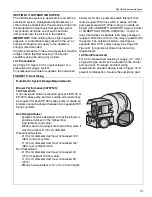
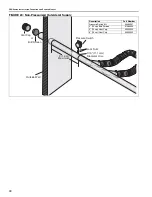
Page 43: ...for the relay in parallel with the pump The outside air blower must have a separate 20A 120V power supply See Page 38 Figure 21 for outside air blower internal wiring requirements 10 2 Non Pressurized For a non pressurized outside air supply a 4 O D single wall pipe duct may be attached to the burner and end vent For length and duct sizing requirements see duct design rules in Figure 19 To prevent...

Page 44: ...al wiring For use with Roberts Gordon heaters the outside air blower must be rewired with existing wires by the electrical contractor See diagram Internal 24 V transformer provided will not be used and can be discarded 4 10 cm Air Flex Duct Wing Nut Filter Housing Filter Top Gasket and Disk Bottom Gasket Door Control Housing Filter Support Clamp Description Part Number Filter Housing 01326801 Filt...

Page 45: ...art Number Blower 90707501 5 12 7 cm Vent Cap 90502302 6 15 cm Bird Screen 01397400 6 15 cm Band Clamp 91913703 Outside Wall Burner Sheet Metal or PVC Outside Air Supply Blower Clamp 4 10 cm Take Off 4 10 cm Air Flex Duct Filter Housing Vent Cap or Bird Screen Description Part Number Filter Housing 01326801 4 10 cm Take Off 01324401 Blower 90707501 5 12 7 cm Vent Cap 90502301 6 15 cm Bird Screen 0...

Page 46: ... Pressurized Outside Air Supply Vent Cap Outside Wall 7 16 11 1 mm Diameter Hole Pressure Switch Lock Nuts 6 1 8 m Maximum Bird Screen or Description Part Number Pressure Switch Kit 90434501 4 10 cm Bird Screen 01365400 4 10 cm Vent Cap 90502300 6 15 cm Vent Cap 90502302 ...

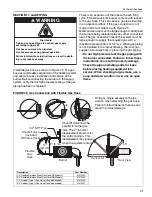
Page 47: ... before placing heating equipment into service When checking for gas leaks use a soap and water solution never use an open flame FIGURE 25 Gas Connection with Flexible Gas Hose WARNING Fire Hazard Tighten gas hose fittings to connect gas supply according to Figure 24 Gas hose can crack when twisted Gas hose moves during normal operation Failure to follow these instructions can result in death inju...

Page 48: ...stem status and settings are viewed and altered from a PC not supplied running ROBERTS GORDON ULTRAVACTM Software ROBERTS GORDON ULTRAVACTM Software requires a PC not supplied running Windows 95 or higher with a Pentium class processor and at least 64k of RAM Special design requirements apply for CRV Series systems using the ROBERTS GORDON ULTRAVACTM Controller 12 3 SPST Transformer Relay P N 9041...

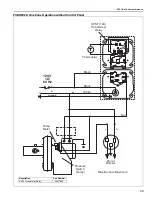
Page 49: ...t Control Panel 1 2 3 4 5 6 COIL COIL R C W G Y Thermostat Pump Motor Pressure Switch Pump SPST 12A Transformer Relay Zone 1 Burners N L L N Nine Burners Maximum Black White Red Black L 120 V 1 Ø 60 Hz N Ground Description Part Number SPST Transformer Relay 90417600 ...

Page 50: ...utside Air Blower without Control Panel 1 2 3 4 5 6 COIL COIL R C W G Y Thermostat Pump Motor Pressure Switch Pump SPST 12 A Transformer Relay Zone 1 Burners N L L N Nine Burners Maximum Black White Red Black L 120 V 1 Ø 60 Hz N Ground Pressure Switch Outside Air Blower N L Outside Air Blower ...

Page 51: ...or Pressure Switch Pump Transformer Relay Zone 1 Burners Zone 2 Burners N L L N L N Nine Burners Total Maximum Between Zones DPST 12 A Transformer Relay Zone 1 Thermostat Zone 2 Thermostat Purple Red Red Black Black Black Black Red Yellow Red Yellow White White DPST 12 A L 120 V 1 Ø 60 Hz N Purple Description Part Number DPST Transformer Relay 90436300 ...

Page 52: ...on 230 Vac Operation separate power circuit required for EP 203 or EP 300 series pumps Pressure Switch Motor Starter Needed for EP 203 and EP 300 Series Pump L 120 V 1 Ø 60 Hz N System Control C T1 C C C C T3 T2 T4 PS 12 Vdc 120 V 1 Ø 60 Hz Ground G L N Ground 120 V 1 Ø 60 Hz PUMP N L Z1 Z2 Z3 Z4 N N N N L L L L All burners must be connected to Ground Not shown Zone 1 Zone 2 Zone 3 Zone 4 Pump L N...

Page 53: ...r supply IEC contactor P N 10050009 rated for the EP 301 pump motor Low voltage thermostats located in heated zone Pressure switch located at pump System Control C T1 C C C C T3 T2 T4 PS 12 Vdc 120 V 1 Ø 60 Hz Z1 Z2 Z3 Z4 N N N N L L L L PUMP N L 208 230 V or 460 V 3 Ø 60 Hz 120 V 1 Ø 60 Hz Ground G L N Ground Individual supply for pump rated for total full load current L N EP 203 or EP 303 3 Ø Pu...

Page 54: ...th wiring material having a temperature rating of at least 105 C and 600 volts FIGURE 34 Burner Internal Ladder Diagram S1 TRANSFORMER VALVE GAS 120 V Power Supply Yellow Yellow Brown Green White Black 3 4 1 5 BURNER IGNITION MODULE Black Blue Yellow V2 GND TH V1 Green Gap TRANSFORMER L1 L2 Black White Blue Yellow Brown ELECTRODE GAS VALVE V2 Gnd S1 V1 TH Black Yellow IGNITION MODULE ...

Page 55: ...for 30 to 60 minutes and adequate ventilation should be provided 1 Start with all temperature setpoints below room temperature 2 Open main gas valve 3 Turn up temperature setpoints one zone at a time waiting to see that all burners in a zone start When the burner ignites a blue flame will be observed through the viewer window 4 If any abnormal operation occurs see the trou bleshooting section of t...

Page 56: ... AND SERVICE MANUAL 50 FIGURE 35 Vacuum Reading Insert tubing about 6 15 cm Combustion Chamber at end position End Vent Manometer 6 5 4 3 2 1 0 1 2 3 4 5 6 Approximate reading after adjusting damper couplings and pump inlet 2 5 3 0 w c ...

Page 57: ...ter Turn OFF manual gas valve in the heater supply line 14 3 To Start Heater Turn gas valve and electric power OFF and wait five minutes for unburned gases to vent from heater Turn ON main gas valve Turn ON electric power Set thermostat to desired temperature Burner should light automatically 14 4 Pre Season Maintenance and Annual Inspection To ensure your safety and years of trouble free operatio...

Page 58: ...ath injury or property damage The Vicinity of the Heater Do not store or use flammable objects liquids or vapors near the heating sys tem Immediately remove these items if they are present See Page 3 Section 3 Vehicles and Other Objects Maintain the clearances to combustibles Do not hang anything from or place anything on the heater Make sure nothing is lodged underneath the reflector in between t...

Page 59: ...ill cause problems Carefully remove any dust and debris from the burner Electrode Replace if there are cracked ceramics excessive carbon residue or erosion of the electrode The electrode gap should be 1 8 3 mm Thermostat or Sensor There should be no exposed wire or damage to the thermostat or sensor Suspension Points Make sure the heater is hanging securely Look for signs of wear on the chain or c...

Page 60: ...ff Check the inlet and outlet of the pump for blockage or excessive soot and clean as necessary Check boots for cracking or deterioration and replace if necessary If a condensate trap is installed check the condition of the trap and the drain line attached Note the condensate trap should be filled with water at the beginning of each heating season Check the condition of the motor mounts Lift the m...

Page 61: ...ner is plugged in Check thermostat wiring and replace thermostat if necessary No Do all the burners ignite smoothly No Yes Check circuit breaker and or fuse on panel supply circuit Refer to control panels listed below Does pump turn on Yes Is there power 120V to the control panel or relay Yes No START No Check for proper vacuum at end vent Unplug the burner wait 10 seconds then plug it in again Do...

Page 62: ...system for proper vacuum at the end vent Is the vacuum setting too low No Yes Is the flame low No Yes No Yes Are the filters on the burners dirty Yes No Is the rotation of the pump motor correct Adjust system for proper vacuum at the end vent Follow burner check procedure given above No Yes Are there any dead burners in a branch Is the vacuum setting too low No Yes Is the system leaking water No Y...

Page 63: ...1351100 Burner Head Assembly Replacement Package 02713000 Mixing Chamber 02790400 Transformer 90436900K Regulator 90207100 Gasket Combustion Chamber 01367800 Electrode Replacement Kit includes electrode electrode gasket and mounting screws 02713200 Ignition Module 90439500 Ignition Cable 90427706 Filter Cartridge with Gasket not shown 01312401 Gasket Burner to Mixing Chamber Ignition Module Mixing...

Page 64: ...les PIPE CONNECTION 1 2 NPT DIMENSIONS Vent Connection Size 4 10 cm or 6 15 cm Outside Air Connection Size 4 10 cm Refer to figure above for dimensional information GAS INLET PRESSURE Natural Gas 4 5 w c Minimum 14 0 w c Maximum LP Gas 10 5 w c Minimum 14 0 w c Maximum ELECTRICAL RATING 120 V 60 Hz 0 3 A Reflector Length A 20 51 cm 10 24 4 cm 6 1 2 16 cm 10 3 4 27 cm 4 10 cm 6 7 8 17 cm 3 1 2 9 cm...

Page 65: ...fications Model EP 100 EP 201 EP 203 EP 301 EP 303 Horsepower Hp 1 3 3 4 3 4 2 2 Phase Ø 1 1 3 1 3 Hertz Hz 60 60 60 60 60 Voltage V 115 230 115 230 208 230 460 208 230 208 230 460 Full Load Amp Amps 4 8 2 4 6 6 3 3 2 4 2 2 1 1 12 8 11 5 5 5 5 2 2 6 R P M 3450 3450 3500 3450 3450 Motor Frame 56 56 56 90 90 Motor Enclosure TENV TENV TEFC TEFC TEFC Noise Level 5 DBA 70 70 Inlet Outlet In 4 4 4 4 4 4...

Page 66: ...CRV SERIES INSTALLATION OPERATION AND SERVICE MANUAL 60 ...

Page 67: ...he installation and service of gas fired heating equipment You cannot prove original purchase date and required annual maintenance history The data plate and or serial number are removed defaced modified or altered in any way The ownership of the CORAYVAC is moved or transferred This warranty is nontransferable Roberts Gordon is not permitted to inspect the damaged controller and or component part...

Page 68: ......

Page 69: ...n the installation and service of products sold and supplied by Roberts Gordon and conform to all requirements set forth in the ROBERTS GORDON manuals and all applicable governmental authorities pertaining to the installation service and operation of the equipment To help facilitate optimum performance and safety Roberts Gordon recommends that a qualified contractor annually inspect your ROBERTS G...

Page 70: ......

Page 71: ......

Page 72: ...to heater Keep all flammable objects liquids and vapors the required clearances to combustibles away from heater Failure to follow these instructions can result in death injury or property damage TO TURN OFF THE HEATER Service Telephone 44 0 1902 498733 Service Fax 44 0 1902 401464 E mail uksales rg inc com E mail export rg inc com Roberts Gordon LLC 1250 William Street P O Box 44 Buffalo NY 14240...

Reviews: