background image


English 

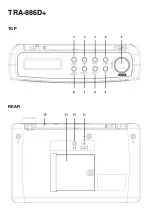
LOCATION OF CONTROLS 

1.  POWER ON - OFF  

2.  MODE 

3.  VOLUME-TUNING KNOB / ENTER 


4.  TUNE 

5.  SLEEP TIMER 

6.  ALARM 

7.  MENU / INFO 

8.  DIMMER / SNOOZE 

9.  PRESET 

10. ANTENNA 

11. DC INPUT 

12. EARPHONE OUT 

13. BATTERY COMPARTMENT 

PRECAUTION 

• 

INSTRUCTIONS 

- All the safety and operating instructions should be read before the 

radio is operated. The manual should be retained for future reference.


• 

HEED  WARNINGS 

-  All  warnings  on  the  appliance  and  in  the  operating  instructions 

should be adhered to.


• 

WATER  AND  MOISTURE 

- The appliance should not be used near liquids or in rooms 

with a high level of humidity.


• 

VENTILATION 

- The appliance should be situated so that its location or position does 

not interfere with its proper ventilation.


• 

HEAT 

- The appliance should be situated away from heat sources such as radiators, 

stoves or other appliances that produce heat.


• 

POWER  SOURCE 

- The radio should be connected to power supply only of the type 

described in the operating instructions or as marked on the appliance.


• 

POWER CORD  PROTECTION 

- Power supply cords should be routed so that they are 

not likely to be walked on or pinched by items placed upon/against them.


• 

OBJECT  AND  LIQUID  ENTRY 

- Care should be taken so that objects do not fall and 

liquids are not spilled into the enclosure through openings.


• 

SERVICING 

- The user should not attempt to service the appliance beyond that descri-

ve  in  the  user  operating  instructions.  All  the  servicing  should  be  referred  to  qualified 

service personnel


Note: 

If the display does not function properly or no reaction to operation of any control may 

due to the electrostatic discharge. Switch off and disconnect the power cord and remove all 

the batteries, then turn the power back on after a few seconds. 

 
POWER SOURCES 

AC POWER: 

You can power your portable stereo system by plugging the AC/DC adaptor 

into the DC plug (11) at the back of the unit and into a wall AC power outlet.  

Check that the rated voltage of your appliance matches your local voltage.  

BATTERY POWER: 

To use the radio with batteries, disconnect the AC/DC adaptor and in-

sert 4 × “LR6” batteries into the compartment (13).  

Be sure that the batteries are inserted correctly to avoid damage to the appliance.  

Remove the batteries when the radio will not be used for a long period of time, as this will 

cause leakage to the batteries and subsequently damage to your radio. 

Summary of Contents for TRA-886D+

Page 1: ...tar com TRA 886D Portable DAB FM Radio User manual Bedienungsanleitung Manuel d instructions Manuale d istruzioni Manual de instrucciones Manual de instruҫões Gebruiksaanwijzing Návod k použití Návod na použitie ...

Page 2: ...n Hör genuss Bitte lesen Sie diese Bedienungsanlei tung durch und heben Sie sie auf um jederzeit darin nachschlagen zu können Vuestro nuevo sistema ha sido construido se gún las normas estrictas de control de calidad ROADSTAR Le felicitamos y le damos las gra cias por su elección de este aparado Por favor leer el manual antes de poner en funcionamien to el equipo y guardar esta documentación en ca...

Page 3: ...TRA 886D TOP REAR ...
Page 4: ...kely to be walked on or pinched by items placed upon against them OBJECT AND LIQUID ENTRY Care should be taken so that objects do not fall and liquids are not spilled into the enclosure through openings SERVICING The user should not attempt to service the appliance beyond that descri ve in the user operating instructions All the servicing should be referred to qualified service personnel Note If t...

Page 5: ...to scan the previous next available station PRESET There are 10 presets available for DAB and 10 presets for FM 1 Set the desired radio station frequency as explained previously 2 Press and hold the PRESET button 9 and it will display Save to P1 3 Choose the number of preset by using the TUNING KNOB 3 4 Press the ENTER button 3 and the display will show Preset Stored RECALL A PRESET STATION 1 Pres...

Page 6: ...to choose the alarm mode Buzzer FM or DAB 10 Confirm with the ENTER button 3 11 Use the TUNING KNOB 3 to set the days as follow Daily Whole week Once One day of the week Weekends Weekdays Monday to Friday 12 Confirm with the ENTER button 3 13 Use the TUNING KNOB 3 to adjust the volume 14 Confirm with the ENTER button 3 15 Use the TUNING KNOB 3 to select Alarm ON or Alarm OFF 16 Confirm with the EN...

Page 7: ... users should contact their supplier and check the terms and conditions of the purchase contract This pro duct should not be mixed with other commercial wastes for disposal CORRECT DISPOSAL OF THIS PRODUCT Waste Electrical Electronic Equipment WARNINGS The exclamation point within the triangle is a warning sign alerting the user of important instruc tions accompanying the product The lightening fl...

Page 8: ...u vermeiden Entfernen Sie die Batterien wenn das Gerät für längere Zeit nicht verwendet wird da dies zu einer Leckage an den Batterien führen und in der Folge zu Ihr Radio beschädigen kann RADIO BENUTZEN 1 Drücken Sie zum Einschalten die Taste POWER 1 2 Wenn Sie das Radio zum ersten Mal einschalten sucht das Gerät automatisch nach DAB Radiosendern Wenn die Suche abgeschlossen ist wird der erste Se...

Page 9: ...o MENU NAVIGATION 1 Drücken un halten Sie die Taste MENU 7 um das Menu einzuloggen 2 Drehen Sie den TUNING KNOB 3 um die Optionen zu wählen 3 Drücken Sie die Taste ENTER 3 um eine Option auszuwählen 4 Drücken Sie noch die Taste MENU 7 um das Menu zu verlassen UHREINSTELLUNG Wenn das Radio eingeschaltet ist 1 Drücken und halten Sie die Taste MENU 7 2 Verwenden Sie TUNING KNOB 3 zur Auswahl von Syst...

Page 10: ...en 13 Drehen Sie den TUNING KNOB 3 to adjust the volume 14 Drücken Sie die Taste ENTER 3 um zu bestätigen 15 Drehen Sie den TUNING KNOB 3 to select Alarm ON aktiviert or Alarm OFF deaktiviert 16 Drücken Sie die Taste ENTER 3 um zu bestätigen Hinweis Um den zweiten Alarm einzustellen wiederholen Sie alle Schritte mit Alarm 2 anstelle von Alarm 1 ALARMEINSTELLUNGEN AKTIVIREN DEAKTIVIEREN Im Standby ...

Page 11: ...er sollten sich an Ihren Lieferanten wenden und die Bedingungen des Ver kaufsvertrags konsultieren Dieses Produkt darf nicht zusammen mit anderem Gewerbemüll entsorgt werden KORREKTE ENTSORGUNG DIESES PRODUKTS Elektromüll SICHERHEITSHINWEISE Das Ausrufszeichen im Dreieck weist den Benutzer auf wichtige Bedienungs und Wartungsanwei sungen Service in diesem Handbuch hin die unbedingt zu befolgen sin...

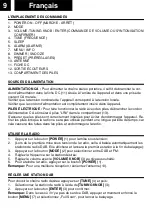
Page 12: ...es pour éviter d endommager l appareil Re tirer les piles lorsque la radio ne sera pas utilisée pendant une longue période de temps car cela causera des fuites dans les piles et endommagera la radio UTILISER LA RADIO 1 Appuyer sur le bouton POWER 1 pour la mise sous tension 2 Lors de la première mise sous tension de la radio celle ci balaie automatiquement les stations de radio DAB Elle affichera ...

Page 13: ...NAVIGUER LE MENU 1 Appuyer et maintenir enfoncé le bouton MENU 7 pour accéder au menu 2 Utilisez le TUNING KNOB 3 pour faire défiler les options 3 Appuyez sur ENTER 3 pour sélectionner un élément 4 Appuyez sur MENU 7 pour quitter le menu RÉGLAGE DE L HORLOGE Quand la radio est allumée 1 Appuyer et maintenir enfoncé le bouton MENU 7 2 Utilisez le TUNING KNOB 3 pour sélectionner System 3 Appuyez sur...

Page 14: ...ndredi 12 Appuyez sur ENTER 3 pour confirmer 13 Utilisez le TUNING KNOB 3 pour régler le volume 14 Appuyez sur ENTER 3 pour confirmer 15 Utilisez le TUNING KNOB 3 pour sélectionner Alarm ON activé ou Alarm OFF éteint 16 Appuyez sur ENTER 3 pour confirmer Remarque Pour régler la seconde alarme répétez toutes les étapes avec Alarme 2 au lieu de Alarme 1 ACTIVER DÉSACTIVER LES RÉGLAGES DE L ALARME Po...

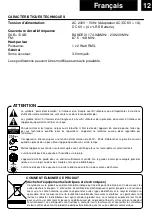
Page 15: ...oit pas être éliminé avec les autres déchets commerciaux COMMENT ÉLIMINER CE PRODUIT déchets d équipements électriques et électroniques ATTENTION Le symbole point d exclamation à l intérieur d un triangle avertit l utilisateur que d importantes instructions d utilisation et de maintenance sont contenues dans le mode d emploi Le symbole éclair à l intérieur d un triangle sert à avertir l utilisateu...

Page 16: ...ie siano inserite con la giusta polarità per evitare di dannegggiare la radio Ri muovere le batterie quando non si usa la radio per un lungo periodo siccome queste potreb bero avere perdite che danneggerebbero la radio USO DELLA RADIO 1 Premere il tasto POWER 1 per accendere la radio 2 La prima volta che si accende la radio questa effettuerà la ricerca automatic di stazi oni DAB e inizierà la ripr...

Page 17: ...IONE DEL MENU 1 Tenere premuto il tasto MENU 7 per accedere al menu 2 Utilizzare il TUNING KNOB 3 per scorrere tra le opzioni 3 Premere ENTER 3 per selezionare una voce 4 Premere di nuovo MENU 7 per uscire dal menu IMPOSTARE L ORARIO Quando la radio é accesa 1 Tenere premuto il tasto MENU 7 2 Utilizzare il TUNING KNOB 3 per selezionare System 3 Premere ENTER 3 per confermare 4 Utilizzare il TUNING...

Page 18: ...are il volume al livello desiderato 14 Premere ENTER 3 per confermare 15 Utilizzare il TUNING KNOB 3 per selezionare Alarm ON acceso o Alarm OFF spento 16 Premere ENTER 3 per confermare Nota Per impostare la seconda sveglia ripetere lo stesso procedimento utilizzando Alarm 2 anziché Alarm 1 ATTIVARE DISATTIVARE LE IMPOSTAZIONI DELLA SVEGLIA Per attivare disattivare le impostazioni quando la radio ...

Page 19: ...fornitore e verificare i termini e le condizioni del contratto di acquisto Questo prodotto non deve essere smaltito unitamente ad altri rifiuti commerciali CORRETTO SMALTIMENTO DEL PRODOTTO rifiuti elettrici ed elettronici ATTENZIONE Il punto esclamativo all interno di un triangolo avverte l utente che il libretto d istruzioni contiene delle importanti istruzioni per l uso e la manutenzione Il sim...

Page 20: ...o 13 Asegúrese que las pilas estén colocadas correctamente para evitar dañar el aparato Retire las pilas cuando no vaya a usar la radio durante un largo tiempo ya que podrían descargarse y dañar la radio USO DE LA RADIO 1 Pulse el boton POWER 1 para encender la radio 2 La primera vez que encienda la radio esta buscará las emisoras de radio digital DAB automáticamente Mostrará en la pantalla la pri...

Page 21: ...smitida por la radio NAVEGACIÓN POR EL MENÚ 1 Pulse y mantenga el botón MENU 7 para acceder al menú 2 Use el TUNING KNOB 3 para desplazarse por las opciones 3 Pulse ENTER 3 para seleccionar un elemento 4 Presione MENU 7 para salir del menú CONFIGURACION DE HORA Y FECHA Cuando la radio está encendida 1 Pulse y mantenga el botón MENU 7 2 Use el TUNING KNOB 3 para seleccionar System 3 Pulse ENTER 3 p...

Page 22: ...r 13 Use el TUNING KNOB 3 para seleccionar el volumen deseado 14 Pulse ENTER 3 para confirmar 15 Use el TUNING KNOB 3 para seleccionar Alarm ON Encendido o Alarm OFF Apagado 16 Pulse ENTER 3 para confirmar Nota Para configurar la segunda alarma repita los pasos anteriores con Alarm 2 en lugar de Alarm 1 ACTIVAR DESACTIVAR LA CONFIGURACIÓN DE LA ALARMA Para activar desactivar las configuraciones en...

Page 23: ... sultar las condiciones del contrato de compra Este produco no debe eliminarse mezclado con otros residuos comerciales ELIMINACIÓN CORRECTA DE ESTE PRODUCTO material electrico y electrónico de descarte ATTENTIÓN El símbolo de exclamación dentro un triángulo tiene el objeto de advertir al usuario de la presencia de instrucciones importantes de funcionamiento y mantenimiento en la documentación adju...

Page 24: ...rifique que as baterias estejam inseridas corretam para evitar danos ao aparelho Remova as baterias quando não vai usar o rádio por um longo período de tempo pois isso causará vazamento às baterias e consequentemente danos ao seu rádio USAR O RÁDIO 1 Pressione o botão POWER 1 para ligar o rádio 2 A primeira vez que você ligar o rádio este fará a busqueda automática das estações de rádio DAB Exibir...

Page 25: ...er as informações transmitidas pelo rádio NAVEGAR NO MENU 1 Pressione e segure MENU 7 para acessar as opções 2 Use o TUNING KNOB 3 para navegar entre as opções 3 Pressione ENTER 3 para selecionar a opção desejada 4 Pressione MENU 7 para sair do menu DEFINIÇÃO RELÓGIO E DATA Quando o rádio está ligado 1 Pressione e segure MENU 7 para entrar no menu 2 Use o TUNING KNOB 3 para selecionar System 3 Con...

Page 26: ... ajustar o volume 14 Confirme com o botão ENTER 3 15 Use o TUNING KNOB 3 para selecionar Alarm ON ligado ou Alarm OFF apagado 16 Confirme com o botão ENTER 3 Nota Para definir o segundo alarme repita todos os passos com Alarme 2 em vez de Alarme 1 ATIVAR DESATIVAR AS CONFIGURAÇÕES DO ALARME No modo de espera pressione repetidamente o botão ALARM 6 para selecionar Alarm ON ou Alarm OFF ALARME DESLI...

Page 27: ...ctuar uma reciclagem segura em termos ambientais Os utilizadores profissionais de verão contactar o seu fornecedor e consultar os termos e condições do contrato de compra Este produto não devera ser misturado com outros residuos comerciais para eliminação ELIMINAÇAO CORRECTA DESTE PRODUTO Resíduo de Equipamentas Eléctricos e Electrónicos ATENÇÃO O ponto de exclamação dentro de um triângulo avisa o...

Page 28: ...paraat of de batterijen correct zijn geplaatst Verwijder de batterijen als de radio gedurende langere tijd niet wordt gebruikt Dit ter voorkoming van lekkage van de batterijen en schade aan de radio OM DE RADIO TE GEBRUIKEN 1 Druk op de POWER knop 1 om het apparaat in te schakelen 2 De eerste keer dat u de radio inschakelt voert deze een automatische scan van de DAB radiozenders uit Na voltooiing ...

Page 29: ...itgezonden MENU NAVIGATIE 1 Houdt u de knop MENU 7 ingedrukt om naar het menu te gaan 2 Gebruik de TUNING KNOB 3 om tussen opties te rollen 3 Druk op ENTER 3 om een item te kiezen 4 Opnieuw MENU indrukken 7 om het menu te verlaten HET INSTELLEN VAN DE JUISTE TIJD Wanneer de radio is ingeschakeld 1 Houdt u de knop MENU 7 ingedrukt 2 Gebruik de TUNING KNOB 3 om System te selecteren 3 Druk op de ENTE...

Page 30: ...3 om te bevestigen 13 Gebruik de TUNING KNOB 3 om het volume aan te passen 14 Druk op de ENTER knop 3 om te bevestigen 15 Druk op de TUNING KNOB 3 om Alarm ON of Alarm OFF te selecteren 16 Druk op de ENTER knop 3 om te bevestigen Let op Om het tweede alarm in te stellen herhaalt u de bovenstaande stappen met Alarm 2 in plaats van Alarm 1 ALARMINSTELLINGEN ACTIVEREN DEACTIVEREN Om de instellingen t...

Page 31: ...n gemengd met ander bedrijfsafval voor de verwijdering CORRECTE AFVALVERWERKING VAN HET PRODUCT elektrisch en elektronisch afval WAARSCHUWING Het uitroepteken in een gelijkzijdige driehoek is bedoeld om de gebruiker erop attent te maken dat de gebruikershandleiding belangrijke instructies bevat voor het gebruik en het onderhoud De bliksemschicht in een gelijkzijdige driehoek is bedoeld om de gebru...

Page 32: ...takovém případě by došlo k únikům z baterií a k následnému poškození vašeho rádia POUŽITÍ RÁDIA 1 Stiskněte tlačítko POWER 1 pro zapnutí 2 při prvním zapnutí rádia rádio automaticky vyhledá rozhlasové stanice dab 3 Vyberte pásmo DAB nebo FM stisknutím tlačítka MODE 2 4 Nastavte rádiovou frekvenci na požadovanou stanici 5 Nastavte hlasitost pomocí tlačítka 3 na požadovanou úroveň 6 Rádio vypnete st...

Page 33: ...ČÍTKA NASTAVENÍ HLASITOSTI 3 vyberte možnost 3 Stiskněte ENTER 3 pro volbu možnosti 4 Nabídku opustíte stisknutím MENU 7 NASTAVENÍ HODIN A DAT Když je rádio zapnuto 1 Stiskněte a podržte MENU 7 pro přístup do menu 2 Pomocí TLAČÍTKA NASTAVENÍ HLASITOSTI 3 vyberte Systém 3 Potvrďte tlačítkem ENTER 3 4 Pomocí TLAČÍTKA NASTAVENÍ HLASITOSTI 3 vyberte Time 5 Potvrďte tlačítkem ENTER 3 6 Pomocí TLAČÍTKA ...

Page 34: ...omocí TLAČÍTKA NASTAVENÍ HLASITOSTI 3 nastavte hlasitost 14 Potvrďte tlačítkem ENTER 3 15 Pomocí TLAČÍTKA NASTAVENÍ HLASITOSTI 3 vyberte Alarm ON nebo Alarm OFF 16 Potvrďte tlačítkem ENTER 3 Poznámky Pro nastavení druhého alarmu opakujte všechny kroky s Alarm2 namísto Alarm1 AKTIVACE DEAKTIVACE NASTAVENÍ ALARMU V pohotovostním režimu stiskněte opakovaně tlačítko ALARM 6 pro volbu Alarm ON nebo Ala...

Page 35: ... úrazu elektrickým proudem Uvnitř skříňky nejsou díly které by mohl opravit nebo seřídit jeho uživatel bez odpovídajícího vybavení a kvalifikace Bude li přístroj vyžadovat seřízení nebo opravu kontaktujte odborný servis Zásahem do přístroje v době platnosti záruky se vystavujete riziku ztráty event záručních plnění Přístroj je konstruován pro napájení střídavým napětím 230 V 50 Hz z elektrické sít...

Page 36: ...používať pretože by mohlo dôjsť k úniku z batérií a k následnému poškodenie vášho rádia PREVÁDZKA RÁDIA 1 Stlačte tlačidlo POWER 1 pre zapnutie 2 pri prvom zapnutí rádia rádio automaticky vyhľadá rozhlasové stanice dab 3 Vyberte pásmo DAB alebo FM stlačením tlačidla MODE 2 4 Nastavte rádiovú frekvenciu na požadovanú stanicu 5 Nastavte HLASITOSŤ POMOCOU TLAČIDLA 3 na požadovanú úroveň 6 Rádio vypne...

Page 37: ... Pomocou tlačidla nastavenia hlasitosti 3 vyberte možnosť 3 Stlačte ENTER 3 pre voľbu možnosti 4 Ponuku opustíte stlačením MENU 7 NASTAVENIE HODÍN A DATA Keď je rádio zapnuté 1 Stlačte a podržte MENU 7 pre prístup do menu 2 Pomocou TLAČIDLA NASTAVENIA HLASITOSTI 3 vyberte systém 3 Potvrďte tlačidlom ENTER 3 4 Pomocou TLAČIDLA NASTAVENIA HLASITOSTI 3 vyberte time 5 Potvrďte tlačidlom ENTER 3 6 Pomo...

Page 38: ...3 13 Pomocou TLAČIDLO OVLÁDANIA HLASITOSTI 3 nastavte hlasitosť 14 Potvrďte tlačidlom ENTER 3 15 Pomocou TLAČIDLO OVLÁDANIA HLASITOSTI 3 vyberte alarm ON alebo alarm OFF 16 Potvrďte tlačidlom ENTER 3 Poznámky pre nastavenie druhého alarmu zopakujte všetky kroky s alarm 2 namiesto alarm1 AKTIVÁCIA DEAKTIVÁCIA ALARMU V pohotovostnom režime stlačte opakovane tlačidlo ALARM 6 pre voľbu alarm ON alebo ...

Page 39: ... napätie na niektorých dieloch vo vnútri skrinky prístroja Nevyberajte prístroj zo skrinky riziko úrazu elektrickým prúdom Vo vnútri skrinky prístroja nie sú diely ktoré by mohol opraviť alebo nastaviť jeho užívateľ bez zodpovedajúceho vybavenia a kvalifikácie Ak bude prístroj vyžadovať nastavenie alebo opravu kontaktujte odborný servis Zásahom do prístroja v do be platnosti záruky sa vystavujete ...

Page 40: ...e type TRA 886D est conforme aux exigences de la directive 2014 53 EU Le texte complet de cette déclaration de conformité EU est disponible à l adres se internet suivante http roadstar com images ce TRA 886D pdf ou en scannant le code QR suivant Con la presente Roadstar Management SA dichiara che l apparecchiatura radio del tipo TRA 886D è conforme alla Direttiva 2014 53 EU Il testo completo della...

Page 41: ...nformiteitsverklaring is beschikbaar op het volgende internetadres http roadstar com images ce TRA 886D pdf of door de volgende QR code te scannen Společnost Roadstar Management SA tímto prohlašuje že rádiové zařízení typu TRA 886D je v souladu se směrnicí 2014 53 EU Úplné znění prohlášení o shodě EU je k dispozici na této internetové adrese http roadstar com images ce TRA 886D pdf nebo skenováním...

Page 42: ...is a registered Trademark of Roadstar S A Switzerland All rights reserved Roadstar Management SA via Passeggiata 7 CH 6883 Novazzano Switzerland MANUAL VER 1 0 22 03 2019 ...

Reviews: