- 6 -
5)
Screw the mandrel on to the sleeve (to the backstop) and then turn it back, so that the flats of the
hexagons of the screw‐plug gauge and sleeve are matching.
6)
Slide on the anvil to the hexagons of the mandrel and sleeve.
7)
Screw on the anvil to the front nozzle.
8)
Set‐up the anvil:
-
For rivet nuts ‐ the rivet nut is screwed on the whole length of the thread on the mandrel and the front
of the rivet nut leans on the anvil. Fasten the position of the anvil with a counternut.
-
for rivet bolts ‐ set‐up the anvil so that there is a cca 1 mm space between the outer side of the rivet
bolt and inner side of the anvil. Do it as following: screw on the anvil to the backstop to the mandrel and
then screw it back one or two turns. Fasten the position of the anvil with a counternut.
9)
Basic stroke set‐up as following (does not apply for all types of rivet nuts):
-
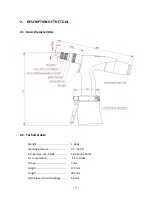
to set‐up the stroke turn the covering sleeve of the front nozzle, value of the stroke are indicated be‐
tween the scale on the body of the front nozzle and the edge of the covering sleeve of the front nozzle,
digits indicate the stroke into millimeters, see the following picture:
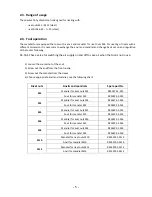
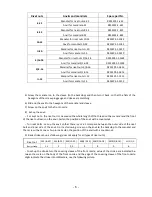
Rivet nuts
Anvils and mandrels
Spare part Nr.
6‐32
Mandrel for rivet nuts 6‐32
RK55SPS‐1‐632
Anvil for mandrel 6‐32
RK55SPS‐2‐632
8‐32
Mandrel for rivet nuts 8‐32
RK55SPS‐1‐832
Anvil for mandrel 8‐32
RK55SPS‐2‐832
10‐32
Mandrel for rivet nuts 10‐32
RK55SPS‐1‐1032
Anvil for mandrel 10‐32
RK55SPS‐2‐1032
¼‐20
Mandrel for rivet nuts ¼‐20
RK55SPS‐1‐1420
Anvil for mandrel ¼‐20
RK55SPS‐2‐1420
5/16‐18
Mandrel for rivet nuts 5/16‐18
RK55SPS‐1‐51618
Anvil for mandrel 5/16‐18
RK55SPS‐2‐51618
3/8‐16
Mandrel for rivet nuts 3/8‐16
RK55SPS‐1‐3816
Anvil for mandrel 3/18‐16
RK55SPS‐2‐3816
½‐13
Mandrel for rivet nuts ½‐13
RK55SPS‐1‐1213
Anvil for mandrel ½‐13
RK55SPS‐2‐1213
Rivet nut
M3 (6‐32)
M4 (8‐32)
M5(10‐32)
M6(1/4‐20) M8(5/16‐18)
M10(3/8‐16)
M12(1/2‐
Basic stroke
(
)
1,5
2
2,5
3
4
5
6


