background image

LearninG about Your  
1.5 cuP mini choPPer

beFore First use

1.

 Remove all packaging materials before using.

2.

  Wash lid, blade and bowl in warm soapy water; rinse and dry 

thoroughly, see CARE AND CLEANING.

assembling the unit

On a flat surface place the bowl, without lid and chopping blade, 

on the base and turn clockwise to lock into position.

note:

 Rotate the bowl until it snaps into place.

1.

  Slide the chopping blade down over the drive shaft, rotating if 

necessary to drop into place.

2.

  Place the lid on the bowl, and then turn clockwise into lid locking 

slot. Continue turning the lid into the lid locking slot as far as it will 

go so that the dot on the lid lines up with the dot on the base.

note:

 For your protection, this unit has a safety lock lid. The unit 

will not operate unless the lid and base dots align. Do not attempt 

to operate the unit without locking the lid in place.

chopping

1.

  Cut food into approximately 1.5 cm (1/2 inch) pieces and place 

up to 1.5 cups of dry food in the bowl at a time.

2.

 Place the lid on the bowl and turn to lock into place.

3.

  Plug the cord into an outlet. Press and hold the Pulse Button 

for 5–10 seconds and then release; the motor will stop. Repeat 

for a finer consistency.

note:

 For more chopping accuracy, press the pulse button for 

2-3 seconds and then release.

4.

  When finished chopping, allow chopping blade to stop rotating 

before removing contents.

5.

  Remove the lid and grasp the stem of the chopping blade. 

Carefully remove it from the bowl. Remove the bowl from the 

base and empty the processed food.

note:

 Do not use bowl for storing food.

-4-

a
b

e

f

g

c

d

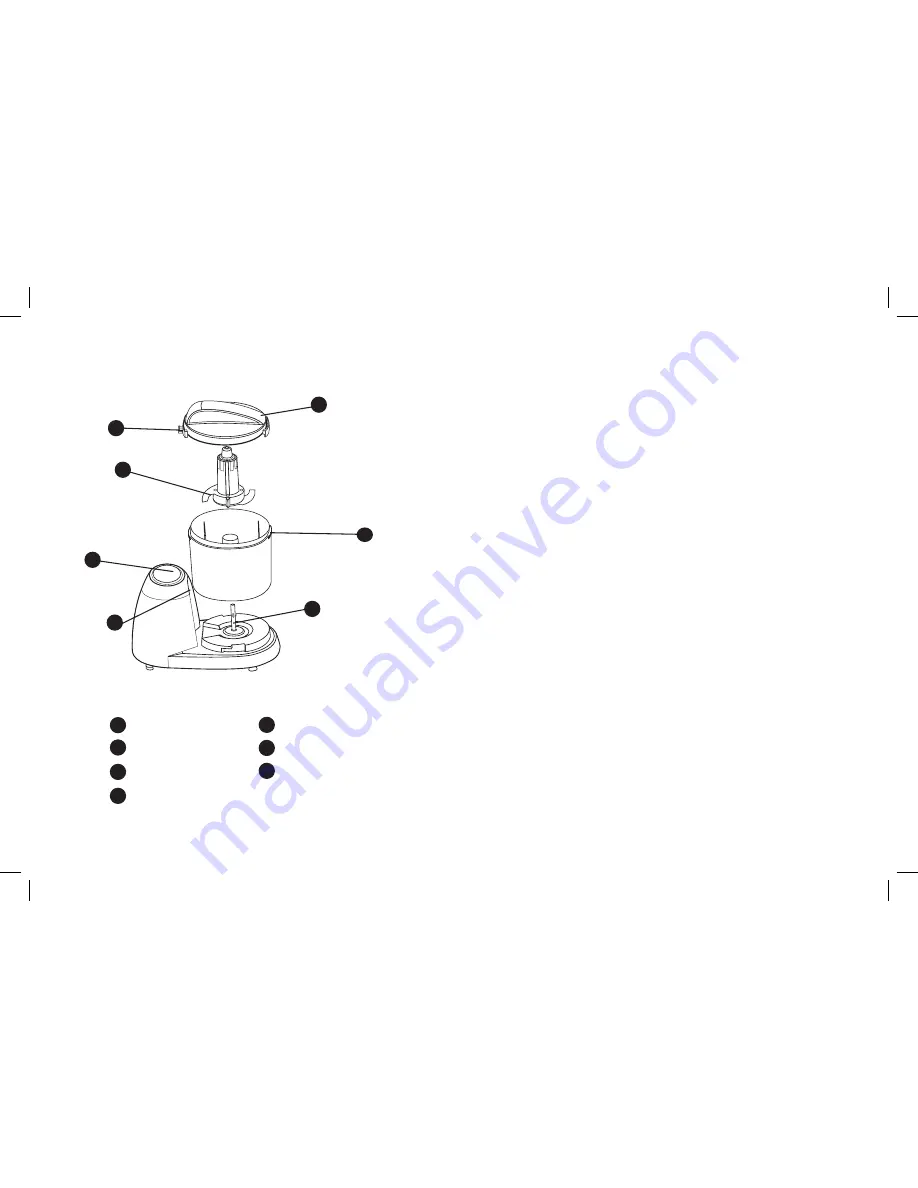
Lid

Lid Locking Tabs

Chopping Blade

Bowl

Pulse Button

Locking Slot

Drive Shaft

b

a

d

g

f

e

c

-5-

Summary of Contents for FPRVMC3000

Page 1: ... limits on JCS s Liability JCS shall not be liable for any incidental or consequential damages caused by the breach of any express implied or statutory warranty or condition Except to the extent prohibited by applicable law any implied warranty or condition of merchantability or fitness for a particular purpose is limited in duration to the duration of the above warranty JCS disclaims all other wa...

Page 2: ...ating appliance 15 To disconnect remove plug from wall outlet 16 DO NOT use this appliance for anything other than intended use 17 To avoid injury never place chopping blade on base without first putting bowl properly in place Make sure motor and chopping blade have stopped completely before removing the lid 18 Be certain the lid is locked securely in place before operating DO NOT attempt to defea...

Page 3: ...k lid The unit will not operate unless the lid and base dots align Do not attempt to operate the unit without locking the lid in place Chopping 1 Cut food into approximately 1 5 cm 1 2 inch pieces and place up to 1 5 cups of dry food in the bowl at a time 2 Place the lid on the bowl and turn to lock into place 3 Plug the cord into an outlet Press and hold the Pulse Button for 5 10 seconds and then...

Page 4: ...de to stop rotating before disassembling 2 Wash the bowl lid and chopping blade in warm soapy water Rinse and dry thoroughly NOTE Bowl and lid can also be placed in the dishwasher CAUTION Blades are sharp Handle with care 3 To clean the base wipe the exterior with a damp cloth or sponge Dry thoroughly with a soft cloth Questions or comments Please visit www rivalproducts com or call us at 800 557 ...

Page 5: ...y la tapa se encuentran firmemente cerrados antes de operar el artefacto 15 Antes de desconectar remueva el enchufe del tomacorriente 9 8 16 No use este electrodoméstico para un propósito distinto de aquel para el cual fue diseñado 17 Para evitar cualquier daño nunca coloque la cuchilla en la base sin antes colocar el recipiente apropiadamente en su lugar Cerciórese de que el motor y la cuchilla s...

Page 6: ...ra picar hacia abajo en el eje rotándola si es necesario hasta que caiga en su lugar 2 Coloque la tapa sobre el recipiente y luego gire en sentido de las manecillas del reloj hacia la ranura aseguradora de la tapa Continúe girando la tapa hacia la ranura aseguradora de la tapa hasta que no gire más de modo que el punto en la tapa se alinee con el punto en la base NOTA Para su protección esta unida...

Page 7: ...nchufe su Mini Picadora cuando no la esté utilizando y antes de limpiarla Nunca sumerja la base el enchufe o el cable en agua ni otros líquidos Permita que la cuchilla pare de girar antes de desmontarla 2 Lave el recipiente la tapa el accesorio batidor y la cuchilla en agua tibia y jabonosa Enjuague y seque completamente NOTA El recipiente el accesorio batidor y la tapa también pueden colocarse en...

Page 8: ...ntía o condición implícita de comerciabilidad o aptitud para un fin determinado se limita en cuanto a su duración al plazo de la garantía antes mencionada JCS queda exenta de toda otra garantías condiciones o manifestaciones expresa implícita legal o de cualquier otra naturaleza JCS no será responsable de ningún tipo de daño que resulte de la compra uso o mal uso del producto o por la imposibilida...

Reviews: