14.
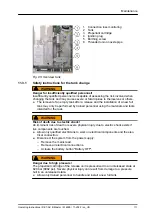
Remove the M3 nuts (Fig. 93/1) of the tank fastening with a 5.5 mm socket
wrench.
15.
Lift up the tank in the rear section and carefully pull it out towards the rear
11.3.3
Disposal of the old tank and installation of a new tank
1.
The release unit (Fig. 95) is labelled as "RELEASED" as it is a pyrotechnic ele-
ment.
2.
Dispose of the old tank in a proper and professional manner.
The fastening material is not included in the scope of delivery of the new
tank to be installed. Keep the fastening material if the new tank is not installed
directly after the removal of the old tank.
3.
L
WARNING! Danger of a faulty release!
Ensure that the blocking switch is set to "Agent disconnect [blocked]" before
installing a new tank.
4.
Install the new tank in the reverse order.
Fig. 93: Tank fastening
Fig. 94: Pulling out the tank
Fig. 95: Release unit
Maintenance
Operating Instructions / DET-AC III Master / 916005 / 11-2022 / en_US
114


