Ritron JOBCOM J Series User Manual Download Page 18

Have questions? Call


800-USA-1-USA


(800-872-1872) or visit our website at 

www.ritron.com

How To Program Per-Channel Features

To match other radios, the owner can select from Table #4 of frequency codes and interference eliminator codes. In order to talk to other radios, the 

channel must be programmed to the same frequency and the same tone code. The following list of features can be programmed on a 

Per-Channel

 basis.

14

    Options 

Description of the feature


[FREQ] Codes


Select a Frequency code for a channel. Choose from 26 VHF frequencies or 


77 UHF frequencies.


[TONE] Codes


Select a Tone code for channel. Choose from 158 interference eliminator 


codes. Tone codes screen-out other users not in your group. All radios must 


be the same code to talk.  


[2-TONE] Codes

  Select a 2-Tone code for a channel. Chose from 9 2-Tone encode pairs. 

Note:


You must assign Send 2-Tone Code to P3 Key

. See 

How To Assign a Function


To A P Key.


 [CH SCAN]


Select ON to mark a channel to be included in the scan list. Select OFF (default) 


to delete a channel from the scan list. Marked channels will be scanned when 


Scan feature is activated. You must assign Scan function to a programmable 


function button (PFB) to activate. See Radio-Wide and PFB Programming.


[SCRAMBLE]


Select ON to activate Voice Scrambling for a specific channel. If ON, icon will 


be displayed and  radio will operate in Scramble mode on this channel. To be 


heard, all radios must have Scramble ON.


  [VOX] 


Select ON to activate Hands-Free VOX for a specific channel. No accessory 


required. If ON, radio will operate “Hands-Free” on this channel and icon will be 


displayed. To adjust level of audio required to trigger radio transmitter refer to 


page 17 [VOX LEV] 

How To Program Radio-Wide Features

Note: Standard 


J Series audio accessories will permit hands-free (VOX) operation if Vox feature is on.


Step 1. 


PRESS & HOLD

 Push-To-Talk button and turn radio 

ON.

Step 2.  

Radio will sound triple


beep, then [

CH  PROG

] will    


be displayed for 3 sec. Then [

CH – 1

] will be displayed.

Step 3.  

Use              to select the desired channel [

CH _ _

 ], pick 1-10. 

Step 4.  

Press         for 

Per Channel 

option


(see list above).

Step 5.  

Use             to go to a specific option; e.g. [

FREQ

], [

TONE

],  


[

2-TONE

], [

CH SCAN

], [

SCRAMBLE

], [

VOX

].

Step 6.  

Press 


to select a desired option

 e.g. 

[

FREQ

]. 


Display will then show current setting of the selected option.

Step 7.  

Use  

  Buttons to scroll option


sub-list; e.g. [

FREQ


codes or [

TONE

] code lists.

Step 8.  

Press     button to 

SAVE

 selection. Display will show 


selected feature. Example: [

FREQ

].

Step 9.  

Use  

  to select a different 

Per-Channel Feature


for the channel; e.g. [

TONE

] – and Repeat    


Steps 7 –  8 

or...

Step10.  

To select a different channel to program, 

PRESS

 the 


Orange

 button on top of the radio. Display will show 


the last channel programmed; e.g. [

CH – 

1].    


Repeat Steps 3 – 8/ 

or...

Step11.  

To return to normal operation turn radio 

OFF

 and    


then 

ON

.

Important: If a Frequency Code is changed you must also reprogram the Tone Code.

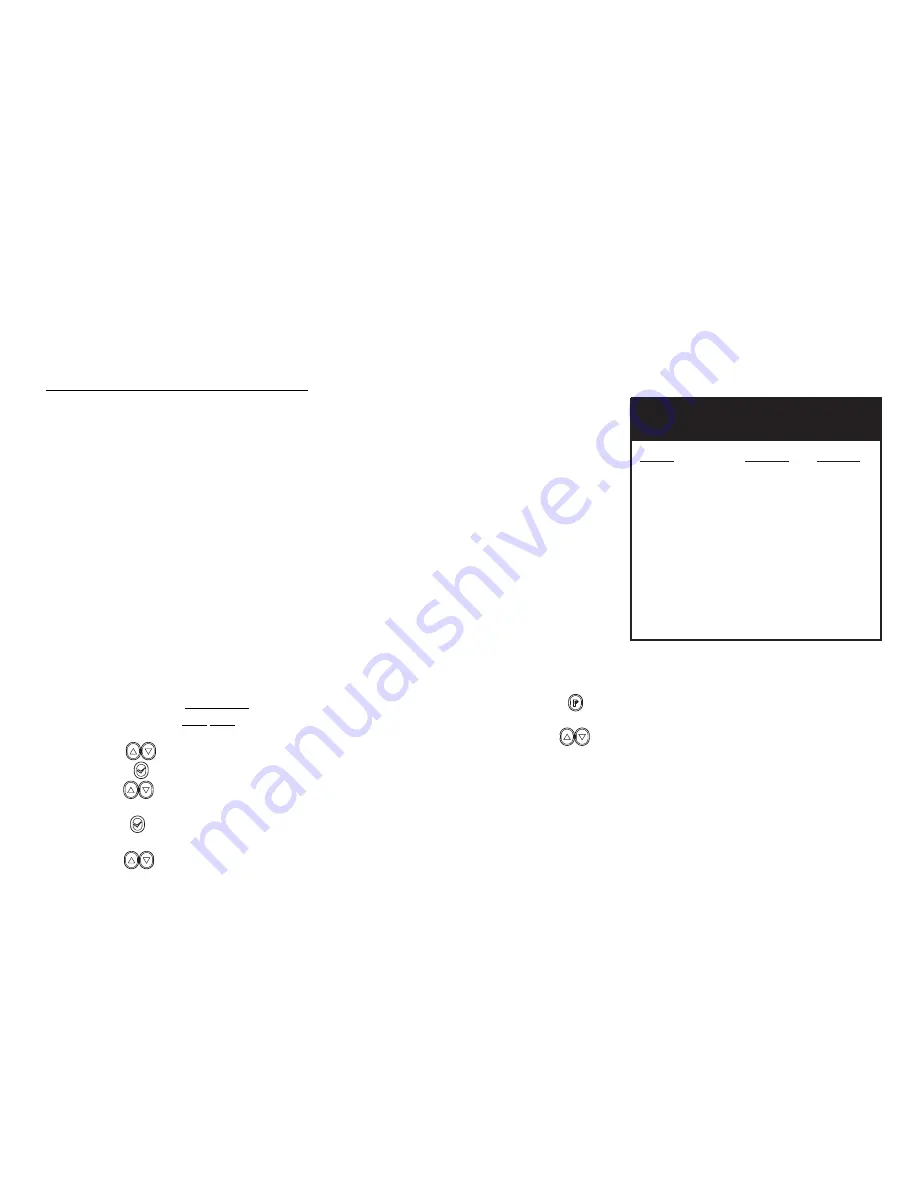
Table #4    2-Tone Page Codes


  Code 

       Tone 1       Tone 2

    2T       NONE       ----               ----

    2T           1         330.5 Hz    569.1 Hz

    2T           2         349.0 Hz    600.9 Hz

    2T           3         368.5 Hz    634.5 Hz

    2T           4         389.0 Hz    669.9 Hz

    2T           5         410.8 Hz    707.3 Hz

    2T           6         433.7 Hz    746.8 Hz 

    2T           7         457.9 Hz    788.5 Hz

    2T           8         483.5 Hz    832.5 Hz

    2T           9         330.5 Hz    600.9 Hz

Summary of Contents for JOBCOM J Series

Page 1: ...Have questions Call 800 USA 1 USA 800 872 1872 or visit our website at www ritron com P N 14500065 Rev D 09 07 User Guide J Series J Series...

Page 2: ...Have questions Call 800 USA 1 USA 800 872 1872 or visit our website at www ritron com...

Page 3: ...on for schools retail stores manufacturing warehousing construction sites property management hotel and motel management and many more Ritron radio communication products improve efficiency and safety...

Page 4: ...r Radio 12 How to Read out Frequency Tone Code Settings 13 How to Program Per Channel Features 14 Table 4 2 Tone Page Codes 14 Table 1 Programmable Frequency Codes 15 Table 2 Interference Eliminator P...

Page 5: ...unless you are specifically designated by the licensee If your radio equipment fails to operate properly or you wish to have the radio programmed contact your authorized dealer or Ritron RITRON INC R...

Page 6: ...UHF Transmit Pwr Out Hi Lo Watt 5 2 4 2 Channel Capacity up to 10 WX up to 10 Selectable Frequency Codes 26 77 Interference Eliminator Codes 158 possible 158 possible NOAA Weather Channel 7 possible...

Page 7: ...rn fully counter clockwise to turn OFF Rotate to adjust volume 2 Push to Talk Button PTT Push and hold to transmit release to listen 3 Up Down Scroll Buttons 4 LED Indicator Lights RED while transmitt...

Page 8: ...ons Controls FIG 1 1 Volume Knob 8 Speaker 7 Microphone 3 Up Down Scroll 5 LCD Display 9 Antenna 2 PTT Button 4 TX RX LED 6 Keypad Lock Menu 4 FIG 2 10 Accessory Connector 11 Spring Action Belt Clip 1...

Page 9: ...hannel Symbol Name Function Signal Strength Indicator shows received signal strength of an incoming call Full circle strong signal circle moderate signal circle acceptable signal circle very weak sign...

Page 10: ...the radio s body 2 Press the top part of the battery towards the radio until both latches firmly attach to the radio Attaching the Battery 1 Turn off the radio 2 Slide the latches located on both side...

Page 11: ...d 1 2 3 5 6 1 To attach audio accessory to the J Series radio first remove the Phillips head screw holding the rubber dust cover in place see diagram below 2 Remove the Phillips head screw on the insi...

Page 12: ...ivate listening and great for noisy environments Mic with PTT can be attached to clothing for easy activation RHD 11X Security type earpiece w pendant PTT with built in microphone and clip Allows priv...

Page 13: ...ill be recharged in approximately 2 5 hours Place radio with attached battery pack or battery pack only see slots for battery only Place spare battery pack in slot with label facing forward Use only a...

Page 14: ...up turn the knob clockwise To turn the volume down turn the knob counter clockwise 1 Align the threaded end of the antenna with the radio s antenna connector 2 Turn the antenna clockwise to attach to...

Page 15: ...operates as follows 1 Press and hold for 2 seconds the programmed button to activate the Emergency Call feature factory default is the P1 Key orange button on top of the radio 2 The radio then sends a...

Page 16: ...quency for your area go to http www nws noaa gov nwr nwrbro htm Click on your state Then click on the county closest to you You will see a frequency listed Match the frequency for your area with 1 of...

Page 17: ...play will read T 4 4 2T X 44 No Tone If no 2 Tone Code is programmed display will read 2T X 2 Tone feature not available in all J Series models This step allows you to read out on a per channel basis...

Page 18: ...X for a specific channel No accessory required If ON radio will operate Hands Free on this channel and icon will be displayed To adjust level of audio required to trigger radio transmitter refer to pa...

Page 19: ...5 12 5 31 461 0625 12 5 32 461 0875 12 5 33 461 1125 12 5 34 461 1375 12 5 35 461 1625 12 5 36 461 1875 12 5 37 461 2125 12 5 38 461 2375 12 5 39 461 2625 12 5 40 461 2875 12 5 41 461 3125 12 5 42 461...

Page 20: ...455 023 025 026 031 032 036 043 047 051 053 054 065 071 072 073 074 114 115 116 122 125 131 132 134 143 145 152 155 156 162 165 172 174 205 212 223 225 226 243 244 245 246 251 252 255 261 263 265 266...

Page 21: ...ones when button is pressed Icon will be displayed when ON Keypad Tones OFF allows silent operation EAR PTT Select ON if earphone only is used When earphone only is connected to radio microphone on ra...

Page 22: ...ithout tone TX PWR KEY When P KEY pressed will toggle transmit power of selected channel frequency between HI and LOW power Icon H or L will be displayed 2T SEND 2T SEND can only be assigned to P3 Key...

Page 23: ...PROG will flash on display for 3 sec Then CH 1 or a programmed name will appear on the display Step 3 Use to select the channel you want to delete CH _ _ 1 10 Step 4 Press for Per Channel Feature lis...

Page 24: ...e instructions are important because they inform users about RF energy exposure and provide simple procedures on how to control it Please refer to the following websites for more information on what R...

Page 25: ...pliance Hold the radio in a vertical position in front of face with the microphone and the other parts of the radio including the antenna at least one inch 2 5 cm away from the nose Keeping the radio...

Page 26: ...on commercial loss lost profits or savings Some states do not allow the exclusion or limitation of incidental or consequential damages or limitation on how long an implied warranty lasts so the above...

Page 27: ...Have questions Call 800 USA 1 USA 800 872 1872 or visit our website at www ritron com...

Page 28: ...il ritron ritron com Website www ritron com Base Station Wireless Intercomm Fixed location 2 way radio desktop or wall mount capable Never needs recharging it s AC powered JMX Series Portables Small b...

Reviews: