background image

are provided. Screw the hold down angles on to the unit as needed, then anchor down the unit. Use of 3/8” x 3-

1/2” stainless steel expansion anchor bolts (not included) is recommended for concrete installations. Anchor bolts 

are available from Ritchie in a two pack, part # 14261. Use an all-weather sealant under the outside edge when 

anchoring to concrete to keep air from leaking under fountain. 

F.


Hose Connection

 - Connect hose fitting to shut-off valve at top of concrete. Slip on barb fitting with 

furnished clamps. Hose should not touch insulation or outside surface of fountain. Place the hose under the 

fountain as you move the unit in place over the riser tube. 

G.


Electrical Connection

 - 

The electrical installation should be made and maintained by a qualified 

electrician conforming to national and local codes.

 The 3-wire power to the fountain must be protected by a 

suitable fuse or circuit breaker with properly sized wire. For wiring connections, see wiring diagram. Wire nuts 

may be used for the 120-volt and neutral splices.  


NOTE:

 National/Local electrical codes may require livestock waterers installed in feedlots in open 

feeding area to be grounded by a separate stranded copper grounding conductor or at least no.6 AWG 

terminating at a point where the branch circuit receives its supply. Check with local inspection 

authorities.  

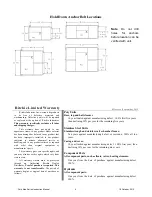
WIRING DIAGRAMS 

FOR UNITS BUILT 

BEFORE 2008 

WIRING DIAGRAMS 

FOR UNITS BUILT 

SINCE 2008 

Pork King Series Instruction Manual

2

18 October, 2012

Summary of Contents for Pork King Series

Page 1: ...inest watering fountain on the market This unit is built to give you excellent service when properly installed and maintained Please follow instructions carefully Read and understand all instructions...

Page 2: ...water line For optimum water line protection use the 12 diameter insulated Ritchie Thermal Tube part numbers and sizes are shown to the left Tube opening must be kept clear NOTE The supply line touchi...

Page 3: ...e over the riser tube G Electrical Connection The electrical installation should be made and maintained by a qualified electrician conforming to national and local codes The 3 wire power to the founta...

Page 4: ...thermostat turn turn To lock in position after adjustment turn turn back As the thermostat is moved toward the heater the water temperature in the trough is lowered The best location is determined by...

Page 5: ...er rights which vary from state to state All warranty claims must be processed through an Authorized Ritchie Dealer Distributor Proof of purchase is required This warranty is not transferrable The per...

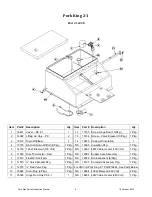
Page 6: ...30 48W Cable Heater 120 Volt 1 Pkg 5 14150 125W Element 120 Volt 4 Pkg NS 12584 Supply Hose Assembly 1 Pkg 6 11885 Disc Thermostat Red 1 Pkg NS 18075 Drain Washers 6 Pkg 1 Pkg 7 13613 Float W Short Ar...

Page 7: ...Element 120 Volt 2 Pkg NS 13830 48W Cable Heater 120 Volt 1 Pkg 6 11885 Disc Thermostat Red 1 Pkg NS 12584 Supply Hose Assembly 1 Pkg 7 13613 Float W Short Arm 1 Pkg NS 18075 Drain Washers 6 Pkg 1 Pkg...

Page 8: ...S 12584 Supply Hose Assembly 1 Pkg 6 11885 Disc Thermostat Red 1 Pkg NS 18075 Drain Washers 6 Pkg 1 Pkg 7 13613 Float W Short Arm 1 Pkg NS 16128 Complete Accessory Pkg 1 Pkg 8 11515 Valve Bracket Pkg...

Page 9: ...kg 1 Pkg NS 16363 Insulation Pkg 1 Pkg 5 11419 250W Element 120 Volt 1 Pkg NS 12584 Supply Hose Assembly 1 Pkg 6 11885 Disc Thermostat Red 1 Pkg NS 18075 Drain Washers 6 Pkg 1 Pkg 7 13613 Float W Shor...

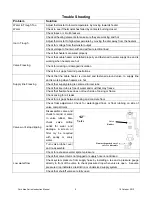
Page 10: ...ping is centered in riser tube Check that riser tube is free of water and mud that may freeze Check that flexible hose does not touch side of casing or frame Check casing for air leaks Check for air g...

Reviews: