Chapter 1 About This Machine
28
Printing Flow
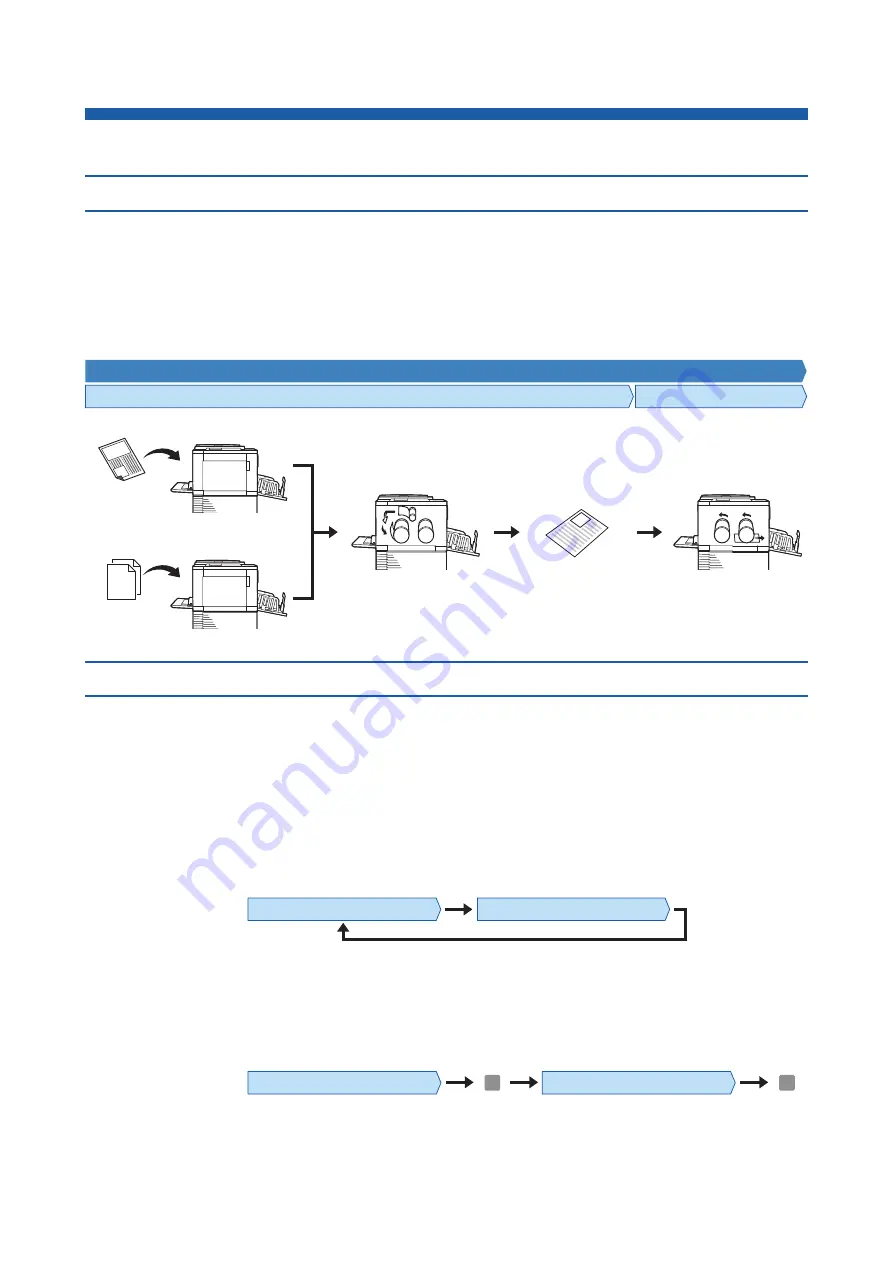
“Master making process” and “Printing process”
This machine is a digital duplicator that uses the screen printing method. The screen printing method first forms
minute holes on a master (plate), which is the base of the printing process. Then, ink is applied through these holes
to transfer images onto paper.
In the screen printing method, “master making process” refers to the steps to create a master, and “printing pro-
cess” refers to the steps in which the ink goes through the created master and the image is transferred onto paper.
In this guide, “master making process” and “printing process” are together called “printing”.
What is [Auto Process]?
[Auto Process] refers to continuous operation of the master making process and the printing process.
You can turn on / off the [Auto Process] setting by pressing the [AUTO PROCESS] key (
■
When [Auto Process] is on
After the master making process, the printing process starts.
After the printing process is complete, if there is a next original on the optional auto document feeder, master mak-
ing for it starts.
If the original is placed on the glass platen, the operation stops after the completion of the printing process.
Use this setting when you do not need to check the proof copy or change the printing conditions and the master
making conditions.
■
When [Auto Process] is off
Operation stops after each process: master-making and printing.
Use this setting when you need to change the printing conditions after checking the proof copies or when you need
to replace the paper.
Printing
Master making process
Printing process
Scanning an original
Paper
original
Original data
Receiving the original
data
The created master is
loaded on the print drum
(cylinder).
A sheet of proof
copy is output.
The print drum
(cylinder) rotates
for printing.
Master making
Proof copy
Printing
Master making process
Printing process
Master making process
Printing process
Stop
Stop
Summary of Contents for MH 9350
Page 21: ...Chapter 1 19 1 About This Machine ...
Page 31: ...29 2 Chapter 2 Basic Operations ...
Page 53: ...51 3 Chapter 3 Functions for Master Making ...
Page 97: ...95 4 Chapter 4 Functions for Printing ...
Page 109: ...107 5 Chapter 5 Useful Functions ...
Page 130: ...Chapter 5 Useful Functions 128 ...
Page 131: ...129 6 Chapter 6 Functions for Scanning ...
Page 137: ...135 7 Chapter 7 Setting the Operation Conditions ...
Page 159: ...157 8 Chapter 8 RISO Console ...
Page 165: ...163 9 Chapter 9 Replacing Consumables ...
Page 177: ...175 10 Chapter 10 Maintenance ...
Page 181: ...179 11 Chapter 11 Troubleshooting ...
Page 205: ...203 12 Chapter 12 Appendix ...
Page 215: ...Chapter 12 Appendix 213 12 V View edit 48 W WAKE UP key 23 Z Zoom 71 ...


