background image

Reset Configuration to Defaults


(scan from A1 to A4 for HID profile or B1 to B5 for SPP profile) 


HID profile 


SPP profile 

A1 


.


.


.


.


.


.


.


.


.


.


.


.


.


.


.


.


.


.


.


.


.


.


.


.


.


.


.


.


.


B1 


.


.


.


.


.


.


.


.


.


.


.


.


.


.


.


.


.


.


.


.


.


.


.


.


.


.


.


.


.


A2 


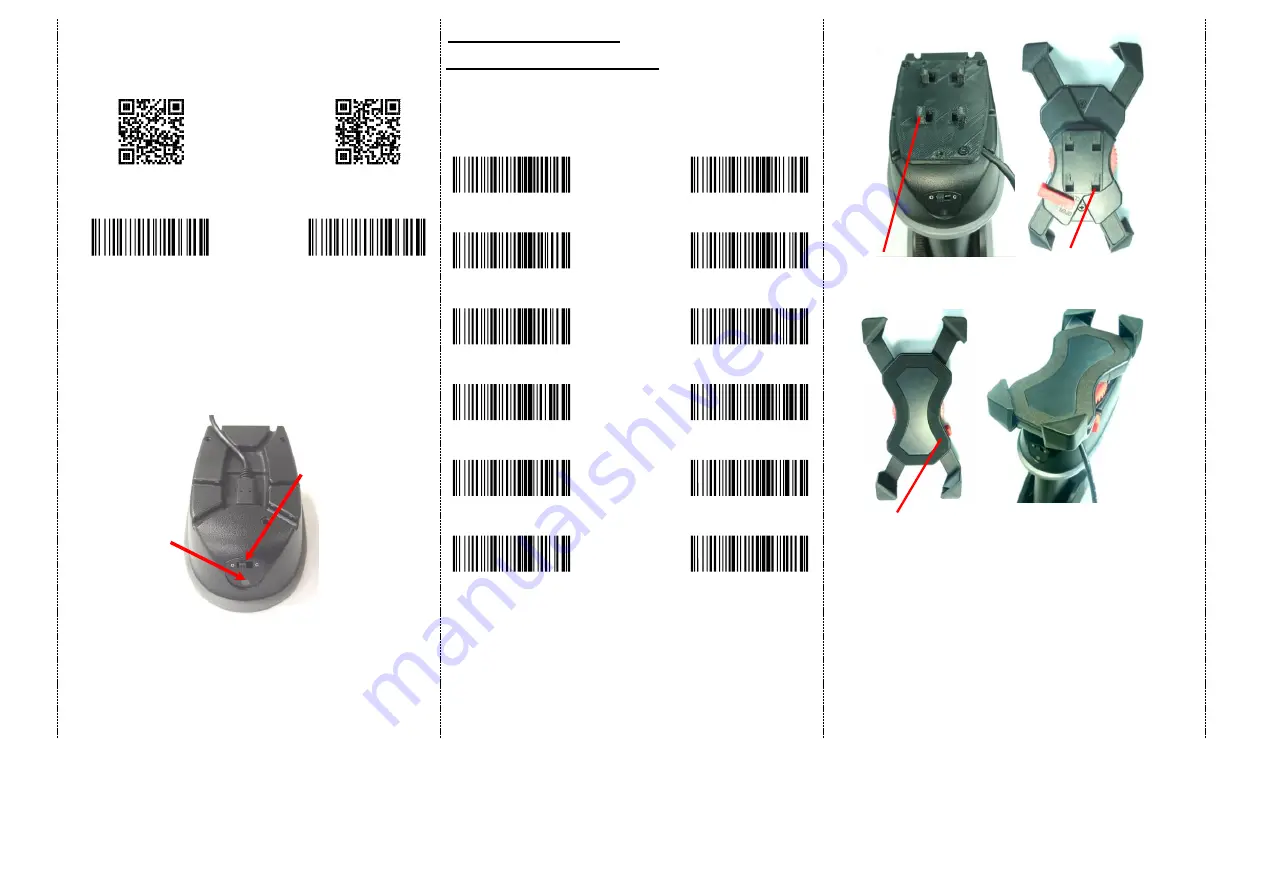
Demo 

%D%F%T


B2 


Demo 

%D%F%T


How to Connect to Smartphone via OTG cable 


1.


Make sure you enter wired OTG mode (below right, page #1) 

and your Android device supports OTG functionality. 

2.


Make sure scanner is in ”O” (OPERATION MODE) (see below) 

3.


Connect scanner to Android OTG device through micro USB cable. 

4.


Scan the barcode 

5.


Open app on smartphone/tablet & data will be sent to the app 

directly 


Keyboard Country   

(Wired OTG mode only) 

 
Scan the appropriate country code as below to program the keyboard 

layout for your country or language. As a general rule, the following 
characters are supported, but need special care for countries other 

than the United States: @ | $ # { } [ ] = / ‘ \ < > ~ 


Demo 

%+-$.00


Demo 

%+-$.06


USA   

(Original setting) 


Italian 


Demo 

%+-$.01


Demo 

%+-$.07


Norway 


France 


Demo 

%+-$.02


www.tec-it.com

%+-$.08


Germany 


Vietnam 


Demo 

%+-$.03


Demo 

%+-$.09


Sweden 


Spain 


Demo 

%+-$.04


Demo 

%+-$.10


Denmark 


Portugal 


Demo 

%+-$.05


Demo 

%+-$.11


Switzerland 


Hungary 


1.


Place the mobile device holder by having the side of open and 

close red switch on the right side of the scanner as presented on 
the above image.   

2.


CAUTION: Please do not pull or press on any of the 4 extensions 

or legs of the holder, for it can unbalance and disrupt the normal 
function of the holder’s 4 extensions. 

Place the mobile device holder lightly on the top of the base, so the 4 
elevated studs fit into the 4 holes of the holder. 


Switch to left: 
“O” (Operation mode) 

  (data transmission) 
Switch to right: 

“C” (Charging mode)   

Indicator (LED) 

Please check the 

“LED Indicator 
Information” on 

page #4 

Holder’s back with 4 holes to fit on 

and lock up with the 4 studs the 

scanner.   


4 Elevated Studs to fit into the 
4 holes of the Holder’s back.


Holder’s front side: Make sure the red switch is on the right 
side (exactly as the above picture shows), when fitting the 4 
holes of the holder to the 4 studs of the scanner 
 

Summary of Contents for RIOSCAN iLS6308KS

Page 1: ...nformation on proper handling in this manual we assume no liability for any resulting personal injury or damage to property Don t put scanner in places excessively high temperatures such as expose under direct sunlight Don t use scanner in extremely humid area or drastic temperature change The rechargeable battery is permanently built into the product and cannot be replaced Never damage the rechar...

Page 2: ...how on the cursor side If the data cannot be sent to smartphone tablet please scan the Reset Configuration to Defaults setting codes on page 3 Notes 1 This product complies with Bluetooth standards This device used with this product must support the same SPP or HID standard For Bluetooth devices with other profiles we cannot guarantee a connection before the product has been tested The communicati...

Page 3: ... France Demo 02 www tec it com 08 Germany Vietnam Demo 03 Demo 09 Sweden Spain Demo 04 Demo 10 Denmark Portugal Demo 05 Demo 11 Switzerland Hungary 1 Place the mobile device holder by having the side of open and close red switch on the right side of the scanner as presented on the above image 2 CAUTION Please do not pull or press on any of the 4 extensions or legs of the holder for it can unbalanc...

Page 4: ...ashes followed by 3 beeps Always Clean memory data before switching to Data Transmission Mode Otherwise Red Orange LED will flash with one long beep sounds and will not switch modes A Data Transmission mode Default 1 When you are out of BT signal range the data you scan will be saved to memory Once you are back within range the data will be sent to smartphone tablet automatically B Data Storage mo...

Page 5: ...rmation Demo When you scan this setting code scanner will output the battery information to device Demo Output battery information automatically Enable Will send data to device every 30 seconds Demo Output battery information automatically Disable The output format of battery information is as below For example 4 NUMBER Number is from 0 4 4 means 80 100 3 means 55 80 2 means 30 55 1 means 10 30 0 ...

Page 6: ...imited DISABLE MENU_OPTO ZZ JY ZZ OTPO_UNEM MENU_OPTO ZZ SK ZZ OTPO_UNEM ENABLE GS1 DataBar Expanded DISABLE MENU_OPTO ZZ DR ZZ OTPO_UNEM MENU_OPTO ZZ SL ZZ OTPO_UNEM ENABLE CODABAR DISABLE MENU_OPTO ZZ B3 ZZ OTPO_UNEM MENU_OPTO ZZ VC ZZ OTPO_UNEM ENABLE Telepen DISABLE MENU_OPTO ZZ B9 ZZ OTPO_UNEM MENU_OPTO ZZ VG ZZ OTPO_UNEM 2D Symbologies ENABLE PDF 417 DISABLE MENU_OPTO ZZ BCF ZZ OTPO_UNEM MEN...

Reviews: