background image


How to append a “prefix” or a “suffix”   

to the barcode data 


prefix 


suffix 


1.


Scan above configuration code for Prefix or Suffix 

2.


Enter the required values (right, numeric barcode) for Prefix or Suffix 

using the hex values for the desired HEX values from “Prefix & Suffix 

TABLE (blew page)” 

3.


Then, end by scanning Code X (below, right) 


*


The max. of special characters is 5.   

*


When you append 1~4 required values for Prefix or Suffix, it must end 

with Code X 

*


It doesn’t need Code X, if you append 5 values to barcode data. 


How to delete Prefix or Suffix 

1.


Scan above configuration code for Prefix or Suffix 

2.


Enter the “0” “0” (above, right) 

3.


Then end by scanning Code X (below, right) 


Numeric barcode for settings 


0


6


C


1


7


D


2


8


E


3


9


F


4


A


5


B


X


Prefix & Suffix TABLE 


HEX 

HID 

(SPP) 

HEX  HID 

(SPP)  HEX 


HEX    HEX    HEX   

01 

CTRL A 

(SOH) 

19  CTRL Y 

(EM) 

20  SPACE  38  8  50  P  68  h 

02 

CTRL B 

(STX) 

1A 

CTRL 

Z(SUB)  21 

39  9  51  Q  69 

03 

CTRL C 

(ETX) 

1B 

ESC 

(ESC) 

22 

3A  :  52  R  6A 

04 

CTRL D 

(EOT) 

1C  CTRL \ 

(FS) 

23 

3B  ;  53  S  6B  k 

05 

CTRL E 

(ENQ) 

1D  CTRL ] 

(GS) 

24 

3C  <  54  T  6C 

06 

CTRL F 

(ACK) 

1E  CTRL ^ 

(RS) 

25 

3D  =  55  U  6D  m 

07 

CTRL G 

(BEL) 

1F  CTRL _ 

(US) 

26 

3E  >  56  V  6E  n 

08  Backspace 

(BS) 


27 

3F  ?  57  W  6F  o 

09 

Tab 

(HT) 


28 

40  @  58  X  70  p 

0A 

CTRL J 

(LF) 


29 

41  A  59  Y  71  q 

0B 

CTRL K 

(VT) 


2A 

42  B  5A  Z  72 

0C 

CTRL L 

(FF) 


2B 

43  C  5B  [ 

73 

0D 

Enter 

(CR) 


2C 

44  D  5C  \ 

74 

0E 

CTRL N 

(SO) 


2D 

45  E  5D  ] 

75  u 

0F 

CTRL O 

(SI) 


2E 

46  F  5E  ^  76  v 

10 

CTRL P 

(DLE) 


2F 

47  G  5F  _  77  w 

11 

CTRL Q 

(DC1) 


30 

48  H  60  `  78  x 

12 

CTRL R 

(DC2) 


31 

49  I  61  a  79  y 

13 

CTRL S 

(DC3) 


32 

4A  J  62  b  7A  z 

14 

CTRL T 

(DC4) 


33 

4B  K  63  c  7B  { 

15 

CTRL U 

(NAK) 


34 

4C  L  64  d  7C 

16 

CTRL V 

(SYN) 


35 

4D  M  65  e  7D  } 

17 

CTRL W 

(ETB) 


36 

4E  N  66  f 

7E  ~ 

18 

CTRL X 

(CAN) 


37 

4F  O  67  g 


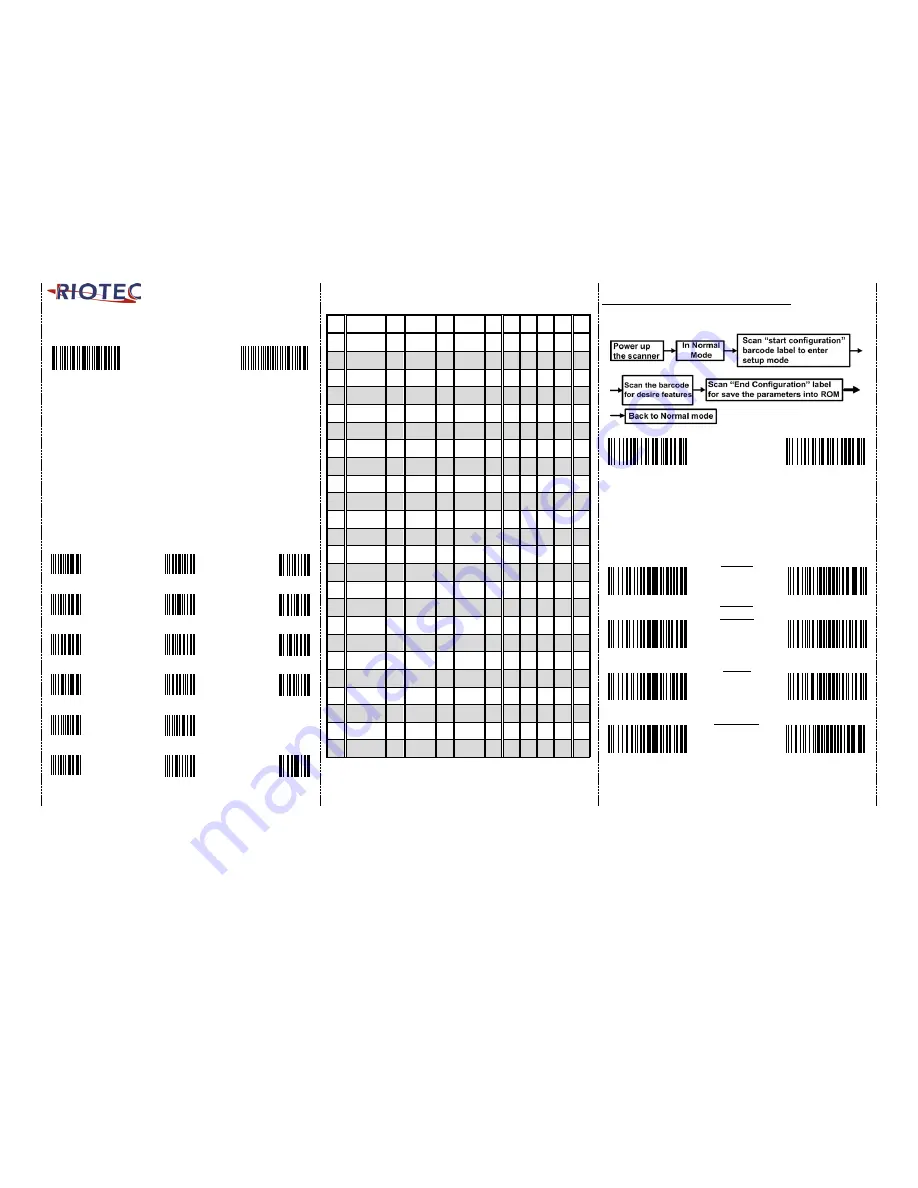
Barcode Configuration Method: 

(Flow chart for setup procedure :) 


Start   

Configuration 


End   

Configuration 


1D Symbologies – 1 


ENABLE 

UPC-E 

DISABLE 


ENABLE 

UPC-A 

EAN13 

DISABLE 


ENABLE 


EAN8 

DISABLE 


ENABLE 


CODE 39 

DISABLE 


Summary of Contents for iLS6300FBQ

Page 1: ...power saving mode there will not be LED indication when charging Reset Configuration to Defaults scan from A1 to A5 for iLS6300DBQ or B1 to B6 iLS6300DBM iLS6300FBQ iLS6300FBM A1 B1 A2 B2 A3 B3 A4 B4 A5 B5 B6 Note Please install PL 2303 driver for iLS6300FBM There are two operating modes on the scanner 1 Data Transmission mode Default It is a necessary to scan clean memory data when switching betw...

Page 2: ...s time it will not enter power saving mode Once you are back within range press trigger to connect to the device Default Power saving Mode Power saving mode OFF Power saving mode ON Default Enter power saving mode after 3 minute inactivity This function converses battery power When you press SCAN Power ON button it will wake up and begin to scan Power saving mode ON Enter power saving mode after 1...

Page 3: ...0 SPACE 38 8 50 P 68 h 02 CTRL B STX 1A CTRL Z SUB 21 39 9 51 Q 69 i 03 CTRL C ETX 1B ESC ESC 22 3A 52 R 6A j 04 CTRL D EOT 1C CTRL FS 23 3B 53 S 6B k 05 CTRL E ENQ 1D CTRL GS 24 3C 54 T 6C l 06 CTRL F ACK 1E CTRL RS 25 3D 55 U 6D m 07 CTRL G BEL 1F CTRL _ US 26 3E 56 V 6E n 08 Backspace BS 27 3F 57 W 6F o 09 Tab HT 28 40 58 X 70 p 0A CTRL J LF 29 41 A 59 Y 71 q 0B CTRL K VT 2A 42 B 5A Z 72 r 0C C...

Page 4: ...gies 2 ENABLE CODE 93 DISABLE ENABLE CODE 11 DISABLE ENABLE CODE 128 EAN UCC 128 DISABLE 1D Symbologies 3 ENABLE INTERLEAVED 25 DISABLE ENABLE STANDARD 25 INDUSTRIAL 25 DISABLE ENABLE MATRIX 25 DISABLE ENABLE CHINESE POST DISABLE ENABLE CODABAR DISABLE Quick guide is subject to change without notice R_160303_01 ...

Reviews: