background image

12

2001475_A


Rimage Producer™ IIIN+ User Guide  

7100N/8100N/6100N/6100

Operate the Producer III

This section provides the information that you need to produce discs with the Producer III.

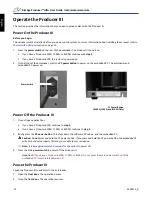
Power On the Producer III

Before you begin:

The carousel must be installed before you power on the system. For more information about installing the carousel, refer to 

the


Install the Carousel


section


on page 13.

1. 

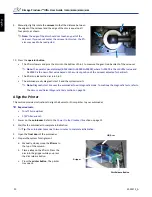
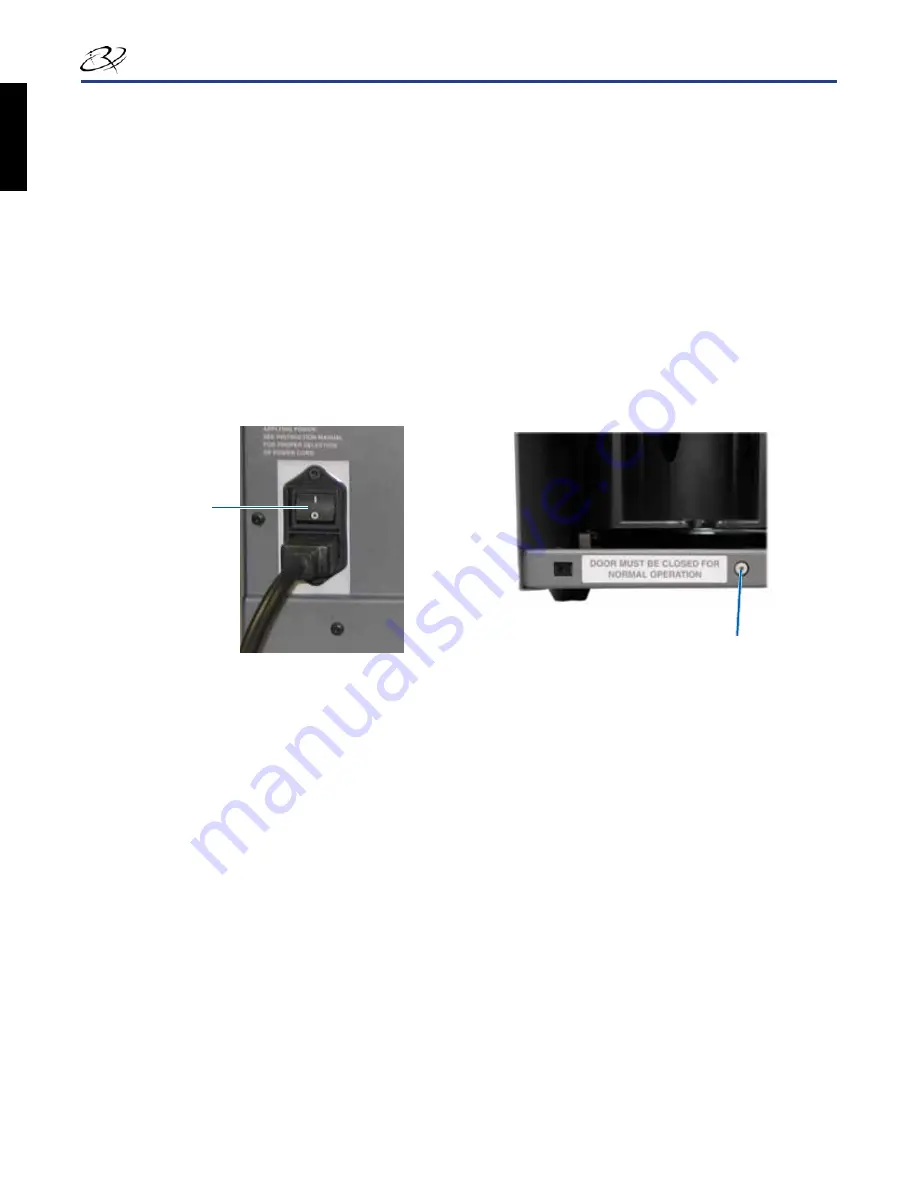
Press the 

power switch

 on the rear of the autoloader. The Producer III powers on. 

•  If you have a Producer 6100N, 7100N, or 8100N, continue with 

step 2

.

•  If you have a Producer 6100, the system is powered on.

2. 

On the front of the autoloader, press the

 PC power button 

to power on the embedded PC. The autoloader and 

embedded PC power on.

Power Off the Producer III

1. 

Close all open applications.

•  If you have a Producer 6100, continue to 

step 3

.

•  If you have a Producer 6100N, 7100N, or 8100N, continue to 

step 2

.

2. 

Briefly press the 

PC power button

This shuts down the software, Windows, and the embedded PC.


n

Caution:

 Do

 not

 press and hold the PC power button. If you press and hold the PC power button, the embedded PC 

will not shut down properly. This may cause data loss or corruption.


Note: 

It takes approximately 30 seconds for the system to power off.

3. 

Press the main

 power switch 

to power off the Producer III.


-

Important! 

If you have a Producer 6100N, 7100N, or 8100N, do not press the main power switch until the 

embedded PC is completely powered off.

Pause the Producer III

Pause the Producer III to add discs to the autoloader.

1. 

Open the 

front door

. The operation pauses.

2. 

Close the 

front door

. The operation resumes.

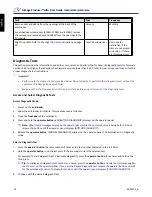
Power Switch

PC Power Button

(6100N, 7100N, and 8100N Only)

En

gli

sh

Summary of Contents for Producer IIIN+ 6100N

Page 1: ...This manual provides the information needed to operate identify the parts of and configure the printing preferences for the Rimage Producer III To set up and install your Rimage Producer III refer to...

Page 2: ...2001475_A English...

Page 3: ...to notify any person or organization of such revisions or changes This document may contain links to web sites that were current at the time of publication but may have moved or become inactive since...

Page 4: ...2001475_A English...

Page 5: ...the Producer III 12 Pause the Producer III 12 Install the Carousel 13 Remove the Carousel 13 Load the Discs 14 Unload the Discs 14 Set Your Printing Preferences 14 Maintain the Producer III 15 Overvi...

Page 6: ...ii 2001475_A Rimage Producer IIIN User Guide 7100N 8100N 6100N 6100 English...

Page 7: ...ive methods that may not be obvious and helps you understand the benefits and capabilities of the product Important An Important note provides information essential to the completion of a task You can...

Page 8: ...2 2001475_A Rimage Producer IIIN User Guide 7100N 8100N 6100N 6100 English...

Page 9: ...ical description of the problem Exact error message received My Rimage Product Information Copy this information from your Rimage Product for future reference Note Make sure you update the Serial Numb...

Page 10: ...sult in loss or damage to the equipment product software or data Safety Precautions To ensure safety read these precautions and familiarize yourself with their meaning before using the equipment Warni...

Page 11: ...his Class A digital apparatus complies with Canadian ICES 003 Issue 4 2004 Cet appareil numerigue de la classe A est conforme a la norme NMB 003 du Canade This product complies with CAN CSA C22 2 No 6...

Page 12: ...atus light is 6 in 15 2 cm high Leave an additional 3 5 in 9 cm for cabling Recorders 1 1 2 4 Standard system 6100 autoloader Everest or Prism printer Rimage Producer Software Suite PSS and external P...

Page 13: ...r to your printer user guide for the correct printer ribbons Rimage Media Kits include the required print ribbons Label design requirements Refer to your printer user guide for label design requiremen...

Page 14: ...8 2001475_A Rimage Producer IIIN User Guide 7100N 8100N 6100N 6100 English...

Page 15: ...ed Front View Disc Dispenser Operator Button Operator Panel Output Bin Carousel Embedded PC Power Button 6100N Only Front Door Recorder Lift Arm 6100 and 6100N Disc Dispenser 8100N only Operator Butto...

Page 16: ...5_A Rimage Producer IIIN User Guide 7100N 8100N 6100N 6100 Back View 7100N 8100N Power Cord Network Cable Power Switch Power Cord Network Cable Power Switch 6100N Power Switch USB Cable Power Cord 610...

Page 17: ...sing carousel Check the client workstation or control center for a message Operator Panel The operator panel has a two line display that informs you of operations or conditions that require operator i...

Page 18: ...Off the Producer III 1 Close all open applications If you have a Producer 6100 continue to step 3 If you have a Producer 6100N 7100N or 8100N continue to step 2 2 Briefly press the PC power button Thi...

Page 19: ...s into the bearing guide 3 Close the front door Remove the Carousel Remove the carousel from the autoloader to load or unload discs Important If the Rimage software is currently running an operation o...

Page 20: ...g side facing down Tip You may designate bins 1 through 4 as input output reject or a specific media type through your software 4 Repeat steps 2 3 until the required bins are filled 5 Close the front...

Page 21: ...er III Instead apply the cleaner to the cloth first Observe precautions for electrostatic sensitive devices whenever you access the embedded PC Preventative Maintenance Schedule Note Your system may r...

Page 22: ...ostic Tests Access Diagnostic Mode 1 Power on the autoloader 2 Allow the autoloader to initialize This may take several minutes 3 Open the front door of the autoloader 4 Press and hold the operator bu...

Page 23: ...ROUSEL CHK DIAGNOSTIC 3 Release the operator button 4 Press the operator button to rotate the carousel from the current bin position to the next bin position Note Each time the carousel rotates the op...

Page 24: ...nt If you are updating the autoloader firmware you must prompt the system to run the carousel calibration test immediately after the lift arm calibration test Calibrate the Lift Arm This test calibrat...

Page 25: ...measures the position of the carousel as well as the gear train backlash of the carousel 1 Remove all discs from the carousel bins 2 Make sure that the autoloader is in diagnostic mode Refer to the A...

Page 26: ...c into bin 1 The autoloader exits diagnostic test 3 and the system restarts Note Diagnostic test 3 causes the autoloader to exit diagnostic mode To continue the diagnostic tests refer to the Access an...

Page 27: ...e recessed print pad b If the disc is not centered side to side on the print pad align the printer side to side i Loosen the side to side screws ii Slide the printer not the printer tray until the dis...

Page 28: ...c retainer and the disc is correct 7 Manually slowly raise the lift arm away from the printer tray 8 Press the printer button The printer tray closes 9 Press the disc release button The gripper releas...

Page 29: ...image Software online help for additional information 2 From the Windows Start menu select All Programs Rimage Utilities Gemini Utilities Gemini Utilities opens Note When the desired tasks are complet...

Reviews: