background image

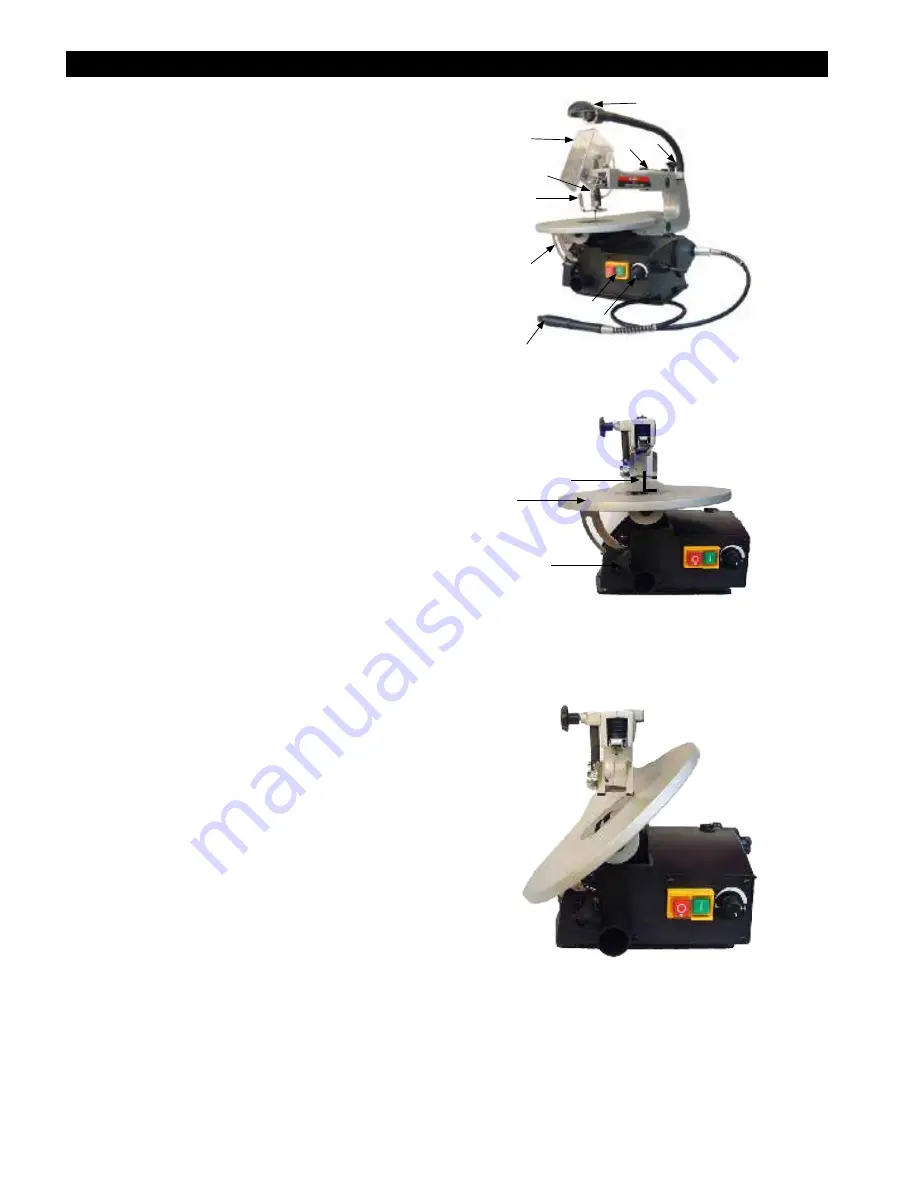
Fig. 01

Fig. 02

6

Assembly

SCROLL SAW DESIGN FEATURES

1. Clamping screw: for removing the saw blade.

2. Blade guard: protects your hands from injury.

3. Work piece holder

4. Shavings blower: keeps the work piece area free 

from dust.

5. Variable speed switch

6. On/Off power switch

7. Angle scale: Scale shows the tilting angle of table.

8. Adjustable light

9. Flexible shaft with drill chuck

10. Setting gauge for saw blades without pin

INSTALLATION

Setting the saw bench

Setting the angle scale

• Release the star button (1) and bring the saw bench 

(2) to a right angle (3) in relation to the saw blade.

• Use a 90° angle to measure the right angle between 

the blade and the bench. The saw blade should be 

90° to the angle.

• Close the star button again when the distance be

-

tween the blade and the 90° angle is at a minimum. 

The bench should then be at 90° to the saw blade.

• Release the lock screw and bring the indicator to 

the zero position. Fasten the screw. Please note: the 

angle scale is a useful piece of supplementary equip-

ment, but should not be used for precision work. Use 

scrap wood for saw tests, adjust the bench if neces-

sary. Note: The table should not be on the motor 

block, this can cause

undesirable noise. Horizontal saw bench and diagonal 

cuts

• The saw bench can be positioned into a 45 degree 

diagonal position or be left in the horizontal position.

• You can read off the approximate degree of angle by 

using the angle scale located under the work bench. 

For more exact adjustment, use scrap wood for some 

saw tests; adjust the bench if necessary.

Blade guard assembly

Install the blade guard to the holder as shown in the 

diagram.

Secure the screws with a nut and washer.

• Lift the saw onto the frame and base and push

it onto the workbench.

• Familiarize yourself with the saw operating

elements and features.

Fig. 03

1

10

2

8

3

4

5

6

7

9

1

2

3

Summary of Contents for 10-600VS

Page 1: ...nual Record the serial number and date of purchase in your manual for future reference Serial Number _________________________ Date of purchase _________________________ For technical support or parts questions email techsupport rikontools com or call toll free at 877 884 5167 ...

Page 2: ...L Never wear loose clothing or jewelry that might get caught in moving parts Rubber soled footwear is recommended for the best footing ALWAYS USE SAFETY GLASSES AND WEAR HEARING PROTECTION Also use a face or dust mask if the cutting operation is dusty NEVER OVERREACH Keep your proper footing and balance at all times ALWAYS GROUND ALL TOOLS If your tool is equipped with a three pronged plug you mus...

Page 3: ...nging accessories Inspect power cables periodically and if damaged have they replaced by an authorized service facility Inspect extension cables periodically and replace if damaged Keep handles dry clean and free from oil and grease Disconnect tools When not in use before servicing and when changing accessories such as blades bits cutters Disconnect tools from the power supply Remove adjusting key...

Page 4: ...No Motor Amps Volts Electronic Variable Speed SPM Cutting Capacity Blade Length Blade Length Height Stroke Throat Depth Table Size Left Tilt Features Features Stroke Speed Per Minute Dust Port Diameter Maximun Sound Level Idle Overall Height Width Depth Depth Base Size Net Weight Shipping Weight Shipping Carton Warranty 10 600VS 1 2 120V 60 Hz 550 1 650 5 2 19 32 19 32 15 3 4 10 1 16 x 15 5 16 0 4...

Page 5: ...l RIKON Power Tools at the number on the cover of this manual as soon as possible Contents of Package 5 Carton Contents Item Description Qty A Pinless blade holder 2 B Safety shield 1 C Pinless blade 1 List of loose parts in bag Description Qty Hex nut M5 2 Washer 5 mm 1 Lock washer 5mm 1 Screw M5X25 1 L wrench 1 ...

Page 6: ...ld then be at 90 to the saw blade Release the lock screw and bring the indicator to the zero position Fasten the screw Please note the angle scale is a useful piece of supplementary equip ment but should not be used for precision work Use scrap wood for saw tests adjust the bench if neces sary Note The table should not be on the motor block this can cause undesirable noise Horizontal saw bench and...

Page 7: ...h a base to keep vibra tion and noise to a minimum Ideal size 400 x 240 mm 15 3 4 x 9 1 2 Changing the saw blades Warning Switch off the saw and remove the power cord from power supply before installing saw blades in order to avoid injuries caused by unintentional activa tion of the saw A Flat saw blades pinless Use the adapters with fl at saw blades 1 The saw blade is fi xed with Allen screws A 1...

Page 8: ...lade Lead one end of the saw blade through the perfora tion in the table and insert the saw blade pins into the notch Repeat this procedure at the upper blade support Before hooking it in slightly press the saw s upper arm down 5 Check the position of the blade pins at the supports 6 Tighten the blade by means of the tightening screw 2 Check the blade s tightness Keep on rotating clockwise in orde...

Page 9: ...cting cable Insulation damage resulting from forcefully pulling out of the wall socket Cracks through aging of insulation Such defective electrical connection cables must not be used as the insulation damage makes them extremely hazardous Check electrical connection cables regularly for damage Make sure the cable is disconnected from the mains when checking Electrical connection cables must comply...

Page 10: ... saw speed must be reduced to minimum when cutting precious and non ferrous metals Inside cuts Warning Switch off the saw and remove the cord from power supply before installing saw blades in order to avoid injuries caused by unintentional activation of the saw This saw is suited also to inside cuts or cuts not starting at the edge of the work piece Proceed as follows Drill a 6mm 1 4 hole in the w...

Page 11: ...de easier Motor The power cord should be replaced immediately if pulled out cut or damaged in any other way Do not lubricate the motor bearings or internal parts Saw arm bearings Lubricate the saw arm bearings every 50 hours Proceed as follows 10 Turn the saw to the side Apply a generous amount of SAE 20 oil to the shaft end and bronze bearings Let the lubricant oil work in overnight Repeat the pr...

Page 12: ...13 Troubleshooting Service on these tools should only be performed by an authorized qualified technician Wiring Diagram ...

Page 13: ...15 Parts List ...

Page 14: ...16 Parts Explosion ...

Page 15: ...17 Notes ...

Page 16: ... no circumstances will Seller be liable for incidental or consequential damages resulting from defective products All other warranties expressed or implied whether of merchantability fitness for purpose or otherwise are expressly disclaimed by Seller This warranty does not cover products used for commercial industrial or educational purposes This limited warranty does not apply to accessory items ...

Page 17: ...For more information 16 Progress Road Billerica MA 01821 877 884 5167 978 528 5380 techsupport rikontools com www rikontools com Copyright RIKON Power Tools Inc 2009 ...

Reviews: