background image

3 How to Operate


3-2. Data screen 


23 


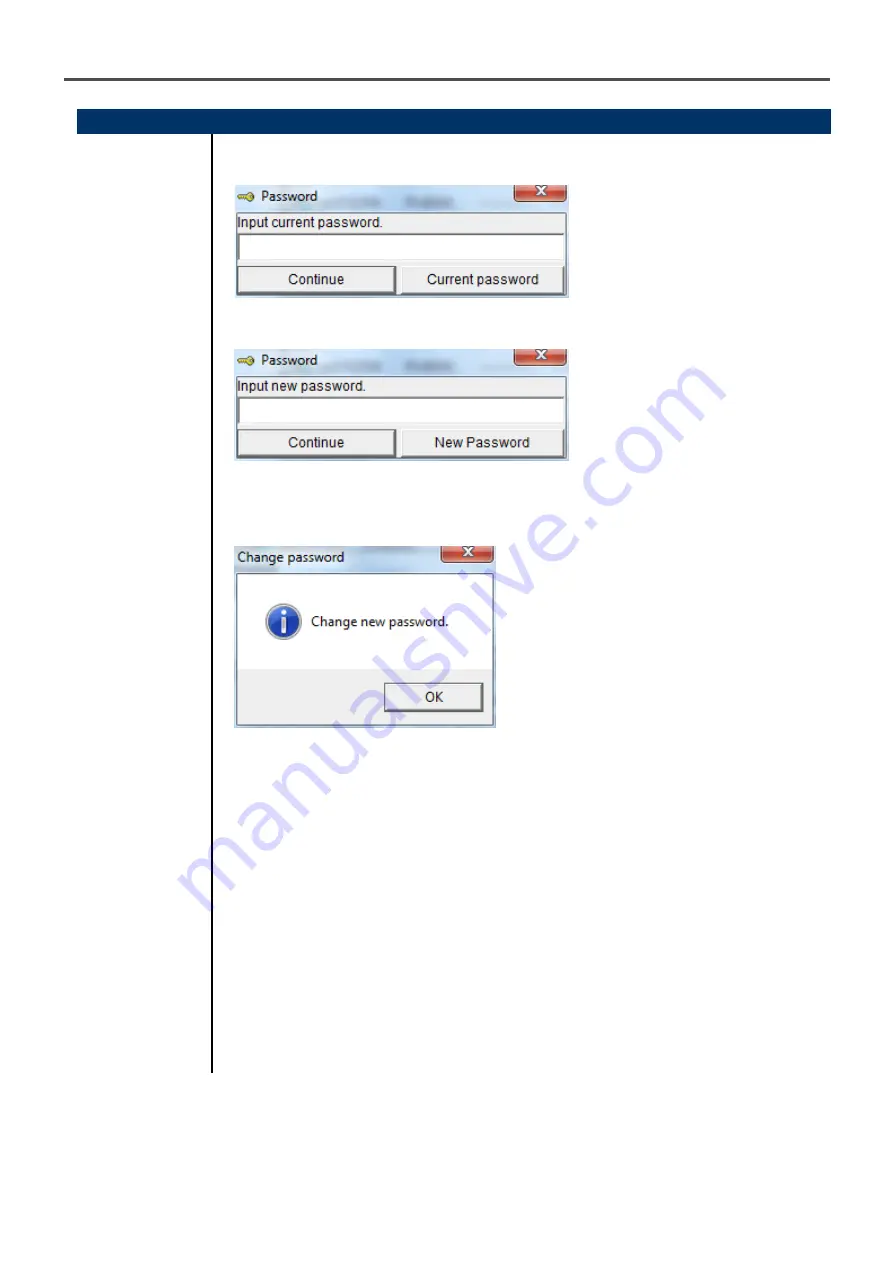
(4) Change password


  Input 

password 


1.    Display the Password dialog in the same way as deleting the data, and click 

Change Password. 


2.    Enter an appropriate password and click the Current password button. The 

following message is displayed. 


3.    Enter the new password and click the New Password button. 
 
4.    The Password dialog is prompted again. Enter the same new password and click 

New Password. 


Click OK to update the password. 


CAUTION: The password immediately after installation is "rki". (Case-sensitive) 


Summary of Contents for FI-8000

Page 1: ...PT3E 0561 Optical Interferometric Gas Concentration Meter FI 8000 Data Logger Management Program SW FI 8000 EX Operating Manual...

Page 2: ...ndows 8 and Windows 10 such as selecting commands or setting dialog boxes First time users of Windows should read the Windows manual in advance to learn common operations of the operating system CAUTI...

Page 3: ...otherwise specified in law Due to the improvement of the product the content of this operating manual might be amended without prior notice It is necessary to agree with the Software License Agreement...

Page 4: ...rd 23 5 Summary pane 24 3 3 Data View screen 25 1 Output to a printer 26 2 Save to a file 28 3 To view data summary simultaneously 29 3 4 Set screen 30 1 Change font colors 31 2 Change status of the m...

Page 5: ...with sufficient disk capacity 2 2 Software installation Insert a disk which stores data of the program to a CD ROM drive of a Windows based PC After a while an installation screen will automatically s...

Page 6: ...t After inserting the CD ROM or starting setup exe the following screen is displayed Click the Next button The following screen is displayed Click the Next button to continue the installation or the C...

Page 7: ...2 Installation and Uninstallation 2 3 Installation procedure 7 Customer Information Destination Folder Click the Next button to display the following screen Click the Next button Click the Next button...

Page 8: ...stallation 2 3 Installation procedure 8 Start setup Complete Click the Next button to start installation When the setup process is completed the following screen is displayed The program can be used i...

Page 9: ...oftware is uninstalled after some operation some files will remain on the PC Of these files FI8000 mdb is a database file If past data needs to be saved copy this file to a different location and then...

Page 10: ......

Page 11: ......

Page 12: ......

Page 13: ...munication place the FI 8000 main unit to an appropriate position and with the program activated turn on the power of the main unit The program automatically judges whether or not communication is pos...

Page 14: ......

Page 15: ......

Page 16: ......

Page 17: ......

Page 18: ...k Yes to start clearing the data 6 Turn off the power of the FI 8000 main unit Power OFF Use the Power Off button to turn off the power of the FI 8000 main unit and initialize the serial port of the P...

Page 19: ......

Page 20: ......

Page 21: ......

Page 22: ...a screen 22 3 Output snap list Save list Save the list displayed in the upper section of the screen as a csv file Click the Save List button Specify the location and the file name and click the Save b...

Page 23: ...2 Enter an appropriate password and click the Current password button The following message is displayed 3 Enter the new password and click the New Password button 4 The Password dialog is prompted a...

Page 24: ...tails When the selected data is a normal data the summary of the data is displayed Snapshot Name Data name Sampling Date Time Recorded time Serial No Station ID User ID Status of the FI 8000 main unit...

Page 25: ......

Page 26: ......

Page 27: ...ng only part of the selected data is not possible 3 Copies can be changed only when the setting is available from the printer When the setting is changed in this way the change affects other applicati...

Page 28: ...3 Data View screen 28 2 Save to a file Save 1 Click the Save button on the screen Specify the location and the file name and click the Save button to store the data Click the Cancel button to cancel...

Page 29: ......

Page 30: ......

Page 31: ......

Page 32: ......

Page 33: ...nd Station ID 16 Characters can be selected and changed from the list The Date Time Set button can be used to align the internal clock of the FI 8000 main unit FI 8000 Date Time to the set time of the...

Page 34: ...tton is clicked the changes are sent to the FI 8000 main unit and stored there When the No button is clicked update is canceled CAUTION The changes cannot be undone Before clicking Update it is possib...

Page 35: ...data storage structure Data is stored in the folder specified by Start in in the Properties tab of the shortcut created at installation 1 File name FI8000 mdb File type Microsoft Jet 3 6 database file...

Page 36: ...ppropriate download cannot be performed properly 2 When downloading avoid similar operations using another application For example performing IR communication during data download 3 Do not kill the pr...

Page 37: ...Turn off the other devices or prevent its interference Error occurs during communication There is a scattered light outside Eliminate the device that uses IR The FI 8000 main unit moved during communi...

Page 38: ......

Page 39: ......

Page 40: ...ommunication component Serial communication component Animation file that shows that data download is in progress 8 2 Current directory during operation File name Details FI8000 ini FI8000 DAT FI8000...

Page 41: ...3 MB Library Approx 5 2 MB Uses up to 40 MB of disk space on installation Communication of the main unit Infrared conforming to IrDA 1 1 protocol Standard communication settings Baud rate 57600 bps ma...

Reviews: