15
20034293
GB
Installation
5.4
Installer/Servicer notes for the use of Gas oil with Bio blends up to 10%
During the burner installation, check that the gasoil and bio
fuel blends are in accordance with Riello specifications
(please refer to the chapters "Technical Data" and "Guid-
ance for the use of bio fuel blends up to 10%" within the
burner technical manual).
If a Bio blend is in use the installer must seek information
from the end user that their fuel supplier can evidence that
the blends of fuel conform to the relevant standards.
Check that the materials used in the construction of the oil
tank and ancillary equipment are suitable for bio fuels, If not
these must be upgraded or replaced with Bio compatible
parts.
Particular attention should be given to the oil storage tank
and supply to the burner. Riello recommends that existing
oil storage tanks are cleaned, inspected and any traces of
water are removed BEFORE bio fuel is introduced (Contact
the tank manufacturer or oil supplier for further advice). If
these recommendations are not respected this will increase
the risk of contamination and possible equipment failure.
In line oil filters should be replaced making sure that they
are Bio compatible. Riello recommends a good quality bio
compatible oil filter at the tank and a secondary 100 micron
filter are used to protect the burner pump and nozzle from
contamination.
The burner hydraulic components and flexible oil lines must
be suitable for bio fuel use (check with Riello if in doubt).
Riello have carefully chosen the specification of the bio
compatible components including the flexible oil lines to
protect the pump, safety value and nozzle. The Riello war-
ranty is dependent upon the use of Riello genuine compo-
nents including the oil lines, being used. The burner must
be commissioned and combustion parameters set to appli-
ance manufacturer's recommendations.
Regularly check visually for any signs of oil leakage from
seals, gaskets and hoses.
It is strongly recommended that with Bio fuel use, oil filters
are inspected and replaced every 4 months. More regularly
where contamination is experienced.
During extended periods of non operation and/or where
burners are using oil as a standby fuel, it is strongly recom-
mended that the burner is put into operation for shorts peri-
ods at least every three months.
5.5
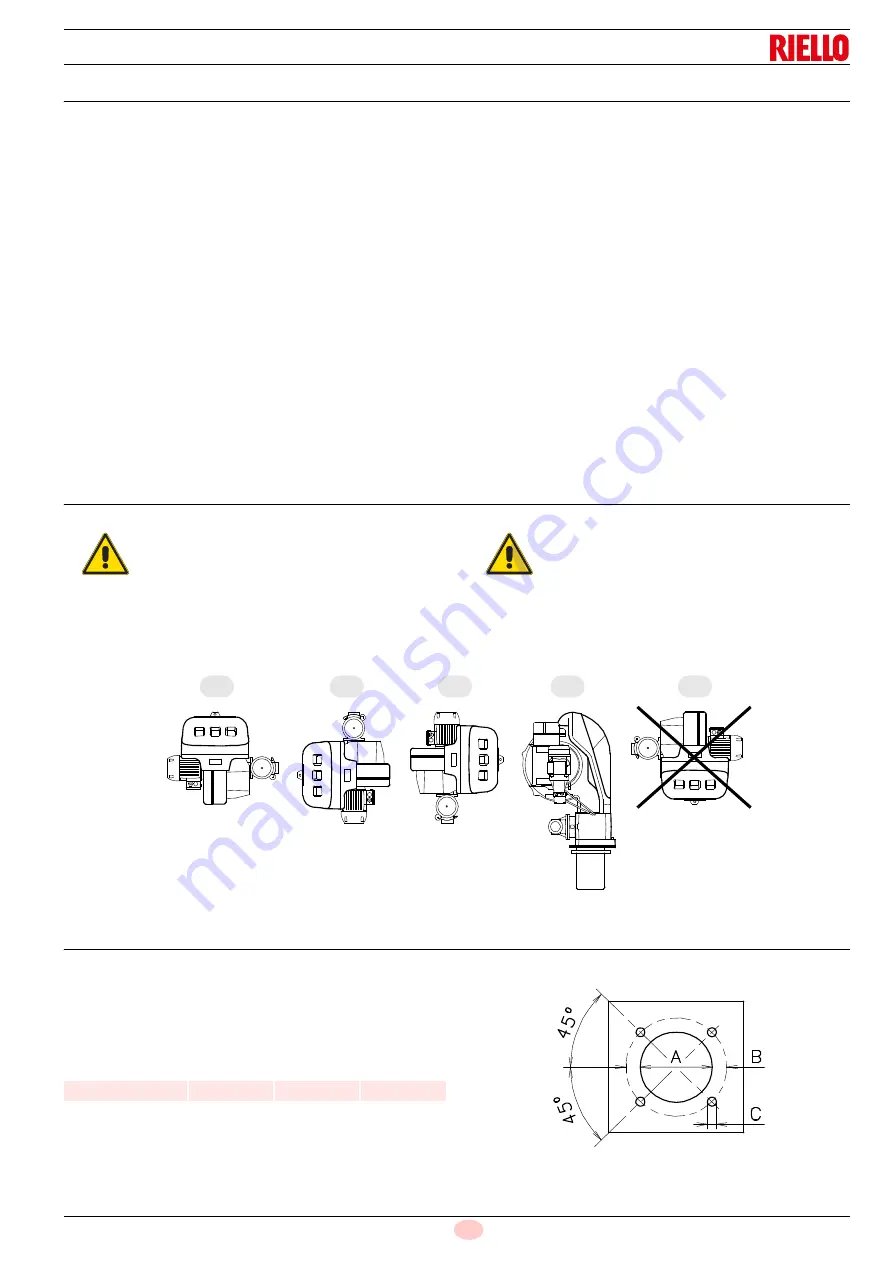
Operating position
5.6
Preparing the boiler
5.6.1
Boring the boiler plate
Drill the combustion chamber locking plate as shown in Fig. 9.
The position of the threaded holes can be marked using the ther-
mal screen supplied with the burner.
Tab. H
WARNING
The burner is designed to operate only in
positions
1
,
2
,
3
and
4
(Fig. 8).
Installation
1
is preferable, as it is the only
one that allows the maintenance operations
as described in this manual.
Installations
2
,
3
and
4
permit operation but
make maintenance and inspection of the
combustion head more difficult, pag. 33
DANGER
Any other position could compromise the cor-
rect operation of the appliance.
Installation
5
is prohibited for safety reasons.
Fig. 8
2
3
4
5
1
S8255
mm
A
B
C
RLS 250/M MZ
230
325 - 368
M 16
D455
Fig. 9
Summary of Contents for RLS 250/M
Page 2: ...Original instructions ...
Page 45: ...43 20034293 GB Appendix Electrical panel layout ...
Page 46: ...20034293 44 GB Appendix Electrical panel layout ...
Page 47: ...45 20034293 GB Appendix Electrical panel layout ...
Page 48: ...20034293 46 GB Appendix Electrical panel layout ...
Page 49: ...47 20034293 GB Appendix Electrical panel layout ...
Page 51: ......


