background image

Email: [email protected]           WWW.RIDGEGATETOOLS.COM 

 |2 


Fastening Rivet Nuts or Rivet Studs: 


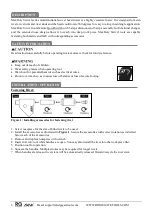
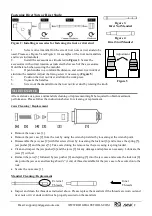
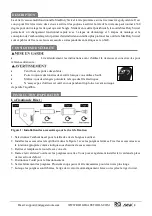
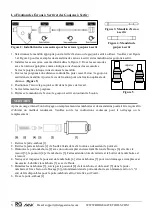
Figure 2: Installing accessories for fastening rivet nut or rivet stud 


1.


Select correct mandrel for the size of rivet nuts or rivet studs to be 

used. Please see Figure 3 and Figure 4 for examples of the rivet nut mandrels 
and rivet stud mandrels. 
2.


Install the accessories as illustrated in 

Figure 2

. Secure the 

accessories with correct rotation as indicated below each of the accessories. 
Hold the knob when securing the mandrel. 
3.


Open handles to a comfortable distance, and screw rivet nut/rivet 

stud into the mandrel. Adjust the fixing screw if necessary. (

Figure 5

4.


Position the rivet nut/rivet stud into the work piece. 

5.


Squeeze the handles. 

6.


Screw out the mandrel from the rivet nut/rivet stud by rotating the knob. 


After extensive use, jaws and mandrels cleaning or replacement might be required to obtain maximum 
performance. Please follow the instructions below for cleaning or replacement.  
 

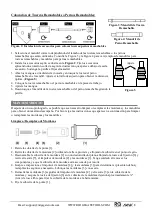
Jaws Cleaning / Replacement 


Remove the nose case [1]. 


Remove the jaw case [2] from the tool by using the wrench provided by loosening at the wrench point.  


Disassemble the jaw case [2] with flat screw driver by loosening the lock nut [6] and remove the spring [5], 
jaw pusher [4] and the jaws [3]. Take care during the removal as the jaw casing is spring loaded.  


Clean and inspect the jaw pusher [4] and the jaws [3] for any damage and replace as necessary. Lubricate the 
jaws [3] with oil. 


Reinsert the jaws [3] followed by jaw pusher [4] and spring [5] into the jaw case and secure the lock nut [6] 
deep into the jaw case and leaving about ¾” (1cm) of thread available for the jaw case to be secured onto the 
tool.  


Secure the nose case [1]. 

 
Mandrel Cleaning / Replacement 


Inspect and clean the threads as indicated above. Please replace the mandrels if the threads are worn out and 
rivet nuts or rivet studs could not be properly secured on the mandrels. 


MAINTENANCE


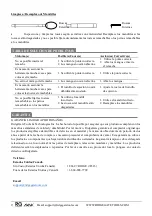
Figure 3: 

Rivet Nut Mandrel 


Figure 4: 

Rivet Stud Mandrel 

External 
Threads 

Inner  
Threads 

Adjustment  

Figure 5 

Summary of Contents for 101- MS201-M

Page 1: ...Swivel Series Heavy Duty Multifunctional Swivel Head Riveter Riveteuse Multifonctionnelle à Tête Pivotante Remachadora Multifuncional de Cabeza Giratoria Instruction Manual Mode d emploi Manual de Instrucciones ...

Page 2: ...1 8 1 4 3 2 6 4 Optional Optionnel Opcional Optional Optionnel Opcional MaxDuty Swivel N 101 MS201 S Optional Optionnel Opcional 8 3 8 SAE UNC Optional Optionnel Opcional 101 MS201 M M4 M10 ISO MaxDuty Swivel Duo 101 MS202 S 1 8 1 4 3 2 6 4 8 3 8 SAE UNC Optional Optionnel Opcional 101 MS202 M M4 M10 ISO MaxDuty Swivel Trio 101 MS203 S 1 8 1 4 3 2 6 4 8 3 8 SAE UNC 8 5 16 SAE UNC 101 MS203 M M4 M1...

Page 3: ...10M 132M SAE UNC 8 3 8 10M 132S SAE UNF 10 3 8 10M 132SF Rivet Stud Mandrel Expansion Set Ensemble de l expansion de mandrin des goujons à sertir Juego de Expansión de Mandril para Pernos Remachables ISO M4 M8 10M 152M SAE UNC 8 5 16 10M 152S SAE and Metric mandrels are not interchangeable Les SAE et les métriques des mandrins ne sont pas interchangeables Los mandriles SAE y métricos no son interc...

Page 4: ...ch of children Wear safety glasses when operating tool Watch out for potential hazards such as electrical wires Do not over reach so as to cause loss of balance or loss of secure footing Fastening Rivet Figure 1 Installing accessories for fastening rivet 1 Select nosepiece for the size of blind rivets to be used 2 Install the accessories as illustrated in Figure 1 Secure the accessories with corre...

Page 5: ...um performance Please follow the instructions below for cleaning or replacement Jaws Cleaning Replacement Remove the nose case 1 Remove the jaw case 2 from the tool by using the wrench provided by loosening at the wrench point Disassemble the jaw case 2 with flat screw driver by loosening the lock nut 6 and remove the spring 5 jaw pusher 4 and the jaws 3 Take care during the removal as the jaw cas...

Page 6: ...threads on mandrel 1 Choose correct mandrel 2 Replace mandrels TWO YEARS LIMITED WARRANTY RidgeGate Tools Technologies Inc makes every effort to ensure that our products meet high quality and durability standards and warrants to the original purchaser with a proof of purchase that eligible products are free from defects in material and workmanship for two years from the date of purchase This warra...

Page 7: ...nettes de sécurité lorsque vous utilisez l outil Méfiez vous des dangers potentiels tels que des fils électriques N essayez pas d utiliser cet outil en vous penchant trop loin en avant au risqué de perdre l équilibre La Fixation de Rivet Figure 1 Installation des accessoires pour le rivet de fixation 1 Sélectionnez l embout nasal pour la taille des rivets borgnes à utiliser 2 Installez les accesso...

Page 8: ... tournant le bouton Après un usage intensif un nettoyage ou remplacement des mâchoires et des mandarins pourrait être requis afin d obtenir un meilleur rendement Veuillez suivre les instructions ci dessous pour le nettoyage ou le remplacement 1 Retirez le porte embout 1 2 Retirez le porte mâchoire 2 de l outil à l aide de la clé fournie en desserrant le point clé 3 Démontez le porte mâchoire 2 ave...

Page 9: ...sertir ne pas être sécurisés dans les mandarins 1 Mandrins de différentes normes sont utilisés 2 Les fils du mandrin sont usés 1 Choisissez le mandrin approprié 2 Remplacez les mandrins GARANTIE LIMITÉE DE DEUX ANS RidgeGate Tools Technologies Inc fait tous les efforts afin de s assurer que nos produits répondent aux normes de qualité et de durabilité Cette garantie limitée n est valide que pour l...

Page 10: ...s Utilice gafas de seguridad al operar la herramienta Tenga cuidado con los posibles riesgos tales como cables eléctricos Evite estirarse demasiado de manera que pierda el equilibrio o la estabilidad Colocación de Remaches Figura 1 Instalación de accesorios para colocar remaches 1 Seleccione la punta dependiendo del tamaño de los remaches ciegos que serán utilizados 2 Instale los accesorios según ...

Page 11: ...osible que sea necesario limpiar o reemplazar las mordazas y los mandriles para obtener un máximo desempeño Por favor siga las instrucciones que aparecen a continuación para limpiar o reemplazar las mordazas y los mandriles Limpieza Reemplazo de Mordazas 1 Retire la cubierta de la punta 1 2 Reitre la cubierta de la mordaza 2 utilizando la llave provista y aflojando la cubierta en el punto de giro ...

Page 12: ...bles en los mandriles 1 Se utilizó el mandril incorrecto 2 Las roscas del mandril están desgastadas 1 Utilice el mandril correcto 2 Reemplace los mandriles GARANTIA LIMITADA POR DOS AÑOS RidgeGate Tools Technologies Inc ha hecho todo lo posible por asegurar que sus productos cumplan con los más altos estándares de calidad y durabilidad Por tal motivo RidgeGate garantiza al comprador original que l...

Page 13: ...25M SAE UNC Mandrel 8 32 10M 121S Mandrel 10 24 10M 122S Mandrel 1 4 20 10M 123 2S Mandrel 5 16 18 10M 124 2S Mandrel 3 8 16 10M 125S SAE UNF Mandrel 10 32 10M 122SF Mandrel 1 4 28 10M 123SF Mandrel 5 16 24 10M 124 2SF Mandrel 3 8 24 10M 125SF RIVET STUD FUNCTION METRIC ISO261 COARSE Mandrel M4 10M 141M Mandrel M5 10M 142M Mandrel M6 10M 143M Mandrel M8 10M 144 2M SAE UNC Mandrel 8 32 10M 141S Man...

Page 14: ...Rev01 2017 EFS WWW RIDGEGATETOOLS COM RidgeGate Tools Technologies Inc Address 2 20279 97th Ave Langley B C Canada V1M 4B9 Tel 1 866 97 RIDGE 74343 US CAN 1 604 888 7709 Outside US CAN info ridgegatetools com ...

Reviews: