ricoo S0644 Installation Manual Download Page 18

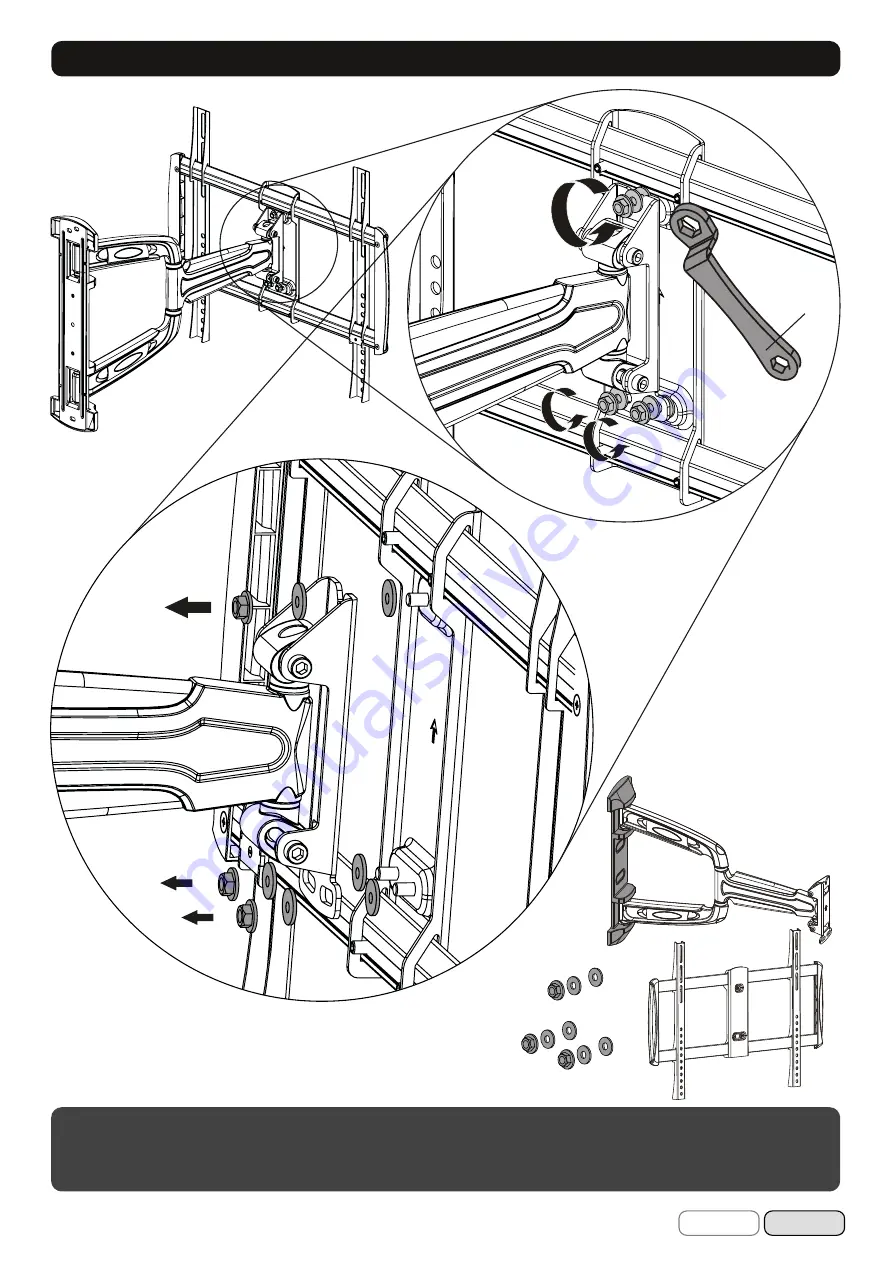
1. Disassembly the front panel.

Unscrew the three nuts on the front panel holder. Please make sure that six black plastic washers don’t disappear because 

they are needed for further assembly.

Overall, there should be 3 pcs. screw-nuts and 6 pcs. plastic washers.

E

3

English

Deutsch

Summary of Contents for S0644

Page 1: ...tor MONTAGEANLEITUNG v 17 01 S0644 35kg 77lbs MAX ACHTUNG NIEMALS DAS MAXIMAL ZUL SSIGE BELASTUNGSGEWICHT BERSCHREITEN MISSACHTUNG KANN ZU SACHSCH DEN ODER SCHWEREN VERLETZUNGEN F HREN 200x200 300x200...

Page 2: ...gesam ten Konstruktion Dieses Produkt ist nur f r den Innenbereich gedacht Verwendung dieses Produkts im Freien kann zu Produkt und Personensch den f hren Aufgrund zahlreicher Fernseh Bauarten auf dem...

Page 3: ...en Sie Ihren H ndler Paket M Paket W Grundger st x1 A Schablone x1 B 3mm Inbusschl ssel x1 C 5mm Inbusschl ssel x1 D Schraubenschl ssel x1 E Betonwand D bel x4 W B D6 Unterlegscheibe x3 W C x3 W A x1...

Page 4: ...n an der Frontplattenaufnahme Bitte achten Sie darauf dass sechs schwarze Plastikscheiben nich abhanden kommen da diese f r den weiteren Zusammenbau ben tigt werden Insgesamt sollen es 3 Stk Schrauben...

Page 5: ...Bitte berpr fen Sie VOR der Montage den Lochabstand zwischen den Befestigungs l chern an Ihrem Bildschirm VESA Befestigungsl cher Diese Wandhalterung unterst tzt folgende Lochabst nde Horizontal Wage...

Page 6: ...Verwendung eines Balkenfinders wird dringend empfohlen Installateure sind daf r verantwortlich die n tigen Werkzeuge f r andere Arten von Einbausituationen zur Verf gung zu stellen Installateure m ss...

Page 7: ...tragen kann WARNUNG Montagel cher bohren Montagel cher markieren Wandplatteandie Wandanschrauben 4b Befestigung an der Massivbetonwand Mit dem Pfeil nach oben Beachten keine Unterlegscheibe f r diese...

Page 8: ...5 Montage der dekorativen Abdeckungen Montieren Sie die dekorativen Abdeckungen entlang der Wandplatte Achten Sie darauf dass diese auf der Wandplatte einrasten 7 English Deutsch...

Page 9: ...ldschirm Oberseite desTVs Passen Sie die Montageschienen an die Montagel cher an Ziehen Sie anschlie end die Schrauben an den Montage schienen mit Hilfe des Inbusschl ssels an C 6 1 F r Bildschirme mi...

Page 10: ...n Sie die Montageschienen mit Hilfe von den dazugeh rigen Schrauben 7 Vorbereitung der Frontplatte 5mm Zwei Plastikscheiben sowie eine Schraubenmutter welche im Schritt 1 entfernt wurden an die obere...

Page 11: ...ren Beachten Die Frontplattenaufnahme muss sich zwischen den beiden Plastik scheiben befinden wie es vor dem Ausbau der Frontplatte im Schritt 1 der Fall war Im Anschluss setzten Sie jeweils eine Plas...

Page 12: ...hwenken der Halterung nicht beintr chtigt wird Kabel m glichst getrennt durchf hren obere oder untere Abdeckung um Signalst rung zu vermeiden Schlie en Sie die Kabel an Ihrem Fernseher an und f hren S...

Page 13: ...hritt 4 Dadurch wird es m glich sein den Bildschirm jederzeit mit den H nden ohne die Schrauben lockern zu m ssen und ohne gro en Kraftauf wand waagerecht gerade stellen k nnen was das Ausrichten ohne...

Page 14: ...m 180 geschwenkt um 5 12 geneigt oder um 2 5 gedreht werden Wartung Pr fen Sie in regelm igen Abst nden mindestens alle drei Monate ob alle Schrauben an dem Produkt fest angezogen sind Bei Fragen kont...

Page 15: ...ION DO NOT EXCEED RATED LISTED WEIGHT SERIOUS INJURY OR PROPERTY DAMAGE MAY OCCUR Full Motion LED LCD TV Wall Mount INSTALLATION MANUAL v 17 01 S0644 35kg 77lbs MAX 200x200 300x200 300x300 400x300 400...

Page 16: ...t failure and personal injury By reason of large television construction types on the market we can t adjust our screen installation materials for the wall mount for each screen type Therefore it is p...

Page 17: ...ey x1 C 5mm allen key x1 D Wrench x1 E Concrete anchor x4 W B D6 washer x3 W C x3 W A x1 W D M5x14 x4 M A M6x14 x4 M B M8x20 x4 M C M6x30 x4 M D M8x50 x4 M F M8x30 x4 M E big spacer x8 M I small space...

Page 18: ...the three nuts on the front panel holder Please make sure that six black plastic washers don t disappear because they are needed for further assembly Overall there should be 3 pcs screw nuts and 6 pc...

Page 19: ...mounting holes Please check BEFORE installation distance between mounting holes on your display Horizintally Vertical Perpendicularly This wall mount supports the following distance between holes Hori...

Page 20: ...f the studs The use of a stud finder is highly recomended Installers are responsible to provide hardware for other types of mounting situations Installers must verify that the supporting surface will...

Page 21: ...oles Drill pilot holes Screw the wall mount onto the wall Installers must verify that the supporting surface will safely support the combined weight of the equipment and all attached hardware and comp...

Page 22: ...5 Installing the decorative covers Install the decorative cobvers along the wall plate rail until they fit snuggly onto the wall plate 7 English Deutsch...

Page 23: ...l plate onto display 6 1 For flat back screen C Adjust the brackets to fit the mounting holes on the back side of the display and tighten all screws on the universal plaety using an allen key Top of d...

Page 24: ...re removed in step 1 on the top screw of the front panel but do not tighten Between the two plastic washers should remain about 5mm distance And the two bottom screws provided with each a plastic wash...

Page 25: ...recess provided on the wall mount Note The front panel holder must be located between the two plastic washers as it was before removing the front panel in step 1 Next put on the two bottom screws eac...

Page 26: ...ack in the cable for arm movement Route the power and signal cable in different cable covers to avoid signal disturbance Connect the cable to your display and run the cables through the cable guide AT...

Page 27: ...ength Step 4 Thereby it will be possible to adjust the screen in the horizontal position without unscrewing the screw or a big effort at all time which is possible without extra tools With this functi...

Page 28: ...swivelled 180 tilted 5 12 and rotated 2 5 Maintenance Check that the bracket is secure and safe to use at regular intervals at least every three months Please contact your distributor if you have any...

Reviews: