background image

Troubleshooting

72

4

G

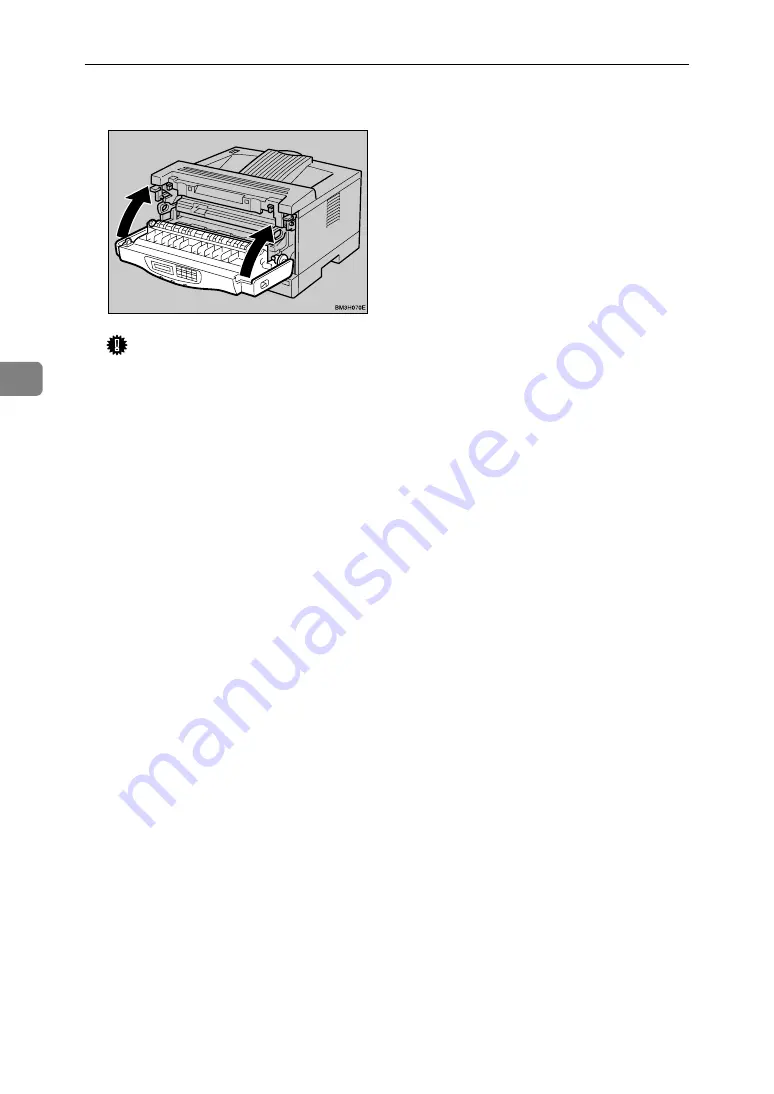
Close the front cover.

Important

Do not close the front cover
with force. If you cannot close
the cover easily, pull out the
toner cartridge from the printer
and insert it again. After that,
close the front cover again.

After installing the new toner
cartridge, the first few pages
might be printed with light den-
sity. If the density does not be-
come darker, see P.63 

“Other

Printing Problems”

.

Summary of Contents for LASER AP1600

Page 1: ...OPERATING INSTRUCTIONS Printer Reference Read this manual carefully before you use this product and keep it handy for future reference For safety please follow the instructions in this manual...

Page 2: ...and interlock mechanisms have been designed to prevent any possible laser beam exposure to the operator The following label is attached on the back of the printer Laser Safety The optical housing uni...

Page 3: ...d trademark of Xerox Corporation Other product names used herein are for identification purposes only and might be trademarks of their respective companies We disclaim any and all rights in those mark...

Page 4: ...s manual the following important symbols are used R WARNING Indicates a potentially hazardous situation which if instructions are not followed could result in death or serious injury R CAUTION Indicat...

Page 5: ...ied in this manu al Turn off the power and disconnect the power plug by pulling the plug not the cable if any of the following conditions exists You spill something into the equipment You suspect that...

Page 6: ...to fall inside the equipment Keep toner used or unused and toner cartridge out of the reach of children For environmental reasons do not dispose of the equipment or expended supply waste at household...

Page 7: ...ive for recommended paper As an ENERGY STAR Partner we have deter mined that this machine model meets the ENER GY STAR Guidelines for energy efficiency The ENERGY STAR Guidelines intend to establish a...

Page 8: ...erence Describes the procedures and provides necessary information about using the printer and its options The manual is included as a PDF file on the CD ROM This Manual Network Interface Board Type 2...

Page 9: ...is not followed paper might be misfed originals might be damaged or data might be lost Be sure to read this Preparation This symbol indicates the prior knowledge or preparations required before op era...

Page 10: ...ting 9 Windows 95 98 Accessing the Printer Properties 9 Windows NT 4 0 Accessing the Printer Properties 10 Macintosh Setting up for Printing 11 Canceling a Print Job 13 Windows 95 98 Canceling a Print...

Page 11: ...ing the Main Menu 81 Selecting the Panel Display Language 82 Making Printer Settings with the Operation Panel 84 Job Control Menu 86 Job Control Parameters 86 Host Interface Menu 93 Host Interface Par...

Page 12: ...n the taskbar point to Settings and then click Printers C Click to select the icon of the printer you want to remove D On the File menu click Delete A confirmation dialog box appears E Click Yes to un...

Page 13: ...ll Control access permission Mem bers of the Administrators Server Operators Print Operators and Power Us ers groups have Full Control Permission by default When you install a printer driver log on us...

Page 14: ...le menu click Delete A confirmation dialog box appears E Click Yes to uninstall the printer driver Windows NT 4 0 Uninstalling the PostScript Printer Driver Limitation Uninstalling a printer driver re...

Page 15: ...Uninstalling the Printer Driver and Software 4 1...

Page 16: ...ings you want to change C On the File menu click Properties D Make settings and click OK Making printer settings from an application To make the printer settings for a specific application open the Pr...

Page 17: ...B Double click the Printers icon C In the Installed Printers list box click the name of the printer you want to set up D Click Setup E Make settings and click OK F Click Close to close the Printers d...

Page 18: ...e Printer Properties Making default printer settings Printer Properties Limitation Changing the setting of the printer requires Full Control access permission Members of Administrators Server Operator...

Page 19: ...ications Making printer settings from an application To make the printer settings for a specific application open the Printer Properties dialog box from that application The following example describe...

Page 20: ...nu click Properties The Printer Properties dialog box appears D Make settings and click OK E Click OK Making printer settings from an application To make the printer settings for a specific applicatio...

Page 21: ...then click Printers The Printers window appears B Click to select the icon of the printer you want to use C On the File menu click Properties The Printer Properties dialog box appears D Make settings...

Page 22: ...h the application you are using With some applications the printer driver s settings are not used and the ap plication s own default settings are applied Any settings you make in the following procedu...

Page 23: ...ox depends on the appli cation you are using See the documentation that comes with the Macin tosh for more information D After configuring the settings click OK Setting up for printing from an applica...

Page 24: ...on the operation panel display indicating that the print job is being cancelled Important The procedure above cancels the print job that is currently being processed by the printer In some cases the...

Page 25: ...job is being cancelled Important The procedure above cancels the print job that is currently being processed by the printer In some cases the printer may already be processing data for the next print...

Page 26: ...ration panel display indicating that the print job is being cancelled Important The procedure above cancels the print job that is currently being processed by the printer In some cases the printer may...

Page 27: ...Setting up the Printer Driver and Canceling a Print Job 16 2...

Page 28: ...mmended that you load paper having the size and direction you fre quently use in the tray selected with Tray Priority For more information about Tray Priority see P 86 Job Control Parameters When load...

Page 29: ...e with the oper ation panel The envelope feeder requires the installation of the optional paper unit When one optional paper unit is installed the envelope feeder can be exchanged with Tray 2 When two...

Page 30: ...inter driver to set the custom size Set the custom size setting with the operation panel X means that the size is not supported Feed direction Size mm Bypass Tray Standard Tray Tray1 Paper Feed Unit A...

Page 31: ...ge you use Use the printer driver to set the cus tom size Set the custom size setting with the operation panel X means that the size is not supported Feed direction Size inch Bypass Tray Standard Tray...

Page 32: ...installation of the optional paper unit The envelope feeder can be exchanged only with Tray 2 Note The supported paper size varies depending on the memory size of the printer P 114 Memory Capacity an...

Page 33: ...m in length The supported size may differ de pending on the printer language you use Use the printer driver to set the cus tom size Set the custom size setting with the operation panel X means that th...

Page 34: ...98 4 216 mm in width and approximately 148 355 6 mm in length The supported size may differ de pending on the printer language you use Use the printer driver to set the cus tom size Set the custom si...

Page 35: ...the side guide If you load paper into the paper tray confirm that the print side is facing up If you load paper onto the bypass tray confirm that the print side is facing down Storing Paper Paper sho...

Page 36: ...acing down onto the bypass tray Translucent paper Load only a piece of translucent paper at a time onto the bypass tray When printing on translucent paper that has a print side load it facing down ont...

Page 37: ...of the stack is not higher than the limit mark on the side guide P 36 Type 1 printer loading envelopes into the envelope feeder and P 47 Type 2 printer loading envelopes into the envelope feeder Conf...

Page 38: ...ough to emit static electricity Paper that has already been printed on with the exception of preprinted let terhead Note Ink on paper from an earlier print job another copier an inkjet printer or othe...

Page 39: ...ies or metal folding bars designed to be interlocked with nicked edges of bent corners with rough cockle or laid finishes with any exposed adhesive when the flap is in the sealed or closed posi tion P...

Page 40: ...might occur Reference For more information about the type and size of paper that can be loaded in the tray see P 17 Paper Types and Sizes A Slide the paper tray out until it stops After that lift it...

Page 41: ...paper in the paper tray Important If you want to use the paper size and feed direction that are not indicated on the paper size dial set the dial to p In this case you should set the paper size using...

Page 42: ...anual to confirm which printer Type 1 Printer or Type 2 Printer you have If you set custom size paper you should set the paper size using the printer driver Also use the opera tion panel to set the cu...

Page 43: ...isplay Paper Input j 1 Tray Priorityl D Press T T T T or U U U U until the fol lowing message appears on the panel display Paper Input j 3 Paper Size l E Press Enter q q q q The following message appe...

Page 44: ...problems might occur Reference For more information about the size and feed direction of paper that can be set in the tray see P 17 Paper Types and Sizes A Slide the paper tray out until it stops Afte...

Page 45: ...onal envelope feeder is not installed you can se lect the sizes for the envelopes for Tray 2 using the operation panel However you cannot load the en velopes until the optional envelop feeder is insta...

Page 46: ...the stack is not higher than the limit mark on the side guides Do not press down the stack of envelopes with too much force D Slide the side guides against the edge of the envelope stack Note Confirm...

Page 47: ...dy F Start printing with the computer Type 1 printer loading envelopes into the envelope feeder Note See the inside front cover of this manual to confirm which printer Type 1 Printer or Type 2 Printer...

Page 48: ...than the limit mark on the side guides Confirm that the envelopes fit under the side guides Do not press down the stack of envelopes with too much force F While pinching the side guides slide them alo...

Page 49: ...j 3 Paper Size l E Press Enter q q q q The following message appears Paper Size j 3 Tray 2 l F Press Enter q q q q G Press U U U U or T T T T to select the envelope type you want to use Reference For...

Page 50: ...Metric version A4 K Inch version 81 2 11 K Reference For more information about the size and feed direction of paper that can be loaded in the tray see P 17 Paper and Other Media Sup ported by this Pr...

Page 51: ...per guide gently A A A A and remove it from the paper tray B B B B B Attach the paper guide to the pa per tray A A A A and push it down wards to lock it in place B B B B Note Confirm which paper size...

Page 52: ...y l F Press T T T T or U U U U until the fol lowing message appears on the panel display Paper Size j 2 Tray1 l G Press Enter q q q q H Press T T T T or U U U U to select the paper size you have set i...

Page 53: ...er stack is not against the right side guide correctly the paper might not be fed cor rectly Note It is recommended to load A5 or 51 2 81 2 paper in the K di rection C Adjust the left side guide to th...

Page 54: ...ly the setting Wait for a while I After the panel display chang es press On Line The Ready message appears on the panel display Ready E Start printing with the computer Type 2 Printer Loading Paper in...

Page 55: ...you want to load D Load paper into the paper tray with the print side up Important Confirm that the top of the stack is not higher than the limit mark inside the tray Confirm that paper fits under the...

Page 56: ...ass tray Note See the inside front cover of this manual to confirm which printer Type 1 Printer or Type 2 Printer you have Important With the bypass tray you can load up to five envelopes at a time Fo...

Page 57: ...Input l C Press Enter q q q q D Press U U U U or T T T T until the fol lowing message appears Paper Input j 3 Paper Size l E Press Enter q q q q The following message appears Paper Size j 1 Bypass Tr...

Page 58: ...eep the paper tray with paper in a cool and dry place B Prepare the envelope feeder C Slide the left side guide to the left by pinching it Slide the rear guide backwards by pinching it D Load envelope...

Page 59: ...pa per tray might slip off H Set the envelope size and feed di rection using the operation panel as follows A Press Menu The following message appears Main Menu j Job Control l B Press Enter q q q q T...

Page 60: ...information about types of envelopes you can select see P 17 Paper and Other Media Supported by this Printer H Press Enter q q q q I After the panel display chang es press On Line The Ready message a...

Page 61: ...Paper and Other Media 50 3...

Page 62: ...and Other Media P 39 Type 2 Printer Loading Paper and Other Media HDD Error The printer detected a disk failure Press Enter q to clear the error and delete the collate job Turn the printer s power swi...

Page 63: ...elete the collate job Try to send the collate job again Delete the font downloaded to the HDD using the Apple Print Utility if you have it This utility is a registered trademark of Ap ple Computer Inc...

Page 64: ...he bypass tray Note When Auto Select is select ed for the paper source using the printer driver this mes sage might appear when there is paper size paper in a dif ferent feed direction in any of the t...

Page 65: ...will not start Note When Auto Select is select ed for the paper source using the printer driver this mes sage might appear when there is paper size paper in a dif ferent direction in any of the trays...

Page 66: ...printed after Low on Toner appears on the panel display A4 5 test chart If the image density gets too light pre pare a new toner cartridge and replace it with a new one P 70 Replacing the Toner Car tr...

Page 67: ...ob Note Be sure to return Page Pro tect to Auto after the print job With Page Protect On the printerperformance might be decreased Remove Misfeed Front Cover Tray There is a misfeed in the printer Rem...

Page 68: ...alled close the front cover and turn the printer s power switch off and then on If the message appears again contact your sales or serv ice representative Error SC_2600 An error has occurred in the HD...

Page 69: ...r s power switch Reinstall the RS232C board and turn on the printer s power switch Turn off the printer s power switch Remove the RS232C board and turn on the printer s power switch Note If you remove...

Page 70: ...and turn on the printer s power switch Note If you remove Network Inter face Board you cannot per form the print job over the network You can send the print job to the printer only via a parallel cab...

Page 71: ...he board and turn on the printer s power switch Note If you remove Network Inter face Board you cannot per form the print job over the network You can send the print job to the printer only via a para...

Page 72: ...If you cannot print a test page it probably indicates printer malfunction You should contact your sales or service repre sentative P 96 List Print Menu If you can print a test page but cannot get the...

Page 73: ...rint ers B Click to select the icon of the printer Next on the File menu click Properties C Click the Details tab D Check the Print to the following port box to confirm that the correct port is select...

Page 74: ...e of the page could be a hazy gray Adjust the image density properly P 84 Making Printer Settings with the Operation Panel If this does not clear the problem replace the toner car tridge to a new one...

Page 75: ...the reverse side of the paper Set the paper upside down Paper misfeeds occur fre quently Check the paper size settings The size set with the pa per size dial might be different from the actual paper s...

Page 76: ...image might be differ ent from those shown in the computer display It takes too much time to resume printing The data is so large or complex that it takes time to process it If the Data In indicator...

Page 77: ...e Type 1 Printer illustrations are used in this section See the inside front cover of this manual to confirm which printer Type 1 Printer or Type 2 Printer you have When opening the front cover you ca...

Page 78: ...fed paper otherwise the printer might be damaged If you can see misfed paper when opening the front cover remove misfed paper from the front If you remove misfed paper from the out put tray the unfus...

Page 79: ...ll out mis fed paper by holding both sides of the paper Be careful not to touch the fusing unit as it becomes very hot Note Misfed paper might have un fused toner on it Be careful not to stain your ha...

Page 80: ...sing unit Follow these steps to reinstall the fusing unit R CAUTION A Turn the printer s power switch off B Align the fusing unit with the mark of the printer A A A A and then slide it in B B B B as s...

Page 81: ...replacement sooner than the normal life de scribed on P 124 Consumables Type 1 Printer illustrations are used in this section See the inside front cover of this manual to confirm which printer Type 1...

Page 82: ...ner cartridge on a flat surface Pull out the tape inside the unit horizontally while hold ing the cartridge with one hand as shown in the illustration Note Be sure to remove the tape com pletely befor...

Page 83: ...annot close the cover easily pull out the toner cartridge from the printer and insert it again After that close the front cover again After installing the new toner cartridge the first few pages might...

Page 84: ...rinter B Place the tray on a flat surface Re move paper from the paper tray C Wipe the gray or brown part of the friction pad with a soft damp cloth After that wipe it with a dry cloth to remove the w...

Page 85: ...solvent such as thinner or benzene D Load paper with the print side up into the paper tray Insert the pa per tray into the printer until it stops Note If misfeeds or multi feeds of pa per occur after...

Page 86: ...is equipped with the optional tray unit do not move the printer and unit to gether as they are not securely attached When lifting the printer con firm that the optional tray unit is not attached to t...

Page 87: ...tray then push it in until it stops I Insert the plug of the power cord into the wall socket securely Connect all the cables that were removed in step B B B B Note Follow the same procedure to clean...

Page 88: ...ller can be released B B B B F Wipe the rubber part of the roller with a soft damp cloth After that wipe it with a dry cloth to remove the water Important Do not use chemical cleaner or organic solven...

Page 89: ...se buttons C Wipe the three rubber parts of the rollers with a soft damp cloth Af ter that wipe them with a dry cloth to remove the water Important Do not use chemical cleaner or organic solvent such...

Page 90: ...included in each menu Category Function menu Job Control P 86 Paper Input Tray Priority Tray Locking Paper Size Thick Paper Print Quality EdgeSmoothing Resolution Image Density Toner Saving System Cop...

Page 91: ...r Language Network Setup IP Address Subnet Mask Gateway RS232C Setup Baud Rate Parity Flow Control Data Bits Stop Bits DTR Polarity Maintenance P 95 System Reset Menu Reset Hex Dump PM Clear HDD Forma...

Page 92: ...ontrol Host Interface Maintenance List Print Note T T T T Press to go to the next page U U U U Press to go back to the previous page After making the printer settings be sure to return to the previous...

Page 93: ...r on the panel display Note The default setting is English If you want to use the English panel display the following procedures are un necessary A Turn on the printer s power switch while pressing Me...

Page 94: ...Selecting the Panel Display Language 83 5 D Press Enter q The setting are applied and the ready message appears on the panel display...

Page 95: ...e desired menu item appears C Press Enter q q q q D Search for the desired menu using U U U U or T T T T The desired menu item or parameter appears Note V shown in front of the tray name indicates the...

Page 96: ...Making Printer Settings with the Operation Panel 85 5 Note Escape Press to return to the previous menu If you press Escape be fore pressing Enter q the adjusted data is canceled Escape...

Page 97: ...ear on the panel display It is recommended that you load paper having the size and direction you frequently use in the tray selected with Tray Priority Tray Locking If you use several different kinds...

Page 98: ...out paper sizes that can be set in Tray 1 see P 17 Paper and Other Media Supported by this Printer Tray 2 option For more information about paper sizes that can be set in Tray 2 see P 17 Paper and Oth...

Page 99: ...elected Resolution You can set the print resolution in dots per inch 300 dpi PCL 5e PS 600 dpi PCL 5e PCL 6 PS 1200 dpi PCL 6 PS Note Default 600 dpi The resolution selected with the printer driver ov...

Page 100: ...ue 15 seconds 30 seconds 60 seconds 180 seconds 300 sec onds Note Default 30 seconds Energy Saver You can set how many minutes or hours the printer wait before switching to Energy Saver mode Energy Sa...

Page 101: ...appear on the display Load Tray XX paper size Load Bypass Tray paper size Print Overrun Memory Overflow Off On Note When it is On and certain type of error occurs the current job might be canceled an...

Page 102: ...load appears only fonts are downloaded on the RAM When you select Download you can select only down loaded fonts on the RAM Font Number You can set the value for the default font you want to use 0 to...

Page 103: ...fault Off Menu Description Symbol Set You can set the set of print characters for the selected font The available options are as follows Roman8 ISO L1 ISO L2 ISO L5 ISO L6 PC 8 PC 8 dn PC 850 PC 852 P...

Page 104: ...you are installing the RS232C board Host Interface Parameters Printer Lang Printer Language Network Setup Menu Description Printer Lang Printer Language You can set the printer language you want to u...

Page 105: ...200 38400 Note Default 9600 Parity You can set Parity None Odd Even Note Default None Flow Control You can set Flow Control Xon Xoff DTR DTR Xon Xoff DTR RTS Note Default Xon Xoff Data Bits You can se...

Page 106: ...can set to isolate the source of a print job problem With this function On all data sent to the printer is printed in hexadecimal character representation On Off Note Default Off PM Clear Type 2 Prin...

Page 107: ...ion Page You can confirm that the current configuration of the printer by printing a con figuration page Reference For more information about the items of a configuration page see P 98 Inter preting t...

Page 108: ...Print j 1 Config Page l D Press Enter q q q q The following message appears on the panel display Config Page Press Enter Key E Press Enter q q q q In a short time the printing a configuration page wi...

Page 109: ...DRAM installed on the printer Hard Disk This item appears when the optional hard disk drive is installed Network Card This item appears when optional Network Interface Board is installed Paper Input S...

Page 110: ...hen optional Network Interface Board is installed Shows the configuration set with Network Setup of the Host Interface menu Reference For more information about Network Setup see P 93 Network Setup RS...

Page 111: ...Making Printer Settings with the Operation Panel 100 5...

Page 112: ...our sales or service representative It is dangerous to handle the plug with wet hands Doing this may re sult in receiving an electric shock The inside of the printer becomes very hot Do not touch the...

Page 113: ...ransfer roller D Fusing unit Description Quantity Friction pad 1 pc P 103 Replacing the fric tion pad Paper feed roller 3 pcs Note One is for the standard tray and the rest is for the trays of the opt...

Page 114: ...tion al paper tray s A Slide the tray until it stops After that lift it slightly then slide it out of the printer Note Do not touch the three white pins on the right side of the printer B Remove paper...

Page 115: ...eave the paper tray pulled out and go to P 104 Replacing the pa per feed rollers Replacing the paper feed rollers R CAUTION A Move the printer to the edge of a sturdy and stable table or desk Importan...

Page 116: ...d unit s fol low the same procedure to replace the paper feed roller of the op tional paper feed unit s E Leave the paper tray pulled out and go to P 105 Replacing the transfer roller Replacing the tr...

Page 117: ...the brown fusing unit lock levers B Slide the fusing unit toward you A A A A and remove it from the print er B B B B as shown in the illustra tion Note Be careful not to drop the fusing unit C Align...

Page 118: ...ce Kit Type 1400 Checking the contents of the box Check the contents of the box according to the following list If one or more items are missing contact your sales or service representative Descriptio...

Page 119: ...ace cable from the printer Replacing the friction pad Replace the friction pad of the stand ard tray tray 1 It is not necessary to replace the friction pad of the option al paper tray s R CAUTION A Sl...

Page 120: ...ocks securely Important Confirm that the friction pad is set correctly gently push it a few times If the friction pad re bounds with the force of the spring the pad has been set cor rectly G Leave the...

Page 121: ...ler into the shaft until the roller clicks into position B B B B D Leave the paper tray pulled out and go to P 110 Replacing the transfer roller Replacing the transfer roller A Open the front cover by...

Page 122: ...rown fusing unit lock levers B Slide the fusing unit toward you A A A A and remove it from the print er B B B B as shown in the illustra tion Note Be careful not to drop the fusing unit C Align the ne...

Page 123: ...el dis play Change Maintenance Kit B Press Menu The following message appears on the panel display Main Menu j Job Control l C Press U U U U or T T T T until the follow ing message appears on the pane...

Page 124: ...Replacing Parts 113 6 The following message appears on the panel display after about three seconds Maintenance j 4 PM Clear l H Press On Line The Ready message appears on the panel display Ready...

Page 125: ...A4 Full Bitmap 16MB 16MB 16MB 48MB 16MB 16MB 48MB A3 Text Only 16MB 16MB 16MB 16MB 16MB 16MB 16MB A3 Text and Graphics 16MB 16MB 16MB 48MB 16MB 16MB 48MB A3 Full Bitmap 16MB 16MB 16MB 48MB 16MB 16MB...

Page 126: ...is a precision piece of machinery Take care to avoid damage dur ing shipment When lifting the printer use the inset grips on both sides of the printer If you drop the printer it could break or cause...

Page 127: ...Parallel Interface Interface Standard 36 pin printer cable and a parallel port on the host computer IEEE 1284 I F Compatible ECP Nibble Do not use a cable more than 2 5 meters 8 2 feet long Resolution...

Page 128: ...tray extender closed Type 1 Printer Type 2 Printer Maximum 795 W or less 600 W or less Printing 510 W or less 400 W or less Energy Saver 30 W or less 30 W or less Type 1 Printer Mainframe only Type 2...

Page 129: ...4 For more information about envelopes see P 25 Types of Paper and Other Media Type 2 Printer 1 Paper weight 80 g m2 20 lb 2 You can load up to 5 envelopes 72 90 g m2 19 24 lb at a time 3 To use the...

Page 130: ...0 For Metric version only Paper Feed Unit A4 Type 2000 For Metric version only Envelope Feeder Type 2000 Unique for Type 2 Printer Paper Feed Unit Type 1400 Envelope Feeder Type 1400 Common for Type 1...

Page 131: ...er Paper Feed Unit Type 1400 Dimensions W D H 360 421 123 mm 14 2 16 6 4 8 without pins on the unit Paper Weight 60 90 g m2 16 24 lb Envelope Size P 17 Paper and Other Media Supported by this Printer...

Page 132: ...able to install the PostScript fonts with this optional Hard Disk Drive With Macintosh types of fonts supported are PostScript Type 1 and PostScript Type 42 To download them use Apple Print Utility wi...

Page 133: ...ata from the computer to the printer 4 RTS Ready To Send RS See the following table 5 CTS Clear To Send CS It is possible to transmit the data from the computer to the printer 6 DSR Data Set Ready DR...

Page 134: ...to LOW Set the DTR to HIGH to have the data resent from the computer Status of the printer Signal Serial DTR Serial XON XOFF Serial DTR RTS Configur ing the parallel port Offline RTS HIGH HIGH LOW LO...

Page 135: ...e printer both Type 1and Type 2 printers is about 3 000 pages A4 5 chart Maintenance Kit Maintenance Kit Type 2000 for Type 1 Printer Maintenance Kit Type 1400 for Type 2 Printer Reference For more in...

Page 136: ...chart 79 Menu key 81 84 Menu Reset 95 menu setting 82 84 messages 51 misfeed 66 N Network Interface Board 119 120 Network Interface Board Quick Configuration Guide vi Network Setup 93 NIB 119 O OHP tr...

Page 137: ...t 95 T toner cartridge replacing 70 transfer roller 102 105 108 110 translucent paper 25 troubleshooting 51 W Warning ii Windows 3 1x canceling a job 14 PCL 5e uninstalling 1 PCL 6 uninstalling 1 prin...

Page 138: ...3 23 EEC Warning Changes or modifications not expressly approved by the party responsible for compliance could void the user s authority to operate the equipment In accordance with IEC 60417 this mach...

Page 139: ...0 181 261 4000 Germany RICOH DEUTSCHLAND GmbH Mergenthalerallee 38 40 65760 Eschborn Phone 49 0 6196 9060 France RICOH FRANCE S A 383 Avenue du G n ral de Gaulle BP 307 92143 Clamart Cedex Phone 33 0...

Page 140: ...PostScript Printer Description PPD files for Windows The printer specific functions can be used by installing the PPD file specific for the printer Software and Utilities Included on the CD ROM Agfa F...

Page 141: ...ore informa tion about using PRINTER MANAGER FOR CLIENT PortNavi A utility that helps you to use network printer effectively It is useful in envi ronments where two or more network printers are used R...

Page 142: ...install the printer driver following the instructions on the screen A Close all applications that are currently running B Click Start on the taskbar point to Settings and then click Printers The Prin...

Page 143: ...and then click Next A dialog box for changing the printer name appears L Change the name of the printer if you want and then click Next M Click Next N In the next dialog box asking if you want to pri...

Page 144: ...nsert the CD ROM into the CD ROM drive C Follow the instructions on the screen D Restart the computer after installation is complete E You should set up the options with the printer driver If you want...

Page 145: ...ers permission Note When setting up options you should access the Printer Properties dialog box from Windows You cannot set up options by accessing the Printer Properties dialog box from an applicatio...

Page 146: ...selecting the printer port appears E Click to select the printer port you want to use and then click Next A dialog box for selecting the printer manufacture and model name appears F Click Have Disk A...

Page 147: ...age Print ers permission by default When you set up options log on using an account that has Manage Printers permission Note When setting up options you should access the Printer Properties dialog box...

Page 148: ...ing the setting of the printer requires Manage Printers permission Members of the Administrators and Power Users groups have Manage Print ers permission by default When you set up options log on using...

Page 149: ...using an account that has Administra tors permission A Close all applications that are currently running B Click Start on the taskbar point to Settings and click Printers The Printers window appears C...

Page 150: ...he Printer Properties dialog box appears D Make settings and click OK Note Settings you make here are used as the default settings for all applications Making default printer settings Printing Referen...

Page 151: ...plications the printer driver s settings are not used and the ap plication s own default settings are applied Any settings you make in the following procedure are valid for the current application onl...

Page 152: ...appears D Make settings and click OK Note Settings you make here are used as the default settings for all applications Making default printer settings Printing Reference Limitation Changing the settin...

Page 153: ...plications the printer driver s settings are not used and the ap plication s own default settings are applied Any settings you make in the following procedure are valid for the current application onl...

Page 154: ...dicating that the print job is being cancelled Important The procedure above cancels the print job that is currently being processed by the printer In some cases the printer may already be processing...

Page 155: ...16 EE GB G054 8630...

Reviews: