


Wi-Fi Settings Guide 2/2
Confi guring Settings Using the Con-
trol Panel
You need to select the same authentication
method and encryption method that the
access point (router) is using. You can check
them on the settings screen of the access
point (router).
Make sure the Ethernet cable is not
connected to the machine.
Check that the wireless LAN
access point (router) is working
correctly.
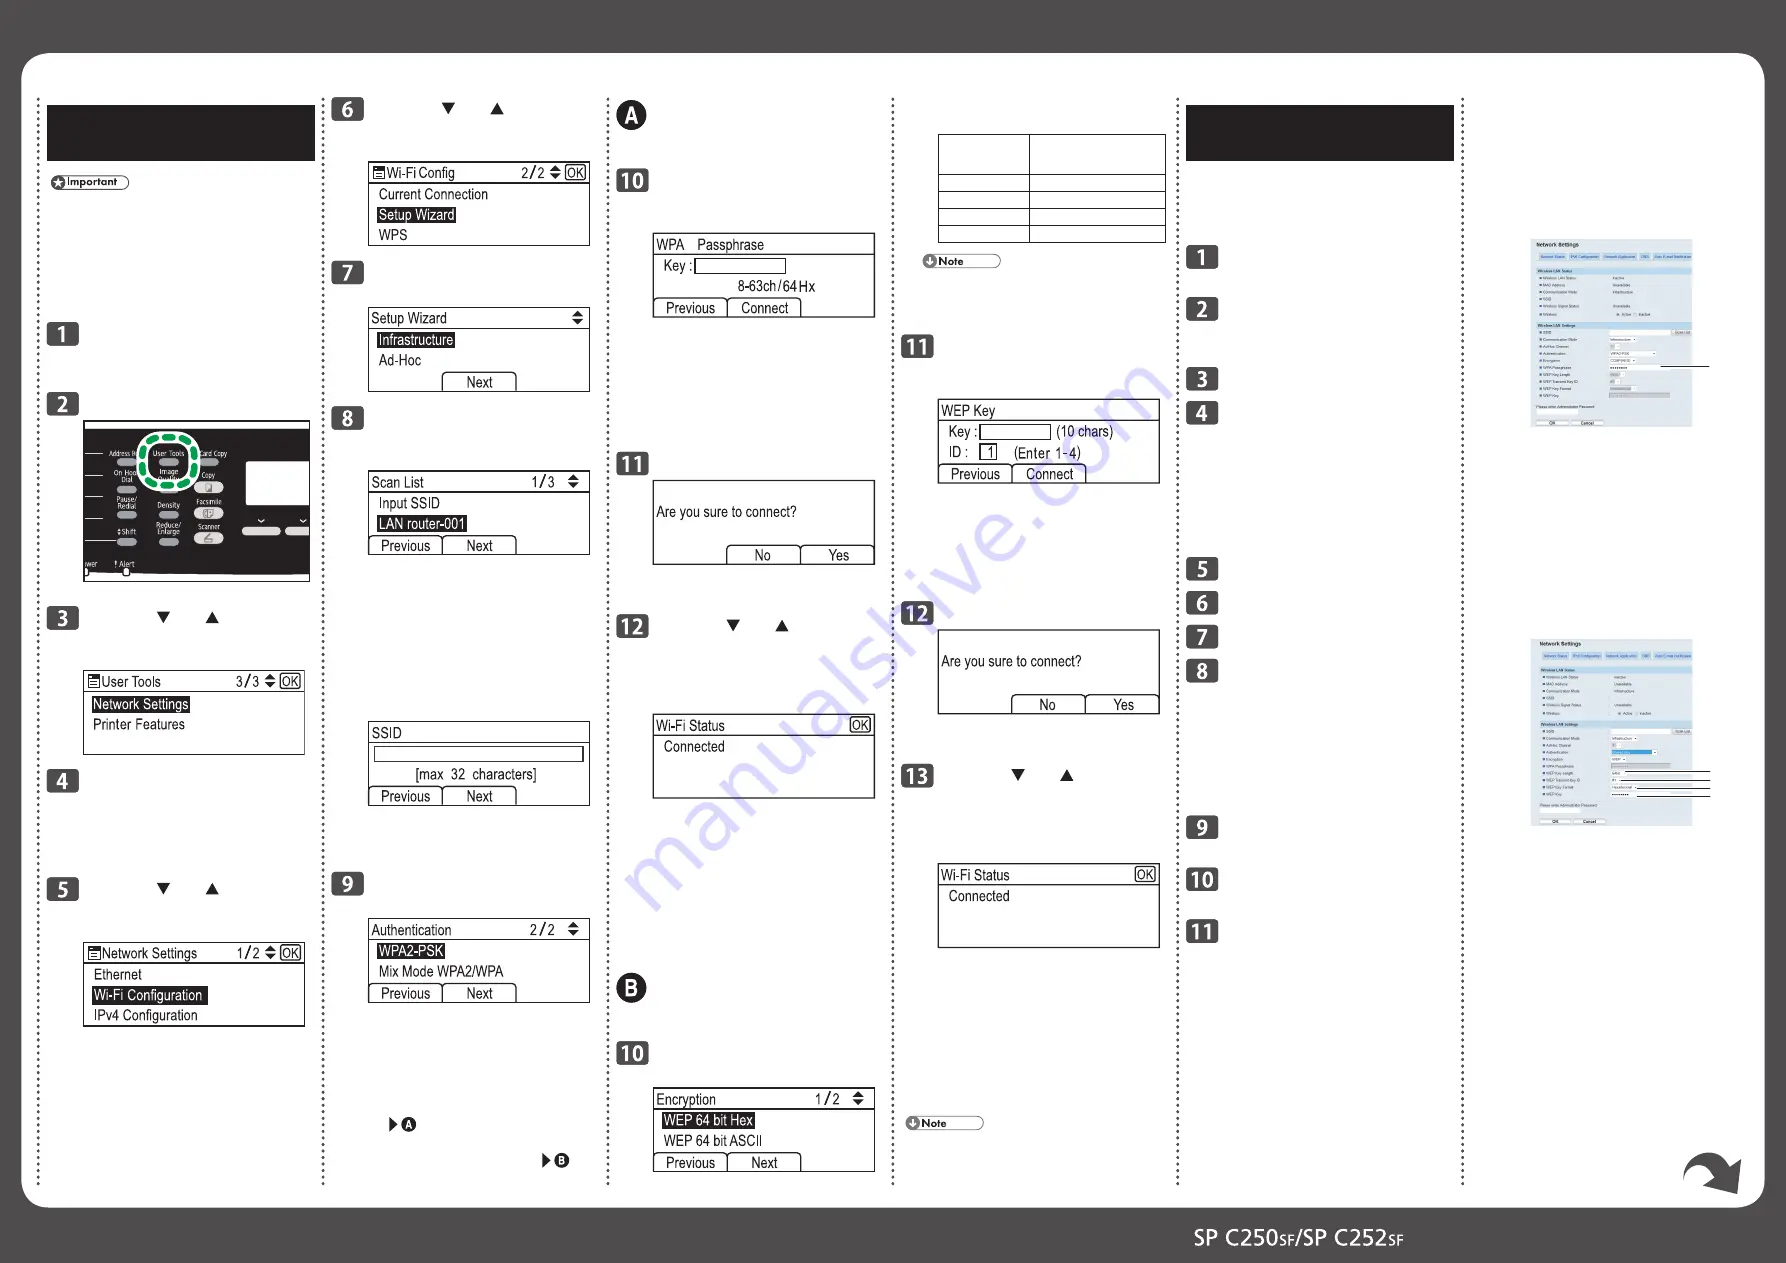
Press the [User Tools] key.
DAC509
Press the [ ] or [ ] key to
select [Network Settings], and
then press the [OK] key.
If you are requested to enter a
password, enter the password
using the number keys, and then
press the [OK] key.
Press the [ ] or [ ] key to
select [Wi-Fi Con
fi
guration],
and then press the [OK] key.
•
•
Press the [ ] or [ ] key to
select [Setup Wizard], and then
press the [OK] key.
.
Select [Infrastructure], and
then press [Next].
Search the SSID to display the
list, select the destination SSID,
and then press [Next].
If you cannot
fi
nd the destination SSID,
con
fi
gure the SSID according to the
following procedure.
1. When entering the SSID, select [Input
SSID], and then press [Next].
2. Enter the SSID using the number keys,
and then press [Next].
The characters that can be used are
ASCII 0x20-0x7e (32 bytes).
For details about checking the SSID, see
"Checking the SSID and Encryption
key".
Select the authentication
method, and then press [Next].
The next steps differ depending on the
authentication method that you have selected.
Proceed to Step 10 of the appropriate section.
If the authentication method is set to
[WPA2-PSK] or [Mix Mode WPA2/
WPA]
If the authentication method is set to
[Open System] or [Shared Key]
•
•
Connecting to devices using the
WPA2-PSK or Mix Mode WPA2/
WPA authentication
Enter the encryption key using
the number keys, and then press
[Connect].
2
As the passphrase, you can enter either
8 to 63 ASCII characters (0x20-0x7e)
or 64 hexadecimal digits (0-9, A-F,
a-f).
For details about checking the
encryption key, see "Checking the
SSID and Encryption key".
Press [Yes].
After connecting to the network, the
Wi-Fi screen is displayed.
Press the [ ] or [ ] key to
select [Wi-Fi Status], and then
press the [OK] key.
When "Connected" is displayed, the
connection has been established.
When "Connecting..." is displayed, the
connection is being established.
When "Disconnected" is displayed, the
connection has not been established.
Start again from the beginning.
The next step is to install the driver from
the CD-ROM provided.
For details, see Driver Installation Guide
on the CD-ROM provided.
Connecting to the devices using
the Open System or Shared Key
authentication
Select the encryption method,
and then press [Next].
•
•
•
•
For the encryption method, refer to the
following:
Encryption
Method
Encryption key
(Maximum number and type of
characters that can be entered)
WEP 64 bit ASCII 5 characters (0x20-0x7e)
WEP 64 bit Hex
10 characters (0-9, A-F, a-f)
WEP 128 bit ASCII 13 characters (0x20-0x7e)
WEP 128 bit Hex 26 characters (0-9, A-F, a-f)
Do not select [None] except in special
cirmunstances. If selected, the security
system will not work.
Enter the encryption key and
ID using the number keys, and
then press [Connect].
For details about checking the encryption
key, see "Checking the SSID and
Encryption key".
The ID is used for identifying the
encryption key. You can register four
encryption keys (ID 1 to 4).
Press [Yes].
After connecting to the network, the
Wi-Fi screen is displayed.
Press the [ ] or [ ] key to
select [Wi-Fi Status], and then
press the [OK] key.
When "Connected" is displayed, the
connection has been established.
When "Connecting..." is displayed, the
connection is being established.
When "Disconnected" is displayed, the
connection has not been established.
Start again from the beginning.
The next step is to install the driver from
the CD-ROM provided.
For details, see Driver Installation Guide
on the CD-ROM provided.
A password for accessing the [Admin. Tools]
menu can be speci
fi
ed in [Admin. Tools
Lock].
•
•
•
•
If the encryption method is set to
[None]
If you have selected [None], proceed to
Step 12.
If the encryption method is set to
[CCMP (AES)] or [TKIP/AES]
1
DAC534
1. WPA Passphrase
Enter the password for the access
point (router).
As the passphrase, you can enter either
8 to 63 ASCII characters (0x20-0x7e)
or 64 hexadecimal digits (0-9, A-F,
a-f).
If the encryption method is set to
[WEP]
1
2
3
4
DAC535
1. WEP Key Length
Select 64 bit or 128 bit.
2. WEP Transmit Key ID
Enter the ID.
3. WEP Key Format
Select ASCII or Hexadecimal.
4. WEP Key
Enter the password for the access
point (router).
❖
❖
❖
Confi guring Settings Using
Web Image Monitor
When con
fi
guring the settings manually, you
can also use Web Image Monitor. It is
convenient for entering characters that are
dif
fi
cult to enter using the control panel.
Connect the Ethernet cable to
the Ethernet port.
Plug the other end of the cable
into a network device, such as a
hub.
Launch the Web browser.
In the Web browser's address
bar, enter "http://(machine’s IP
address)/" to access the
machine.
If a DNS or WINS server is used and the
machine’s host name has been speci
fi
ed,
you can enter the host name instead of
the IP address.
Click [Network Settings].
Select [Wireless] tab.
Set [Wireless] to [Active].
Click [Scan List] to display the
list, select the destination SSID,
and then click [OK].
If you cannot
fi
nd the destination SSID,
con
fi
gure the SSID according to the
following procedure.
1. In [SSID], enter the SSID for the
access point (router).
Set [Communication Mode] to
[Infrastructure].
In [Authentication], select the
authentication method.
In [Encryption], select the
encryption option.
If the authentication method is set to
[Open System], set the encryption
option to [None] or [WEP].
If the authentication method is set to
[Shared Key], set the encryption option
to [WEP].
If the authentication method is set to
[WPA2-PSK], set the encryption
option to [CCMP (AES)].
If the authentication method is set to
[Mixed Mode WPA/WPA2], set the
encryption option to [TKIP/AES].
•
•
•
•


