background image

24

English

Introduction

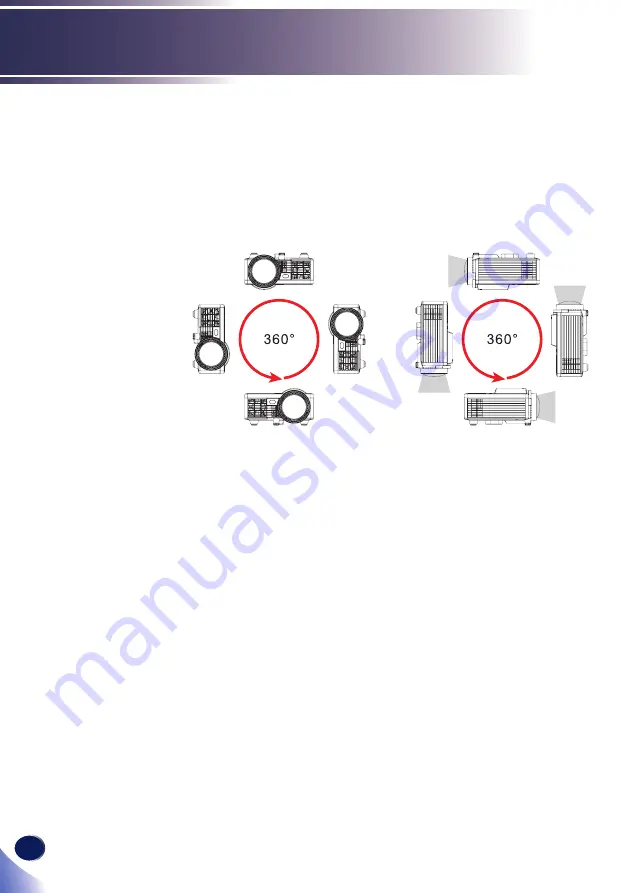
360° Installation

This projector supports 360° free orientation operation.


The projector must be installed in a location that is sturdy 

enough to support the full weight of the projector and 

brackets. (PJ WXC1210 Series weighs approximately 0.5kg).


Ensure that the projector is tightly secured to the brackets.

Summary of Contents for PJ WXC1210

Page 1: ...perations User Settings Multi Media Operation Troubleshooting Appendices Read this manual carefully before you use this machine and keep it handy for future reference For safe and correct use be sure...

Page 2: ......

Page 3: ...25 Connect to Video 26 Powering On Off the Projector 27 Powering On the Projector 27 Powering Off the Projector 28 Warning Indicator 29 Adjusting the Projected Image 30 Adjusting the Height of Project...

Page 4: ...e to this machine Fire or electric shock could result from spillage or if such objects or substances fall inside this machine Warning Keep the machine and attachments out of the reach of children If t...

Page 5: ...ld result in fire or electric shock Warning Be sure to disconnect the power cord from the wall outlet at least once a year and check for the following The power cord s inner wires are exposed broken e...

Page 6: ...y result in an electrical shock or damage to the unit Warning If the machine topples or if a cover or other part gets broken you must turn off its power immediately After turning off the power be sure...

Page 7: ...t are strong enough to support the projector PJ WXC1210 Series weighs less than 0 5kg The projector must be installed in a location that is sturdy enough to support the full weight of the projector an...

Page 8: ...could result in fire or electric shock Caution Do not put your face or hand near the exhaust vents Doing so could result in burns or an accident due to hot air coming from the exhaust vents Caution D...

Page 9: ...r cords could result in fire or electric shock Caution Be sure to disconnect the plug from the wall outlet and clean the prongs and the area around the prongs at least once a year Allowing dust to bui...

Page 10: ...into the product c The product has been exposed to rain or water d The product does not operate normally when following the operating instructions Adjust only those controls that are covered by the o...

Page 11: ...te medical attention Notes Be sure to use AAA R03 size batteries Dispose of batteries in a designated disposal area Attention should be drawn to the environmental aspects of battery disposal If the re...

Page 12: ...o the lens while the LED lamp is on The strong light from the LED lamp may cause damage to your eyesight If you wish to discard this product please contact your local authorities the shop where you bo...

Page 13: ...otice Users in EU countries CE Marking Traceability Information For EU Countries Only Manufacturer Ricoh Co Ltd 3 6 Nakamagome 1 chome Ohta ku Tokyo 143 8555 Japan Importer RICOH Europe SCM B V Blanke...

Page 14: ...ailable By following these instructions you ensure that this product is treated correctly and help to reduce potential impacts on the environment and human health which could otherwise result from ina...

Page 15: ...d on batteries and accumulators This symbol means that in the European Union used batteries and accumulators should be disposed of separately from your household waste In the EU there are separate col...

Page 16: ...en viewing images using 3D glasses with projector How 3D images are viewed may vary according to the individual Do not use 3D glasses for viewing any material other than 3D images Before viewing 3D im...

Page 17: ...tible LED light source 20000H life Multi Auto functions Auto detection Auto image and Auto saving the adjustments Full function remote control User friendly multilingual on screen display Advanced dig...

Page 18: ...re your unit is complete Contact your dealer immediately if anything is missing HDMI cable Documentation Read This First Warranty Card Power cord Enter AV Mute Focus Keystone Volume Auto Menu Input EC...

Page 19: ...roduction Product Overview 1 Control panel 2 Lens 3 Laser sensor for detecting auto focus 4 Lens cap 5 Adjustable feet 6 Ventilation inlet 7 Connection ports 8 Ventilation outlet 9 Infrared remote sen...

Page 20: ...18 English Introduction Connection Ports 1 Anti theft lock hole 2 Type C terminal for AC adapter 3 Type C terminal 4 Type A terminal 5 MicroSD card slot 6 HDMI terminal 1 2 4 5 6 3...

Page 21: ...Indicate the projector s LED status 3 Temp Indicator Indicate the projector s temperature status 4 Menu Press the Menu button to launch the Onscreen display OSD 5 Four Directional Select Keys Use or...

Page 22: ...ute Mutes unmutes audio and or video depending on the chosen mute option in the OSD menu Menu Setup Advanced Mute 2 Auto Automatically synchronizes the projector to the input source 3 Uses to operate...

Page 23: ...rd 12 Move Enters Moving mode 13 Power Turns the projector on off 14 Input Selects input sources 15 Enter Confirms your section of items in menu system 16 ECO Dims the projector LED light source which...

Page 24: ...llowing precautions Use AAA R03 type battery Avoid contact with water or liquid Do not expose the remote control to moisture or heat Do not drop the remote control If the battery has leaked in the rem...

Page 25: ...n the remote control and the remote control signal receiver the remote control may not operate correctly When the remote control signal receiver is lit with a fluorescent light or other strong light s...

Page 26: ...s 360 free orientation operation The projector must be installed in a location that is sturdy enough to support the full weight of the projector and brackets PJ WXC1210 Series weighs approximately 0 5...

Page 27: ...B Flash Disk not supplied 5 MicroSD Card not supplied 6 Power Cord Connect to Computer Make sure that the power plug is fully inserted into all the AC adapter AC inlet the wall outlet and projector Ty...

Page 28: ...lied 4 MicroSD Card not supplied 5 Power Cord Make sure that the power plug is fully inserted into all the AC adapter AC inlet the wall outlet and projector DC jack Type C port supports 5V 1 5A output...

Page 29: ...power is turned on If it is out of focus please refer to page 31 for manual focus Powering On Off the Projector CAUTION Do not look into the lens while the projector is on The strong light from the pr...

Page 30: ...gain 2 Press the power key again to confirm 3 After 3 5 seconds the Power indicator will light amber and the projector has entered standby mode If you wish to turn the projector back on you must wait...

Page 31: ...r temperature Please contact a service center for repair When the Temp indicator flashes red 2 secs on 0 5 sec off and the message below displays on screen it indicates one of the fans has failed The...

Page 32: ...mage The projector is equipped with adjustable feet to raise and lower the image to fill the screen To raise lower the image 1 Use to fine tune the display angle You can raise the projector front up t...

Page 33: ...ting the Projector Focus To focus the image adjust Manual Focus in OSD Display menu Refer to page 41 Warning Avoid damaging the projector DO NOT rotate the focus ring by hands The projector will focus...

Page 34: ...08 0 67 42 40 26 50 0 86 2 83 60 1 29 0 81 50 88 31 80 1 03 3 39 65 1 40 0 88 55 12 34 45 1 12 3 67 70 1 51 0 94 59 36 37 10 1 21 3 96 80 1 72 1 08 67 84 42 40 1 38 4 52 90 1 94 1 21 76 32 47 70 1 55...

Page 35: ...ss the or buttons on the Control Panel or Remote Control 3 To adjust settings press the or buttons on the Control Panel or Remote Control 4 To exit the OSD press the Menu button on the Control Panel o...

Page 36: ...HDMI HDMI Media Type C Volume 0 10 5 Picture Mode Bright Depends on Default Setting of Color Table PC sRGB Wide Eco Brightness 0 10 5 Contrast 0 10 5 Image Format Auto Auto 4 3 16 9 16 10 Zoom 50 75...

Page 37: ...0 0 Projection Auto keystone on No reverse Left Right reverse Auto keystone off No reverse Left right reverse Up down reverse Up down and Left Right reverse Auto Focus On On Off Manual Focus 1 Based o...

Page 38: ...Polish Dutch Russian Swedish Janpanese Korean Turkish Boot up Source Auto Auto HDMI Media Type C Direct Power On On Off Off Sleep Timer Auto Auto Off 0 30 1 00 3 00 8 00 12 00 Advanced Mute Audio Vide...

Page 39: ...Set Media as input source Media Searching Media Type C Set USB Type C as input source Type C Searching Type C Volume Adjust the volume Press the to turn up the volume up to 10 Press the to turn down t...

Page 40: ...rightness Adjust the brightness of the image Press the to increase the brightness of the screen up to 10 Press the to reduce the brightness of the screen minimum value 0 Contrast Adjust the contrast P...

Page 41: ...English 39 English User Settings Image Go to Image sub menu Display Go to Display sub menu Setup Go to Setup sub menu...

Page 42: ...n laptop Zoom Adjust the magnification of the image Magnification can be set 50 75 100 125 150 175 or 200 To move around the zoomed area press Move and then any of the direction keys or Color Temperat...

Page 43: ...erse Auto Keystone Off No reverse Left Right reverse Up Down reverse Left Right and Up Down reverse Auto Focus On Perform automatic focus adjustment Off Automatic focus adjustment is off Manual Focus...

Page 44: ...countdown timer interval between 0 30 1 00 3 00 8 00 12 00 Auto or Off The countdown timer will start with or without a signal being sent to the projector The projector will automatically power off w...

Page 45: ...Enter a password 6 Digits Exit Reset Return all data to the factory defaults After choosing this option a confirmation message appears on the screen Select Yes to confirm or No to cancel reset Reset...

Page 46: ...switch between the left and right of an image to display Change the setting if the 3D images you see appear not as expected On Select when left and right 3D images are swapped to be displayed Off If...

Page 47: ...gits Use 4 directional keys to enter new password Enter the new password 6 Digits Change Password Exit Confirm New Password 6 digits Enter the same password that you entered Change Password Enter the...

Page 48: ...46 English User Settings If the confirmed Password doesn not match with the entered Password Input the new Password again By entering Menu key you can cancel the Change Password menu...

Page 49: ...l YUV422 YUV440 YUV444 Progressive YUV420 1600 x 1200 1 929 000 YUV422 YUV440 YUV444 BMP Video Format File Format Video Codec Decode Max Resolution Max Bit Rate bps Audio Codec Profile MPG MPEG MPEG1...

Page 50: ...age Lines Limitation Size Limitation Adobe PDF PDF 1 0 1 1 1 2 1 3 1 4 Up to 360 pages One File Up to 32MB Microsoft Word British Word 95 Because office viewer does not load all pages of MS Word file...

Page 51: ...open set the input source to Media Please see page 37 3 Media Menu The Media menu opens USB SD Card How to use Multi Media projection with USB and SD Card A USB flash disk must be plugged into the pro...

Page 52: ...enu Select the multimedia file s in one of the following folders Music Photo Video or Office To return to the previous page press the Up key on the Remote Control or key on the Control Panel Music Set...

Page 53: ...ed the image data and folder with image format data will be displayed Select the folder you want to display by using the four directional keys and then press Enter If you press it returns to the upper...

Page 54: ...Control or key on the Control Panel If you want to display the Control Command bar press Enter key Control the Slideshow by using the Control Command bar icons You can choose the icon by using keys on...

Page 55: ...s image by using keys on the Control Panel or keys on the Remote Control 5 2 Video After Video tab is selected the video filename and folder with video data will be displayed Select the Video data or...

Page 56: ...trol Panel If you want to display the Control Command bar press Enter key Control the video playback by using the Control Command bar icons You can choose the icon by using keys on the Control Panel o...

Page 57: ...lowing buttons on the Remote Control Pauses Plays the video Rewinds the playback rewind speed changes in 3 steps Forwards the playback forward speed changes in 3 steps 5 3 Music After Music tab is sel...

Page 58: ...displayed at bottom of the screen Icon are permanently visible as long as the music playback window is opened Control the music playback by using the Control Command bar icons You can choose the icon...

Page 59: ...ing buttons on the Remote Control Pauses Plays the music file Rewinds the playback Forwards the playback 5 4 Office Viewer As the projector is using the simplified Office Viewer some files that appear...

Page 60: ...ed to view Microsoft Office documents and adobe PDF files is compatible application not native Depending on the document unexpected issues may occur during projection such as missing or garbled charac...

Page 61: ...mand bar will also disappear if you press the Up key on the Remote Control or key on the Control Panel If you want to display the Control Command bar press Enter key Control dislaying the Office file...

Page 62: ...f the file content to displayed as Fit to Width or Fit to Height Closes the content and goes to the file list In Move mode the display area can only be moved within the same page If you want to change...

Page 63: ...evious page Goes to the next page Enter Enter Displays Control Panel Magnify Magnifies Enlarges Reduces the image Move Switches to the Move mode In Move mode Moves the displayed area to 4 directions E...

Page 64: ...ay differ from the original content We strongly recommend you to preview the displayed file s before performing the presentation To ensure the correct displaying of the PDF file you need to use the em...

Page 65: ...n of the computer 2 Press the toggle output settings For example in Windows system press Windows key P If you experience difficulty changing resolutions or your monitor freezes restart all equipment i...

Page 66: ...Change Aspect by pressing the Aspect button on the remote control or Menu button on the control panel and change the image aspect in Menu Image Format Problem Image is too small or too large Move the...

Page 67: ...WER indicator TEMP indicator LED indicator Blue Amber Amber Amber Standby Input power cord Flashing Amber Normal Power on Blue Error Over temp Flashing Amber On 3 sec Off 1 sec Error Fan failed Flashi...

Page 68: ...the ambient temperature is within operational range Warning The projector will switch off automatically Over temperature Please contact a service center for repair Fan failed one of the system fans is...

Page 69: ...832 x 624 75 49 1 XGA 1024 x 768 60 48 4 1024 x 768 70 56 5 1024 x 768 75 60 1024 x 768 85 68 7 1024 x 768 120 99 PC Signal MAC 1152 x 864 75 67 5 SXGA 1280 x 768 60 47 8 1280 x 768 75 60 3 1280 x 102...

Page 70: ...WXGA 1680 x 1050 60 65 3 Component Signal 480i 1440 x 480 59 94 15 7 576i 1440 x 576 50 15 6 480p 640 x 480 59 94 31 5 720 x 480 59 94 31 5 576p 720 x 576 50 31 3 720p 1280 x 720 60 45 1280 x 720 50...

Page 71: ...ector Adapter power in USB Type C connector Power out 5V 1 5A max 1 Digital Video Audio In Displayport ALT mode HDCP1 3 USB Type A connector Power out 5V 0 5A max Up to 64GB FAT32 or NTFS format Suppo...

Page 72: ...bber tabs from both rear feet and then remove the tilt adjustment foot in the front Refer to the image below for the location of the screw holes Cabinet Dimensions Unit mm Holes for ceiling mount Scre...

Page 73: ...PDF Adobe Reader Adobe Acrobat are either a registered trademark or trademark of Adobe Systems Incorporated HDMI the HDMI Logo and High Definition Multimedia Interface are trademarks or registered tra...

Page 74: ......

Page 75: ...Y0F6 6221 AU EN GB EN...

Reviews: