background image

28

English

User Controls

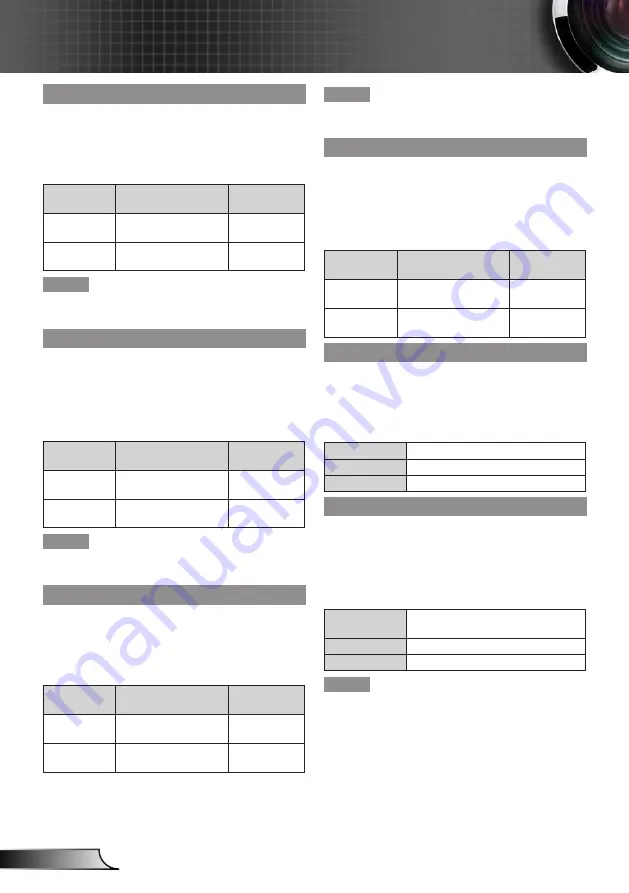
Sharpness

Adjust the sharpness of the projected image.

Press ▲▼ to select [Sharpness].

1) 

Press ►, <

2) 

确认

> to display the adjustment 

dialog box.

Press ◄► to adjust the setting value.

3) 

Operation

Adjustment

Adjustment 

range

Press ►.

Contours become 

sharper.

Maximum-

value 31

Press ◄.

Contours become 

softer.

Minimum 

value 0

Note

[Sharpness] can be adjusted only when Video is 


y

selected.

Saturation

Adjust a video image from black and white to saturated 

color.

Press ▲▼ to select [Saturation].

1) 

Press ►, <

2) 

确认

> to display the adjustment 

dialog box.

Press ◄► to adjust the setting value.

3) 

Operation

Adjustment

Adjustment 

range

Press ►.

Increase the intensity 

of the color.

Maximum-

value 100

Press ◄.

Decrease the intensity 

of the color.

Minimum 

value 0

Note

[Saturation] can be adjusted only when Video is 


y

selected.

Hue

Adjust the skin tone.

Press ▲▼ to select [Hue].

1) 

Press ►, <

2) 

确认

> to display the adjustment 

dialog box.

Press ◄► to adjust the setting value.

3) 

Operation

Adjustment

Adjustment 

range

Press ►.

Adjust the color to be 

greenish.

Maximum-

value 100

Press ◄.

Adjust the color to be 

reddish.

Minimum 

value 0

Note

[Hue] can be adjusted only when video is selected 


y

and the color mode is NTSC or NTSC 4.43.

Gamma

Adjust the gamma table when the dark areas or bright 

areas of the image is not clear.

Press ▲▼ to select [Gamma].

1) 

Press ►, <

2) 

确认

> to display the adjustment 

dialog box.

Press ◄► to adjust the setting value.

3) 

Operation

Adjustment

Adjustment 

range

Press ►.

Emphasize detail in 

dark areas of image.

Maximum-

value +3

Press ◄.

Emphasize detail in 

bright areas of image.

Minimum 

value 0

Color Temp

Select the color temperature.

Press ▲▼ to select [Color Temp].

1) 

Press ►, <

2) 

确认

> to display the choosing 

dialog box.

Press ◄► to select the desired item.

3) 

Low

The screen looks warmer.

Mid

The medium color temperature.

High

The screen looks colder.

Color Space

Select an appropriate color matrix type from Auto, RGB 

or YUV.

Press ▲▼ to select [Color Space].

1) 

Press ►, <

2) 

确认

> to display the choosing 

dialog box.

Press ◄► to select the desired item.

3) 

Auto

Switched automatically according 

tothe input signal.

RGB

For computer input.

YUV

For component input.

Note

[Color Space] will be in gray and can not be operated 


y

when Video is selected.

Summary of Contents for PJ U3000

Page 1: ...e you use this machine and keep it handy for future reference For safe and correct use be sure to read the Precautions in this manual before using the machine Appendices User Controls Installation Int...

Page 2: ......

Page 3: ...usting the Projected Image 22 Adjusting the Projector s Height 22 Adjusting the Projector s Focus 23 Adjusting Projection Image Size 23 On screen Display Menus 24 User Controls 24 Menu Tree 25 Picture...

Page 4: ...the lamp module has been replaced To replace the lamp follow the procedures listed under Replacing the Lamp Warning Do not remove the cabinet cover or you may be exposed to dangerous voltage Refer ser...

Page 5: ...ncrease in temperature during normal use and may damage the other unit Caution Do not use attachments not recommended by RICOH Use of an incompatible attachments could cause hazards or damage to the p...

Page 6: ...rized substitutions may result in fire electric shock or other hazards Only the replacement of the lamp should be made by users Caution Upon completion of any service or repairs to this product ask th...

Page 7: ...resentative if you want to install a machine on a wall or ceiling Safety Precautions to Be Followed Do not obstruct the machine s vents Doing so risks fire caused by over y y heated internal component...

Page 8: ...o not Block the slots and openings on the unit provided for ventila tion Use abrasive cleaners waxes or solvents to clean the unit Use under the following conditions Extremely heat cold or humidity In...

Page 9: ...n The strong light from the lamp may cause damage to your eyesight 3 Do not place anything in front of the lens while the projec tor is operating Things placed in front of the lens may overheat and bu...

Page 10: ...8 English Usage Notice If you wish to discard this product please contact your local authorities the shop where you bought this product your local dealer or sales service representatives...

Page 11: ...just 2 hours and can lead to death Keep new and used batteries away from children If the battery compartment does not close securely stop using the product and keep it away from children If you think...

Page 12: ...hen viewing images using 3D glasses with projector How 3D images are viewed may vary according to the indi vidual Do not use 3D glasses for viewing any material other than 3D images Before viewing 3D...

Page 13: ...ative resolution HD compatible 720p and 1080p supported VGA monitor loop through works in standby mode 0 5W BrilliantColorTM Technology Security Bar and antitheft lock hole RS232 control Built in mono...

Page 14: ...Card Power Cord Remote Control CR2025 Battery is contained CD ROM Package Overview Unpack and inspect the box contents to ensure all parts listed below are in the box If something is missing please co...

Page 15: ...view Main Unit Focus Ring 1 Lens 2 IR Receiver 3 Control Panel 4 Lamp Cover 5 Input Output Connection Ports 6 Power Socket 7 Elevator Feet 8 Elevator Feet 9 Elevator Feet Spacer 10 3 4 8 6 1 3 2 Front...

Page 16: ...Turns the main menu on off or returns to upper level in the menu operations button Automatically synchronize the PC analog timing to its optimized condition button Select an input signal buttons Use t...

Page 17: ...ctor For S Video 7 Audio Out Connector 8 PC Control Connector 9 Computer 1 In Connector 10 Computer 2 In Connector 11 Audio 2 In Connector For Computer 2 In 12 Video Input Connector 13 Audio In Connec...

Page 18: ...be adjusted by pressing and buttons when menu is not displayed 10 button Automatically synchronize the projector to the input source 11 button Confirm your section of items in menu system 12 buttons A...

Page 19: ...lable for four directions up down left right to the projector is 35 and the operation distance may become short If there are any obstacles between the remote control and the remote control signal rece...

Page 20: ...y have different acces sories Optional accessory 1 Power Cord 2 Audio Cable 3 RGB Cable 4 Serial Cable 5 HDMI Cable Connect to Computer Notebook Mic Computer 2 In Audio 2 In Audio 1 In HDMI In Service...

Page 21: ...1 Power Cord 2 S Video Cable 3 Audio Cable 4 D sub 15 to RCA Cable 5 HDMI Cable 6 Video Cable 7 Microphone LAN Computer 2 In Audio 2 In Audio 1 In HDMI In Service PC Control Computer 1 In Monitor Out...

Page 22: ...pressing 2 button on the control panel or on the remote control The Power LED will turn green Turn on your source that you want to display on the screen 3 computer notebook video player etc The proje...

Page 23: ...the button again to confirm Power Off Press power key again 2 The indicator will turn red and blink rapidly after the projector is turned off And the fans will continue to oper ate for about 60 secon...

Page 24: ...feet for adjusting the image height 1 To raise the image Use screw in feet to raise the image to the desired height angle and fine tune the display angle 2 To lower the image Use screw in feet to low...

Page 25: ...l image position y y Projection distance A Projection distance B Offset HD Screen Lens Center Screen Size 4 3 Projection Distance A Projection Distance B Offset Hd Diagonal inch mm Inch mm Inch mm mm...

Page 26: ...5 Press to display adjusting box 6 Use to switch or adjust desired item by pressing keys 7 Press button to go back to the Sub Menu and press again to go back to the Main Menu press button once more to...

Page 27: ...4 VGA Out Standby Off On LAN Standby Off On Test Pattern Off On Setup Logo Off On Reset No Yes Mute Off On Microphone Volume 0 32 Volume 0 32 Auto Source Off On Input HDMI Computer 1 Computer 2 S Vide...

Page 28: ...Settings 3D 3D Auto Off On 3D Invert Off On 3D Format Frame Packing Side by Side Half Top and Bottom Frame Sequential Field Sequential 1080p 24 96Hz 144Hz DHCP Off On IP Address Subnet Mask Gateway DN...

Page 29: ...this function Wall color Select an appropriate color for wall projection Press to select Wall color 1 Press 2 to display the choosing dialog box Press to select the desired item 3 White For White colo...

Page 30: ...t the color to be greenish Maximum value 100 Press Adjust the color to be reddish Minimum value 0 Note Hue can be adjusted only when video is selected y y and the color mode is NTSC or NTSC 4 43 Gamma...

Page 31: ...the aspect ratio or using the zoom function to change the screen pictures may be an infringement of the rights of the original copyright owner for that program under copy right protection laws Take ca...

Page 32: ...the on the remote control or the on the control panel to adjust the upper of the keystone Press the on the remote control or the on the control panel to adjust the bottom of the keystone Note The adju...

Page 33: ...ays the CC4 data Note The closed caption is mainly used in the north Ameri y y ca This function shows the text information contained in the image signal Captions may not be displayed with signals from...

Page 34: ...attern Off Disable the function Startup Logo Set this function to display the RICOH logo when the projector is turning on Press to select Startup Logo 1 Press 2 to display the setting dialog box Press...

Page 35: ...ress 2 to display the adjustment dialog box Press to adjust the volume 3 Operation Adjustment Adjustment range Press Turn up the volume Maximum value 32 Press Turn down the volume Minimum value 0 You...

Page 36: ...ss The input with a check mark will be able to be y y searched when Auto Source is set to On To remove the check mark choose the desired y y item and press Auto Power Off Min Set the time to automatic...

Page 37: ...High Altitude Set to On when the projector is used at elevation between approx 762 m 2500 ft and approx 3 000 m 10 000 ft Press to select High Altitude 1 Press 2 to display the adjustment dialog box P...

Page 38: ...lays the input signal source and setting state infor mation of the projector Press to select Information 1 Press 2 to display the information dialog box Displays Model Name Source Resolution y y Softw...

Page 39: ...2 to display the setting dialog box Press to switch On Off 3 On Select when left and right 3D im ages are swapped to be displayed Off If the 3D images are displayed correctly do not change the Off se...

Page 40: ...onnected to LAN Subnet Mask Select Subnet Mask of projector for LAN connection Gateway Select Gateway of projector for LAN connection DNS Select DNS of projector for LAN connection Press to select IP...

Page 41: ...s from the OSD 222 LAN Based on network web page for the input string in tools tab 333 the limitation for Input Length is in the below list space and the other punctuation key included Category Item I...

Page 42: ...the language for web management LAN Settings Page Set up the Projector Name Location and Administrator information up to 21 characters for each field Press Save to store the settings Choose DHCP to as...

Page 43: ...rojection modes Front Front Ceiling Rear and Rear Ceiling See Ceiling Mount function Input The Source Select menu allows you to select your projector s input source You can select Computer1 Computer2...

Page 44: ...to receive notification when an abnormality or warning occurs Out going SMTP server User name and Password should be provided by your network administrator or MIS Alert Condition You can select the a...

Page 45: ...Click Enable then Submit Login page of Web Management Contact Service Center if you forget your administrator password Login Page Welcome to Web Management Projector Name IP Address Administrator Pass...

Page 46: ...than or equal to 1600 x 1200 resolution See your operating system s Help file If you are using a Notebook y y First follow the steps above to adjust resolution of the computer Press the toggle output...

Page 47: ...ce Refer to Page 23 The image is stretched when displaying 16 9 DVD title Change the aspect ratio by pressing the button on the remote control or select Position Aspect Ratio from the OSD menu to show...

Page 48: ...th horizontally and vertically of one of the IR receivers on the projector Make sure there are not any obstructions between the remote control and the projector Move to within 8 m 0 of the projector M...

Page 49: ...t is only supported on 3D Timing on page 54 LED Indicator Messages Message LED LED LED Red Green Red Red Standby Red Standby Choose On to VGA OUT Standby or LAN Standby Flashing Red 3 sec Power on Gre...

Page 50: ...y again Fan lock error The proejctor will switch off automatically Warning FAN LOCKED No source found Out of display range Over temperature Warning TEMPERATURE TOO HIGH Please 1 Make sure air in and o...

Page 51: ...ing the button 2 Allow the projector to cool down for at least 60 minutes 3 Disconnect the power cord 4 Unscrew the two screws on the cover 1 5 Lift up and remove the cover 2 6 Unscrew the two screws...

Page 52: ...cleaning procedure Dust Filter Cleaning Procedure 1 Switch off the projector power by pressing the button 2 Disconnect the power cord 3 Pull the latch by the arrow direction 1 4 Remove the dust filte...

Page 53: ...0 75 37 5 640x480 85 43 3 640x480 120 61 9 IBM 720x400 70 31 5 SVGA 800x600 56 35 1 800x600 60 37 9 800x600 72 48 1 800x600 75 46 9 800x600 85 53 7 800x600 120 77 4 Apple MAC II 832x624 75 49 1 XGA 10...

Page 54: ...60 44 8 1280x800 60 49 6 1366x768 60 47 7 1440x900 60 59 9 WSXGA 1680x1050 60 65 3 Component signal Modes Resolution V Frequency Hz H Frequency Hz 480i 720x480 1440x480 59 94 29 97 15 7 576i 720x576 1...

Page 55: ...0 70 31 5 SVGA 800x600 56 35 1 800x600 60 37 9 800x600 72 48 1 800x600 75 46 9 800x600 85 53 7 800x600 120 77 4 Apple MAC II 832x624 75 49 1 XGA 1024x768 60 48 4 1024x768 70 56 5 1024x768 75 60 0 1024...

Page 56: ...x576 1440x576 50 25 15 6 480p 720x480 59 94 31 5 576p 720x576 50 31 3 720p 1280x720 60 45 0 720p 1280x720 50 37 5 1080i 1920x1080 60 30 33 8 1080i 1920x1080 50 25 28 1 1080p 1920x1080 23 98 24 27 0 10...

Page 57: ...B Cb Input B Output 11 NC 4 NC 12 DDC Data NC 5 Ground Horiz sync 13 Horiz sync Input Output Composite H V sync Input 6 Ground Red 7 Ground Green 14 Vert sync Input Output 8 Ground Blue 15 DDC CLK NC...

Page 58: ...y lamp 280W Lamp Life 3000hours typical Full Mode 4000 hours typical ECO Mode Projection screen size 60 100 inch Projection distance 520 mm 890 mm 10mm Speaker 10W Mono Connection terminal Computer In...

Page 59: ...57 English Appendices Cabinet Dimensions Unit mm Screw type M4 x 4 Maximum screw length 11mm 357 00 367 00 240 95 230 90 82 50 134 40 112 50 38 80 74 80 136 03 151 02 25 50 85 50 163 00...

Page 60: ...ies Microsoft Windows Windows Vista Internet Explorer and PowerPoint are either a registered trademark or trademark of Microsoft Corporation in the United States and or other countries HDMI the HDMI L...

Page 61: ......

Page 62: ...Y067 6221 AU EN US EN GB EN...

Reviews: