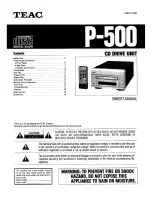
background image

1. Jumper Set Up

Before installation, set the jumper on the jumper connector on the 

rear panel.

Master (MA)

Drive set as Master (factory default)

1.  

Slave (SL)

Drive set as Slave

2.  

Cable Select (CS)

Drive mode set by CSEL on the host IDE interface

The drive can be connected as the Master or Slave on an E-IDE (ATAPI) interface.

❍   

When several (up to four) E-IDE devices are connected, each must be set in a unique
way.

❍   

A hard disk is normally installed as the Primary Master on the E-IDE (ATAPI)
interface. Other E-IDE peripheral devices such as hard drives and CD-ROMs are then
set accordingly.

❍   

3.  

Caution

If two peripheral devices with the same settings are both connected to the Primary or
to the Secondary E-IDE bus, the host computer may fail to run, or may malfunction,
so careful attention is necessary.

●   

Make sure that the host computer is turned OFF when connecting or removing a
jumper.

●   

Must be connect the jumper in the vertical direction. If connected horizontally, the
drive may malfunction or be damaged.

●   

Summary of Contents for MP7400A

Page 1: ...nterference by one or more of the following measures Reorient or relocate the receiving antenna Increase the separation between the equipment and receiver Connect the equipment into an outlet on a cir...

Page 2: ...with the requirements of the EMC Directive 89 366 EEC and the Low Voltage Directive 73 23 EEC Please take notice that the manufacturer of this equipment does not offer any warranty against data loss d...

Page 3: ...lating to the drive Failing to comply with the information in this manual and or incorrect handling of the drive may result in serious personal injury or damage to the product Indicates restriction or...

Page 4: ...Link incorporated that overcomes buffer underrun problems Buffer underrun errors that would occur when data transfer falls behind writing operation has been inevitable for CD RW drives JustLink which...

Page 5: ...g the drive The disc may be damaged causing data loss Be careful to prevent foreign objects such as liquids or metal from entering the drive Should by chance a foreign object enter the drive please co...

Page 6: ...place it on the disc tray and mount it See Fig 2 We suggest using dry air cleaner as compressed air for cleaning Other Cautions When moving the equipment make sure that the disc has been removed from...

Page 7: ...fig1 Check 1 Recording surface 2 fig2 50 to 100mm 1 Back...

Page 8: ...t Can read data at 40x speed 6 0MB sec data transfer rate write data at 40x speed CD R 6 0MB sec data transfer rate and write data at 10x speed 2 High Speed CD RW 1 5MB sec data transfer rate The reco...

Page 9: ...nced IDE interface as Primary Slave Secondary Master or Slave Drive bay 5 25 inch half height bay required Power 5V 12V power socket required The media written using the CD R RW drive may not be reada...

Page 10: ...1 Headphone jack This jack is for connecting headphones or mini speakers 2 Volume control This is used to adjust the output volume of the headphone jack It can t be used to adjust the output volume f...

Page 11: ...a sound card Analog signal 3 Jumper Connector This jumper determines whether the drive is configured as a master or slave Changing the master slave configuration takes effect after power on reset 4 ID...

Page 12: ...gency eject hole For more information on how to do this see figure 2 Pull the front door to open it all the way then grip the disc tray between thumb and forefinger and gently pull it straight out If...

Page 13: ...may be as follows The four vanes may be oriented just at the angles as shown below 2 In such a case push the tip of the thin wire in the following direction with the wire angled at about 15 degrees so...

Page 14: ...tray and the tray will be inserted back into the drive Caution After ejecting the disc return the disc tray inside the unit quickly When the disc tray is in the ejected position dust and other debris...

Page 15: ...an 80mm CD place it in the small round depression with its label side facing up Writing to an 80mm CD R CD RW disc is not supported Only reading is possible The face with the label on it should be up...

Page 16: ...Load the disc by pressing the eject button or by lightly pushing in the disc tray 3...

Page 17: ...al for the computer to know the location of the IDE connector Turn off all peripheral appliances of the computer and the computer itself and disconnect their power cords from the wall sockets Discharg...

Page 18: ...ue way A hard disk is normally installed as the Primary Master on the E IDE ATAPI interface Other E IDE peripheral devices such as hard drives and CD ROMs are then set accordingly 3 Caution If two per...

Page 19: ...re than one jumper is installed the drive may malfunction or be damaged Next 1 Jumper Set Up 2 Removing the Computer Cover 3 Mounting the Drive 4 Connecting the Power Connector 5 PC Connections 6 Soun...

Page 20: ...ter for details about removing the cover Caution There may be sharp edges inside the computer take care to avoid injury Example When newly installing the MP7400A drive into a PC Back Next 1 Jumper Set...

Page 21: ...e unit into the bay Do not apply excessive pressure to the cables inside the computer 2 Secure the drive with the screws provided If there is not enough space behind the drive connect the E IDE cables...

Page 22: ...Back Next 1 Jumper Set Up 2 Removing the Computer Cover 3 Mounting the Drive 4 Connecting the Power Connector 5 PC Connections 6 Sound Card Connection 7 Replacing the Computer Cover 8 Device Drivers...

Page 23: ...properly into the socket If there is no spare power cable available in the computer you will have to purchase a splitter cable of a suitable type Back Next 1 Jumper Set Up 2 Removing the Computer Cove...

Page 24: ...s follows Master 1 Slave 2 Motherboard 3 Primary 4 Secondary 5 less than 6 inches 6 less than 18 inches 7 To Install as a Master Drive To Install as a Slave Drive To Install as a Master Drive To insta...

Page 25: ......

Page 26: ...lave Drive To install the drive as a Slave change the jumper setting on the rear panel Master drive Booting hard disk 1 Slave drive This drive 2 Secondary connector 3 Primary connector 4 Master drive...

Page 27: ...Back Next 1 Jumper Set Up 2 Removing the Computer Cover 3 Mounting the Drive 4 Connecting the Power Connector 5 PC Connections 6 Sound Card Connection 7 Replacing the Computer Cover 8 Device Drivers...

Page 28: ...s to L and R to R Refer to the manual for the sound card for detailed information regarding connection MP7400A 1 When L R 2 Sound Card 3 Motherboard 4 Primary or Secondary 5 Digital audio connecter No...

Page 29: ...1 Jumper Set Up 2 Removing the Computer Cover 3 Mounting the Drive 4 Connecting the Power Connector 5 PC Connections 6 Sound Card Connection 7 Replacing the Computer Cover 8 Device Drivers...

Page 30: ...f the drive unit is complete replace the computer cover Back Next 1 Jumper Set Up 2 Removing the Computer Cover 3 Mounting the Drive 4 Connecting the Power Connector 5 PC Connections 6 Sound Card Conn...

Page 31: ...rofessional XP Users The drive is displayed in control panels system hardware device manager If the drive is not recognized by your computer For Windows 98 98SE Me Users If a indicator is displayed on...

Page 32: ...Back 1 Jumper Set Up 2 Removing the Computer Cover 3 Mounting the Drive 4 Connecting the Power Connector 5 PC Connections 6 Sound Card Connection 7 Replacing the Computer Cover 8 Device Drivers...

Page 33: ...CD RW media do not attach any stickers or labels to the media Using media with labels attached not only causes read and write errors but data on the disc may be lost due to damage to the media itself...

Page 34: ...4X 600KB sec 6X 900KB sec 8X 1 2MB sec 10X 1 5MB sec 12X 1 8MB sec 20X 3 0MB sec 1 32X 4 8MB sec 1 40X 6 0MB sec 1 Write Speed CD R 8X 1 2MB sec 12X 1 8MB sec 16X 2 4MB sec 20X 3 0MB sec 24X 3 6MB se...

Page 35: ...sation 10 to 90 R H No condensation Vibration 0 035mmpp 10 45Hz 0 025mmpp 45 65Hz 0 2 X 9 8 m s2 65 150Hz 1 X 9 8 m s2 5 to 300Hz Shock 2 X 9 8 m s2 3msec half sine 50 X 9 8 m s2 11msec half sine Envi...

Page 36: ...All references to the product in this document are to specifications in effect when the product was released Copyright RICOH Co Ltd All rights reserved...

Reviews: