Ricoh Caplio 300G Operation Manual Download Page 9

9

Chapter 1 / Section 1 Getting Started

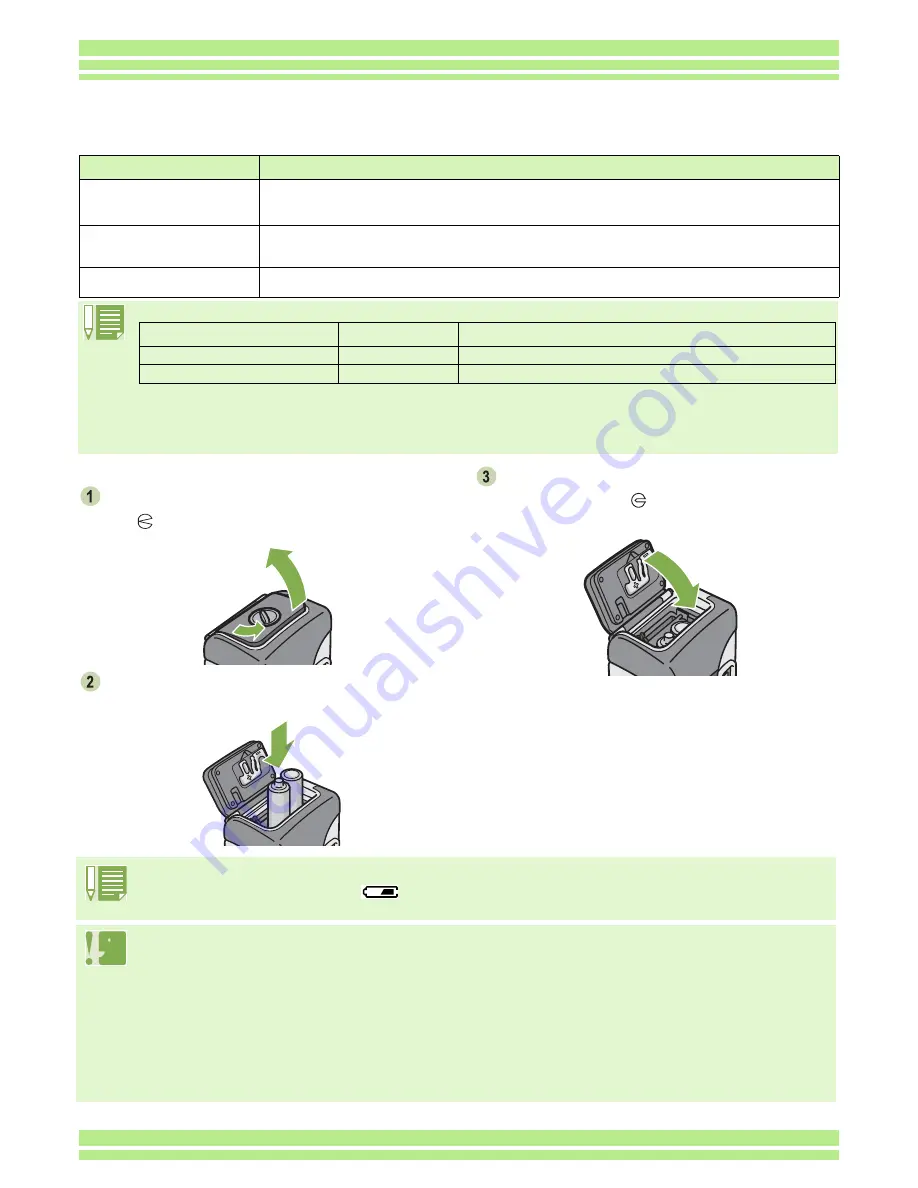
Insert the batteries following these steps.

Turn the battery/card cover's knob toward 
the 

 mark to open the cover.

Insert the two batteries, making sure they are 
facing the correct way.

Close the battery/card cover and turn the 
knob toward the 

 mark.

Inserting the Batteries

When the batteries wear out

 Just before the batteries wear out, 

 is displayed on the LCD Monitor. When this happens, replace the 

batteries with a fresh set.

• Before opening or closing the cover, make sure that any contaminants adhering to the camera, such as water, 

sand, or mud, are removed from it. Do not open and close the cover in a place where such contaminants can easily 
get into the camera.

• Other batteries, such as manganese (R6) and Ni-Cd batteries cannot be used.
• Please remove the batteries to store the camera if you are not going to use it for long periods of time.
• The strength of alkaline batteries varies by brand and become weaker the longer it is from the time of manufacture. 

Battery life for alkaline batteries is drastically reduced when cold.

• Nickel metal hydride batteries (available in stores) are not charged at the time of manufacture.Charge before use.
• The battery may become very hot immediately after operation. Turn the camera off and leave it to cool down 

sufficiently before removing the battery.

The following batteries can be used in the camera. Please choose which kind to use according to your needs.

Below is an indication of the number of images you can take. 

The number of shots is based on a temperature of 22 degrees celsius, shooting at 30–second intervals and one out of every 
two being shot with the flash.
If you set the camera to the Power-Save mode, the number of shots you can take will increase.
In addition to the batteries, you can use the AC Adaptor (sold separately).

Battery Type

Feature

AA Alkaline Batteries (LR6) 

(included)

You can obtain them anywhere, so they are convenient for travel.
However, in a low-temperature environment the number of shots you can take will decrease. Warm 

the batteries before use.

Rechargeable Battery (DB-

43, DB-40)

(sold separately)

This is a lithium–ion battery. This is economical because you can recharge it using the battery charger 

BJ-2 (sold separately) and use it over and over again. They last a long time, so they are convenient for 

travel.

Nickel-Hydrogen Battery 

(available in stores)

This is economical because you can recharge it and use it over and over again. Please use a 

recharger available in stores.

Battery Type

Number of Shots Number of Shots (In the Synchro-Monitor Mode: see p.21)

AA Alkaline Batteries (LR6)

approx. 50

approx. 60

Rechargeable Battery

approx. 350

approx. 400

Summary of Contents for Caplio 300G

Page 1: ...Operation Manual For the safe use of your camera be sure to read the Safety Precautions thoroughly before use...

Page 2: ...rms This indicates an explanation of a technical term Important This indicates important information and restrictions Meaning of Symbols This booklet is designed to help you enjoy your Caplio 300G rig...

Page 3: ...ro Photo 45 Section 3 Using Special Features for Improved Pho tography Using the Flash 47 Using the Self Timer 49 Changing the Exposure EXPOSURE COMP 50 Using Natural and Artificial Lighting WHITE BAL...

Page 4: ...puter 117 For Windows 98 98SE Me 2000 117 For Windows XP 118 How to Use the RICOH Gate L 120 The RICOH Gate L Window 120 How to Use the Optional settings 121 How to Use the Background Illustration Set...

Page 5: ...This section explains how to get your camera ready from taking it out of the package to preparing to shoot Chapter 1 Using Your Camera Section 1 Getting Started...

Page 6: ...300G Video Cable USB Cable CD ROM The software and the operation manual are included on this CD ROM CD ROM from Kodak Contains the Kodak EasyShare software Quick Start Guide AA Alkaline Batteries 2 Ne...

Page 7: ...er 8 Terminal Cover 9 Lens 10 USB Terminal 11 Video Out Terminal 1 Auto Focus Lamp 2 Viewfinder 3 Flash Lamp 4 Delete Self timer Button 5 Wide angle Thumbnail Display Button 6 Telephoto Enlarged View...

Page 8: ...d to select the desired mode and operation for shooting and playback still image viewing Symbol Mode Name Function Setup Mode Allows you to set and confirm camera settings Movie Mode Allows you to rec...

Page 9: ...r operation Turn the camera off and leave it to cool down sufficiently before removing the battery The following batteries can be used in the camera Please choose which kind to use according to your n...

Page 10: ...ery Make sure the power is off Turn the battery card cover s knob toward the mark to open the cover Release the yellow latch to remove the battery Close the battery card cover and turn the knob toward...

Page 11: ...e camera and the power outlet While in use if you detach the AC Adaptor or unplug it from the outlet data may be lost The AC adaptor is used with the battery card cover open Do not attempt to close it...

Page 12: ...n 1 Getting Started Removing the AC adaptor Make sure the power is off Unplug the power plug from the outlet Release the yellow latch to remove the battery Close the battery card cover and turn the kn...

Page 13: ...the Power On Off The camera is switched between On and Off as follows Auto Power off If the camera goes unused for a set period of time it will automatically turn itself off to save power To use the...

Page 14: ...ckly In FORMAT choose the Date and Time format Check the display on the bottom of the screen and then press the button Once you have set the date and time the display returns to the Setup screen Butto...

Page 15: ...get any dirt on the card s metal parts About where to record When an SD Memory Card is not inserted the camera records images in the internal memory when an SD Memory Card is inserted it records imag...

Page 16: ...Make sure the power is off Turn the battery card cover s knob toward the mark to open the cover Press the card gently and release it The card pops out just a little Gently take the card out of the cam...

Page 17: ...Display AUTO White Balance set value p 52 Daylight Overcast Tungsten light Fluorescent light One push How to Use the LCD Monitor The LCD Monitor can be used to view the subject when you are shooting a...

Page 18: ...p 15 Recording to an SD Memory Card p 15 5 Flash Mode Types Still Image Shooting Mode p 33 Movie Mode p 42 Multi Shot Mode p 39 S Multi Shot Mode p 39 M Multi Shot Mode p 39 PORTRAIT Mode p 36 SPORTS...

Page 19: ...ing Value Indicates exposure time p 66 17 Battery Insufficient Capacity Remaining Battery Power 18 Zoom Bar Zoom status p 43 19 PHOTOMETRY No Display Multi Light Metering Method p 60 Center Spot 20 Se...

Page 20: ...le being played back 7 Total number of files Total number of files recorded 8 Image Size Setting Value Image size p 55 9 Folder No Number of the folder in which the file is saved 10 File No Number of...

Page 21: ...Monitor is turned off No Display This is a useful mode to reduce power consumption You cannot turn the LCD Monitor Display on off by pressing Self timer Flash or Macro buttons Turning the LCD Monitor...

Page 22: ...e left right up and down see p 27 Wide angle Thumbnail Display Button If you press the button in Shooting Mode you can shoot with the wide angle zoom see p 43 If you press the button in Playback Mode...

Page 23: ...SIZE F2048 N2048 F1280 N1280 N640 p 55 FOCUS AF MF SNAP p 58 CONT MODE OFF CONT SCONT MCONT p 39 PHOTOMETRY MULTI CENTRE SPOT p 60 ISO SETTING AUTO ISO200 ISO400 ISO800 p 62 SHARPNESS SHARP NORMAL SOF...

Page 24: ...by pressing the button Setting Option Refer to MOVIE SIZE 320 240 160 120 p 42 WHITE BALANCE Daylight Overcast Tungsten light Fluorescent light One Push p 52 FOCUS AF MF SNAP p 58 Setting Option Refer...

Page 25: ...ton TPlayback Menu In Playback Mode display by pressing the button Setting Option Refer to DENSITY DEEP NORMAL LIGHT p 72 Setting Option Refer to SLIDE SHOW ON OFF p 82 PROTECT Select Release 1 FILE S...

Page 26: ...efer to PORTRAIT p 36 SPORTS p 36 LANDSCAPE p 36 NIGHTSCAPE p 36 TEXT MODE p 36 HIGH SENSITIVITY p 36 Setting Option Refer to CARD FORMAT p 97 IN FORMAT p 98 DATE SETTINGS p 14 POWER SAVE ON OFF p 99...

Page 27: ...ct the desired item Press the button To implement a confirmation screen shooting menu Press the button to select YES Press the button To select an item you want to implement playback menu Press the bu...

Page 28: ...item To select a setting value Press the buttons to select the desired item When you have selected EXE CUTE Press the button The following screen is displayed so make the necessary settings To close t...

Page 29: ...Section 2 Basic Shooting The basics of shooting are explained here from how to hold your camera to how to shoot still images and movies...

Page 30: ...e out clearly due to camera shake Hold the camera as below for best results Be careful when you are shooting not to get a finger your hair or the strap in front of the lens or the flash To prevent cam...

Page 31: ...left of the Viewfinder Check one of these to make sure the subject is in focus If the camera cannot automatically focus the crosshairs in the center of the LCD monitor turn red and the auto focus lam...

Page 32: ...e p 34 You can use the battery for a longer period of time by using the viewfinder and shooting in power save mode see p 99 In this mode however you cannot check the focus on the LCD monitor Instead o...

Page 33: ...p in the lower left of the Viewfinder Check one of these to make sure the subject is in focus Gently press the shutter release button all the way The still image you have taken freezes for a moment on...

Page 34: ...n subjects are hard to bring into focus It may be impossible to bring the following subjects into focus Subjects lacking contrast the sky a white wall the hood of a car etc Flat two dimensional object...

Page 35: ...osure and white balance are fixed and the crosshair in the center of the LCD Monitor turns green as does the auto focus lamp in the lower left of the Viewfinder Check one of these to make sure the sub...

Page 36: ...d as TIFF format files HIGH SENSITIVITY This is best for taking pictures in dimly lit places Shooting with Scenery Matching If you use the Scene Mode you can select from among six types of shooting mo...

Page 37: ...d here If you switch the Mode Dial to Shooting Mode you can operate Shooting Mode as usual If you return to Scene Mode again the scene selection screen as previously used is displayed In Text Mode ima...

Page 38: ...NDSCAPE Fixed on Flash Off Disabled NIGHTSCAPE Forced flash is disabled Disabled Initial setting Auto TEXT MODE Initial setting Flash Off Enabled HIGH SENSITIVITY Initial setting Flash Off Enabled Com...

Page 39: ...Button down and once you release it the previous two seconds of shots are recorded The 16 still images are grouped together as a set and are recorded as one image file Shooting with Multi Shot If you...

Page 40: ...The Shooting menu is displayed Select CONT MODE and press the button Press the buttons to select CONT SCONT or MCONT Press the button Press the button The Shooting Menu closes and the symbol is displa...

Page 41: ...ton 16 pictures are taken automatically Shooting with M Multi Shot Operation continued from the previous page Compose your picture then press and hold the shutter release button Storing to memory begi...

Page 42: ...image size either 320 240 or 160 120 pixels The maximum shooting time of each is 30 seconds 320 240 and 120 seconds 160 120 Each movie you shoot is recorded as one AVI file The flash cannot be used W...

Page 43: ...below Turn the Mode Dial to Shooting Mode Compose your picture while viewing either the LCD Monitor or the Viewfinder and zoom by pressing either the button or the button A bar is displayed in the LC...

Page 44: ...button Buttons used here Shooting with the Digital Zoom The Digital Zoom function enlarges images by processing them When you use the digital zoom pressing the Telephoto button enlarges the subject e...

Page 45: ...n you can get up close with the lens and take a photo Macro Photo This is good for shooting flowers insects and other small subjects because you can get a close up of one centimeter 1 2 inch from your...

Page 46: ...Section 3 Using Special Features for Improved Photography This section describes how to change the various shooting related settings...

Page 47: ...When your subject is poorly lit or backlit the flash fires automatically Red eye reduction When shooting images of people the red eye phenomenon in which people s eyes appear red is reduced Lit Forced...

Page 48: ...hands and shoot When in LANDSCAPE of Scene Mode the flash setting is fixed to Flash Off When in NIGHTSCAPE of Scene Mode Forced Flash cannot be selected Also the initial setting value is Auto If you p...

Page 49: ...links begins to shorten and the audio tone begins to beep After shooting Self timer mode switches off Buttons used here Using the Self Timer You can set the Self timer to shoot after either two or ten...

Page 50: ...hat is mainly dark it will turn out entirely bright over exposure with people appearing white and black objects appearing greyish The same happens when you take photos of people in a spotlight Changin...

Page 51: ...he minus side makes darker Moving it to the plus side makes it brighter Press the button Exposure Compensation settings are completed Press the button The Shooting Menu closes and the setting value ap...

Page 52: ...e Balance fails to adjust properly Overcast Select when shooting in cloudy weather or shade and the White Balance fails to adjust properly Tungsten light Select when shooting under tungsten light and...

Page 53: ...Menu closes and the setting value is displayed on the upper left of the screen This setting will be used for shooting until you change it Buttons used here In Auto Mode if the subject has limited whit...

Page 54: ...te Balance is set Press the button White Balance settings are complete Press the button The Shooting Menu closes and the setting value is displayed on the upper left of the screen This setting will be...

Page 55: ...l Mode About Image Size Image size relates to how large the image is A small image is best for sending via email and using in home pages When printing pictures choose the larger size to obtain better...

Page 56: ...ene Mode and select a mode to prepare the camera Press the button The Shooting menu appears Select PIC QUALITY SIZE and then press the button Press the buttons to select PIC QUALITY SIZE Press the but...

Page 57: ...ow the steps below Turn the Mode Dial to Movie Mode Press the button The Shooting menu appears Select MOVIE SIZE and then press the button Press the buttons to select Size Press the button Movie Size...

Page 58: ...ton the focus moves closer If you press the button the focus moves further away Manual Focus is used for shooting until you change the settings Buttons used here Manual Focus Shooting FOCUS When Auto...

Page 59: ...s below Turn the Mode Dial to Shooting Mode When shooting in Scene Mode set to Scene Mode then select a Shooting Mode When shooting movies set to Movie Mode Press the button The Shooting menu appears...

Page 60: ...T Light metering is determined by measuring only the central part Use this setting when you want to use the brightness of the center It is useful if there is marked difference in contrast or backlight...

Page 61: ...on Press the buttons to select the desired setting Press the button Light Metering Method setting is complete Press the button The Shooting Menu closes and the specified value is displayed on the left...

Page 62: ...g until you change it Buttons used here Sensitivity Settings ISO SETTING You can set the sensitivity ISO SETTING of your camera according to your preferences At purchase the sensitivity is set to Auto...

Page 63: ...t SHARPNESS and then press the button Press the buttons to select the desired setting Press the button Sharpness settings are complete Press the button The Shooting Menu closes and the setting value i...

Page 64: ...elect AUTO BRACKET and then press the button Select ON and then press the button Press the button The Shooting Menu closes and AB is displayed on the left side of the screen Buttons used here Shooting...

Page 65: ...Exposure Compensation value as the standard at 0 5EV 0 and 0 5EV After shooting the three shots are displayed on the LCD Monitor They are from the left 0 5EV the standard compensation value and 0 5EV...

Page 66: ...u change it Buttons used here Setting the Exposure Time TIME EXPOSURE If you set the camera to TIME EXPOSURE when you shoot the shutter stays open for the time specified By setting an exposure time yo...

Page 67: ...setting then use the button to set the minutes Press the button to move to the seconds setting then press the buttons to set the seconds Press the button Interval Shooting settings are completed Butt...

Page 68: ...In steps to if you press and hold the buttons you can quickly raise or lower the setting value If you use batteries for power you may exhaust the batteries Using the AC Adaptor sold separately is rec...

Page 69: ...oting Menu closes and is displayed on the bottom right of the screen This setting will be used for shooting until you change it Buttons used here Inserting the Date into a Still Image DATE IMPRINT You...

Page 70: ...press the button Press the button to select YES Press the button The display indicates the camera is restoring the initial settings once it is finished you return to the Mode screen Buttons used here...

Page 71: ...nt to display the Grid Guide calibration scale and make your composition The Grid Guide is made of lines that divide the LCD Monitor screen into thirds both vertically and horizontally The Grid Guide...

Page 72: ...button Press the buttons to select the desired density setting Press the button Density settings are complete Press the button The display returns to the shooting screen The value of the DENSITY setti...

Page 73: ...an display still images or movies on the LCD Monitor and check them This section explains displaying still images and movies on the LCD Monitor It is recommended you plug in the AC Adaptor whenever vi...

Page 74: ...Review again and the camera is ready to shoot Buttons used here Viewing the Photo You Just Took Right after shooting a still image if you want to see it immediately you can display the shot in Shootin...

Page 75: ...tton To view still images in the enlarged display mode follow the steps below Press the Enlarged View button The still image is enlarged One part of the still image is displayed on the LCD Monitor The...

Page 76: ...essing the DELETE button To delete a still image or movie that is displayed follow the steps below While using the Quick Review function press the Delete button Press the button to select DELETE Press...

Page 77: ...ou can view the previous still image or movie If you press and hold either the or the button you can move quickly between images Buttons used here Viewing a Still Image or Movie When you take a still...

Page 78: ...Memory Card and turn the power back on Turn the Mode Dial to Playback Mode The last still image taken is displayed For movies the first frame is displayed as a still image Move to the still image you...

Page 79: ...ress the shutter release button Playback begins The elapsed playback indicator or the elapsed time is displayed on the LCD Monitor Buttons used here Fast Forward Press the telephoto button during play...

Page 80: ...used here Viewing at a Glance The LCD Monitor screen is split into six thumbnail images allowing you to view your still images or movies at one glance Thumbnail Display If you select a still image or...

Page 81: ...w button The still image is enlarged One part of the still image is displayed on the LCD Monitor Press the buttons to move to the part you want to display To return to the original display press the T...

Page 82: ...still images or movie frames are shown in order If you want to stop the slide show in progress press any button on the camera Until stopped the slide show will repeat itself Buttons used here Showing...

Page 83: ...n Buttons used here Viewing on a Television You can also view the still images and movies you have taken on a TV screen The camera displays everything on the TV screen just as on its LCD Monitor To us...

Page 84: ...of the big advantages of digital cameras is that you can delete unwanted still images and movies on the spot This section explains deleting still images and movies you have taken For how to protect s...

Page 85: ...uttons used here Deleting Unwanted Still Images or Movies You can easily delete still images and movies that have not come out right The following are the three ways to delete photos One shot at a tim...

Page 86: ...aken is displayed Press the Delete button Press the button to select DELETE ALL and press the button A screen appears to confirm the deletion Press the button to select YES Press the button The displa...

Page 87: ...ons to select the still images or movies you want to delete Press the Delete button The trash symbol appears in the upper left of the still image or movie Repeat Steps and to select all the still imag...

Page 88: ...yed Press button to select PROTECT and then press the button Press the button to select 1 FILE Buttons used here Write protecting Your Images PROTECT You can protect still images and movies from being...

Page 89: ...left of the screen The procedure for releasing protection from one file at a time is the same as that for setting protection For how to display still images or movies see p 77 To set remove protection...

Page 90: ...e button Press the button to select ALL FILES Confirm you are choosing SELECT and then press When set to Protect the Protect symbol appears in the upper left of the screen Buttons used here To remove...

Page 91: ...er left of the first still image or movie Press the buttons to select the still image or movie you wish to Protect and press the button The Protect symbol appears in the upper left of the still image...

Page 92: ...ocess once finished you return to the playback screen Buttons used here Copying the Contents of Internal Memory to a Memory Card COPY TO CARD You can copy all the movie and still image data stored in...

Page 93: ...n Buttons used here Using a Printing Service PRINT The still images recorded on SD Memory Card can be printed out if you take them to a shop that offers a digital camera print service To use a print s...

Page 94: ...tton Press the button to select ALL FILES Confirm you are choosing SELECT and then press Once the DPOF setting is made the DPOF symbol appears in the upper left of the screen Buttons used here To remo...

Page 95: ...OF setting Press the button The Playback menu appears Press the button to select PRINT and then press the button The DPOF symbol appears in the upper left of the first still image Press the buttons to...

Page 96: ...Section 6 Changing Camera Settings This section explains how to make changes to the camera s settings In this section still images and movies will both be referred to as images...

Page 97: ...r still images cannot be accidentally erased and the memory card cannot be formatted If you return the switch to the former position it is once again possible to erase images and format the card Butto...

Page 98: ...e button Formatting commences When it finishes the SETUP screen returns Buttons used here Formatting Internal Memory IN FORMAT Formatting the internal memory clears all the images recorded in the memo...

Page 99: ...u can reduce the power consumption of the LCD Monitor and extend the life of your batteries At the time of purchase Power Save Mode is set to OFF If you have activated Power Save mode power consumptio...

Page 100: ...0 Minutes Possible Settings Changing Auto Power Off Settings AUTO POWER OFF If you do not operate the camera for the set period of time it will shut off automatically Auto Power off to conserve batter...

Page 101: ...UND Press the buttons to select the desired setting This setting will be used until you change it ON Make sound Default OFF Silent Possible Settings Beep at Recording BEEP SOUND When you shoot an imag...

Page 102: ...If numbering exceeds RIMG999 further recording is not possible Possible Settings Changing File Name Settings SEQUENTIAL NO When you shoot a still image it is stored on SD Memory Card or in internal m...

Page 103: ...ect the desired setting This setting will be used for shooting until you change it OFF Photo not displayed for confirmation 1 Minute Default 2 Seconds 3 Seconds Possible Settings Changing Image Confir...

Page 104: ...justment bar appears Press the buttons to adjust the brightness Moving it to the side makes it darker Moving it to the side makes it brighter The brightness of the screen behind the bar changes as you...

Page 105: ...creen appears Press the button to select LANGUAGE Press the buttons to select the desired setting This setting will be used until you change it JPN Japanese ENG English Default FRE French GER German C...

Page 106: ...Viewing on TV VIDEO OUT MODE You can view your still images and movies on a television screen by connecting your camera to a television with the video cable included Your camera is set to NTSC video...

Page 107: ...sold separately The explanations provided here assume that the AC Adaptor is being used Please do not connect your camera to the computer before installing the software for downloading If you happene...

Page 108: ...older under the CD ROM drive using Internet Explorer 2 If using Windows98 98SE Me or Windows2000 double click DX81xxx exe or Win2000 respectively Software and OS Applicability Table The software that...

Page 109: ...ater 800 X 600 or greater recommended Display colors 256 colors or greater 65000 or greater recommended CD ROM drive A CD ROM drive compatible with the above mentioned computer body USB port A USB por...

Page 110: ...he CD ROM drive of your computer and the screen shown on the right appears The screen shown here is from Windows XP For all versions of Windows except for Windows XP p 111 Windows XP p 113 Install the...

Page 111: ...zard screen appears Click Next After a few moments the Choose Destination Location screen appears Confirm where you want to install and then click Next After a few moments the Select Program Folder sc...

Page 112: ...ol Panel The control panel screen appears Double click the Add Remove Programs icon Select Caplio Software and then click Change Remove Select the language to use and then click the OK button A messag...

Page 113: ...screen appears Confirm where you want to install and then click Next After a few moments the Select Components screen appears Confirm the software you want to install and then click Next Thereafter if...

Page 114: ...ick the Add Remove Programs icon Select Caplio Software and then click Change Remove Select the language to use and then click the OK button A message appears to confirm whether you want to remove the...

Page 115: ...click the Acrobat folder Double click the English folder Double click ar500enu ar500enu exe Install Acrobat Reader by following the messages displayed Installing Acrobat Reader Acrobat Reader is soft...

Page 116: ...ect Next Select Search for the best driver in these locations Include this location in the search and then press the Browse button Select the folder where the Caplio Software is installed that has the...

Page 117: ...ocuments folder Downloaded images are saved in folders with the date of each shot inside the Caplio folder Connect your camera to the computer using the USB cable The camera turns on RICOH Gate L star...

Page 118: ...Choose Pictures to Copy screen appears The images in your camera are displayed and marked as checked Images that are checked will be transferred to your computer Uncheck images you do not want to tran...

Page 119: ...ch the images were transferred is opened with the images inside displayed For details of further operations from here onwards please refer to the Windows XP manual or on line Help Please refer to the...

Page 120: ...after saving See p 121 Background illustration settings Changes the background design in the RICOH Gate L window see p 122 About Displays the version of RICOH Gate L Exit Closes RICOH Gate L 2 Save B...

Page 121: ...nd saves images shot on the same day in the same folder For example if shot on May 1 2002 20020501 folder For each time saved Creates a new folder for each time images are saved and saves the images s...

Page 122: ...types of patterns If you select Background illustration setting from the menu displayed by the MENU button in the RICOH Gate L window the Background illustration settings dialog box appears 1 Backgro...

Page 123: ...t connects to a computer and can read the contents of cards like the SD Memory Card In addition to the PC Card type there are Card Readers compatible with various types of cards such as SD Memory Card...

Page 124: ...gether as images When downloading images from your camera it is recommended you safeguard the power supply by using the AC Adaptor sold separately The steps here are explained on the premise that the...

Page 125: ...images using iPhoto You cannot display movie files in iPhoto Please use QuickTime Player instead Software and OS Applicability Table The software that can be used differs according to the OS in use a...

Page 126: ...ater 800 X 600 or greater recommended Display Colors 256 colors or greater 32 000 or greater recommended CD ROM Drive A CD ROM drive compatible with the above mentioned Macintosh machine USB Port A US...

Page 127: ...he Caplio CD ROM included with the camera Mac OS 8 6 to 9 2 2 Mac OS X 10 1 2 to 10 2 Install the software Connect the camera to your computer Download images to the computer p 131 p 132 Mac OS 8 6 to...

Page 128: ...n your Macintosh Insert the attached CD ROM in the CD ROM drive The CD ROM icon is displayed on the desktop Double click the CD ROM icon and open the MacOS9 folder The Caplio 300G Installer icon appea...

Page 129: ...ars prompting you for the administrator s password Click the key icon A verification window appears Enter the administrator s name and password and then click OK Click Continue The Select a Destinatio...

Page 130: ...lio Mounter Prefs System Folder Preferences Caplio USB Driver System Folder Extensions Uninstalling the Software For Mac OS X 10 1 2 to 10 2 When you want to remove the software follow the steps below...

Page 131: ...nnect the USB cable to its USB terminal Your camera turns on Connecting the Camera to a Computer After installing the software on your computer connect your camera to it Disconnecting your camera from...

Page 132: ...H Gate L see p 133 For Mac OS X 10 1 2 to 10 2 Download using the Mounter see p 134 Downloading Pictures to Your Computer After you have connected your camera to the computer images are downloaded aut...

Page 133: ...mputer using the USB cable Your camera turns on When an SD Memory Card is not loaded the Caplio icon is displayed and you can view the image files stored in internal memory When an SD Memory Card is l...

Page 134: ...stored in internal memory When an SD Memory Card is loaded the Caplio SD icon is displayed and you can view the image files stored on the SD Memory Card loaded Double click the displayed icon It can...

Page 135: ...ecifies where to save images and which application will launch if you press the Application button or after saving See p 136 Background illustration If you select this a sub menu will appear allowing...

Page 136: ...how to create a folder Do not Create Your downloaded images will all be saved in the folder specified in item 2 For each date photographs Creates a new folder assigning the date it was shot as the fo...

Page 137: ...splaying Thumbnail Images How to Use DU 10 DU 10 enables you to view downloaded images at a glance as well as edit rotate and resave images This section explains how to use DU 10 DU 10 can only be use...

Page 138: ...or click the Close button in the upper right corner of the screen Starting and Exiting DU 10 There are two methods of starting DU 10 Auto Start from RICOH Gate L In the RICOH Gate L option settings i...

Page 139: ...sed are displayed so you can use those functions with just one simple click 3 The Thumbnail Display Area The reduced images are displayed at one glance 4 Folder Display Area The folders inside My Comp...

Page 140: ...ing from small to large the opposite is descending order For the alphabet a b c is ascending order and z y x is descending Select which order to use 1 2 or 3 and choose either ascending or descending...

Page 141: ...ges How to Use DU 10 To change the display size use either the tool bar or Display size from the View menu You can change the display size to one of five sizes available 1 Extra large 2 Large 3 Medium...

Page 142: ...slide show from the menu bar Place the pointer of the mouse on one of the images you selected right click and choose slide show from the menu Menu Shortcut menu displayed with right click The slide s...

Page 143: ...og box 1 Operating method Select either Auto slide show the slides are played automatically in order or Manual switch frames by clicking the mouse button or pressing the Enter key 2 Display interval S...

Page 144: ...Information Dialog Box To display image information follow one of the steps below Using the File Menu Click the image in the Thumbnail Display Area for which you want to see information Select Proper...

Page 145: ...File menu The Save As dialog box appears Specify where to save the new file Save in Enter the name of the new file in File Name Click Save TIFF File This is read tiff file This is a format used when...

Page 146: ...Appendices...

Page 147: ...e Digital Zoom 3 4 times Monitor Display Parts Screen Size 1 6 Type Translucent Amorphous Silicon TFT LCD Pixel Count Approx 80 000 White Balance AUTO Fixed Daylight Overcast Tungsten light Fluorescen...

Page 148: ...viation for Design rule for Camera File system standardized by JEITA Compression Format JPEG Baseline Format Compliant Still Movie Image Size 2048 X 1536 N approx 568KB Screen F approx 1 12MB Screen 1...

Page 149: ...r directly from a wall outlet PC Card Adaptor FM SD53 For when you want to load an SD Memory Card directly into your computer s PC Card Slot Rechargeable Battery DB 43 Available for this camera Batter...

Page 150: ...let plug please consult your travel agent on a plug adaptor suitable for wall outlets in your country of destination The Warranty This product is for domestic use The warranty is only valid domestical...

Page 151: ...beach or a dusty place such as a construction site pay sufficient attention to prevent sand or dust from adhering to the camera z Do not leave the camera in places where there are extremes of temperat...

Page 152: ...mera This may cause a change in quality paint to peel etc z As the surface of the LCD Monitor is easily scratched do not rub hard objects against it z Please clean the surface of the LCD Monitor with...

Page 153: ...AC Adaptor reconnect it p 9 p 10 p 11 Cannot recharge the batteries Battery life Replace the batteries with a new set p 10 Batteries run out quickly They are being used in extreme high or low temperat...

Page 154: ...sh fired the picture is dark The distance to the subject is greater than 2 5 meters in Telephoto or greater than 4 5 meters in Wide angle Get closer to your subject and shoot p 47 The image is too bri...

Page 155: ...ot recorded normally Load a normally recorded card p 15 The SD Memory Card s contact surfaces are dirty Wipe with a soft dry cloth There is something wrong with the SD Memory Card Play another card an...

Page 156: ...9 p 10 p 11 The date is wrong The correct date time are not set Set the correct date time p 14 The date set has disappeared The batteries were removed If the batteries are removed for about two weeks...

Page 157: ...it If there is click the Delete E button to delete it Select Caplio Software from Add Remove Applications of the Control Panel click the Add Remove button and then install the software 4 Turn off your...

Page 158: ...icon is displayed 4 Click the System icon select the Hardware tab and click Device Manager 5 If there is right click the unknown device mark to display the menu and select Driver Update Once the Star...

Page 159: ...SETTINGS CANNOT BE SET FOR THIS FILE This file movies and other cannot be selected for printing INSUFFICIENT MEMORY Files cannot be stored Make sure there is enough free space or delete files p 85 Th...

Page 160: ...rranty period 6 This warranty only applies to the camera and not to the accessories such as the case and strap nor does it apply to the battery and other consumables provided 7 Any consequential damag...

Page 161: ...er or an experienced radio TV technician for help FCC 15 105B Changes or modifications not expressly approved by the party responsible for compliance could void the user s authority to operate the equ...

Page 162: ...http www ricoh co jp r_dc Ricoh Factory Service Center 250 North 54th Street Chandler AZ 85226 http www ricohzone com RICOH HONG KONG LIMITED Personal Multimedia Products Center 21 F Tai Yau Building...

Reviews: