background image

Page 

25

 / 

59


3.2- General safety information  

1. Keep work area clean 
Cluttered areas invite accidents and injuries. 
2. Consider work area environment 
Do not expose product to rain or to humidity. 
Do not use product in damp or wet locations, during weather conditions. 
Keep work area well lit (natural light or sufficient artificial lighting) and ventilated. 
3. Guard against electric shock


Check that the electric circuit is adequately protected and that it corresponds with the power, voltage 
and frequency of the motor. 
Check that there is a ground connection, and a regulation differential switch upstream. 
Ground the log splitter.  
Avoid body contact with earthed or grounded surfaces (e.g. pipes, radiators, ranges, refrigerator…). 
Never open the pushbutton box on the motor / the switch / plug box. Should this be necessary, contact 
a qualified electrician. 
Mark sure your fingers do not touch the plug's metal prongs when plugging or unplugging the log 
splitter. 
Disconnect power cable if product or cable is damaged during operation. Unplug product by pulling 
the plug. Do not pull the cable. 
4. Keep children away


Do not let bystanders touch the tool or its power cable or extension cord.  
All bystanders (esp. children) should be kept away from tool and work area. 
Keep the product away from children or from their environment. Never allow children to operate the 
product. Children should be supervised to ensure that they do not play with the product. 
The use of this product by children is forbidden. 
Only well-instructed adults should operate the product. This product is not intended for use by 
persons (including children) with reduced physical, sensory or mental capabilities, or lack of 
experience and knowledge, unless they have been given supervision or instruction concerning use of 
the product by a person responsible for their safety. 
5. Store idle product 
When not in use, product should be stored in a dry and locked up place, out of reach of children. 
6. Do not force the product 
It will do the job better and safer at the rate speed for which it is intended. 
Do not use the product for purposes other than those for which it is intended. The product will do a 
better and safer job if it is used only for the purposes it was designed for. 
Do not, under any circumstances, alter your log splitter. This equipment was designed and engineered 
to be used in accordance with the operating instructions. Altering the equipment or using the 
equipment in such a way as to circumvent its design capabilities and capacities, could result in serious 
or fatal injury.  
Never try to split logs larger than those indicated in the specifications table. This could be dangerous 
and may damage the machine. 
7. Use the right product 
Do not force small products or attachments to do the job of heavy duty tools.  
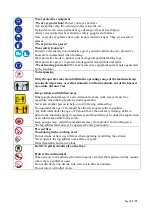
8. Dress properly 


Do not wear loose clothing, gloves, neckties or jewellery; as they can be caught in moving 
parts.  
Wear protective hair covering to contain long hair. 

9. Use protective equipment 
Wear protective equipment appropriate to working conditions and work environment 
Wear protective helmet, safety goggles, ear mufflers, face or dust mask or breathing mask with proper 
filter, rubber gloves and non-skid footwear to reduce the risk of personal injury during products use or 
manipulation. 

Summary of Contents for 042181

Page 1: ...i istruzioni e di manutenzione EN LOG SPLITTER User and maintenance manual FR FENDEUR DE BUCHES Manuel d instructions et d utilisation R f Art Nr PREHLS52N 042181 Imp da Ribimex Italia s r l Via Igna...

Page 2: ...tion may cause injury and or damages Please keep this manual for future reference Note Non contractual information and photos which may be changed without prior notice Actual product may differ from i...

Page 3: ...le istruzioni operative per ogni esigenza futura il manuale insieme all apparecchio in un luogo sicuro in modo da poterlo consultare non appena sorge un dubbio sull uso o sulla manutenzione Dare quest...

Page 4: ...i bambini Lo spaccalegna progettato per essere utilizzato da un solo operatore Altre persone presenti devono mantenere una distanza di sicurezza al meno 5m dalla zona di lavoro quando lo spaccalegna i...

Page 5: ...zzare il prodotto Accertarsi che tutti i dadi bulloni viti montaggi idraulici stringitubi ecc siano correttamente fissati Controllare sempre il livello dell olio nel serbatoio Non utilizzare mai lo sp...

Page 6: ...i che non ci siano chiodi o oggetti piantati sui ceppi da spaccare Non tentare mai di spaccare i ceppi che contengono chiodi o filo metallico L estremit del ceppo deve essere tagliata Accertarsi sempr...

Page 7: ...iochino con il prodotto L utilizzo di questo prodotto vietato a bambini ed adolescenti Questo prodotto pu essere utilizzato esclusivamente da persone adulte ben addestrate Questo prodotto non adatto a...

Page 8: ...soddisfare le condizioni per garantire il funzionamento senza problemi del prodotto Le etichette di sicurezza danneggiate o illeggibili devono essere sostituite 17 Non dannegiare il cavo Non trasport...

Page 9: ...fica per la finalit d uso prevista Rischi residui sono ridotti al minimo rispettando le avvertenza di sicurezza e un lavoro conforme al uso destinato come tutte le indicazioni delle presenti istruzion...

Page 10: ...ri lavorino in prossimit dell apparecchio ad es per il carico e lo scarico ricordarsi che l apparecchio pu essere azionato da un solo operatore L apparecchio non deve essere usato dai bambini Effettua...

Page 11: ...otezione 6b Utilizzare le tappi quadrate per fissare il pannello posteriore 6d al pannello sinistro del dispositivo di protezione 6a NOTA se l inserimento a mano delle tappi quadrate risulta difficile...

Page 12: ...i almeno 1 5mm2 Impianto elettrico ed idraulico Impianto elettrico Impianto idraulico 4 5 Allentare la vite di sfiato Svitare la vite di sfiato 14 di 3 o 4 giri prima di iniziare a spaccare la legna L...

Page 13: ...egnoda spaccare Non utilizzare lo spaccalegna per scopi non appropriata ad esempio taglio di prodotti contenenti materiali pericolosi o per qualsiasi uso non descritto in questo manuale Lo spaccalegna...

Page 14: ...o manterr l aria sigillata nel circuito idraulico Continue compressioni e decompressioni danneggieranno le guarnizioni del circuito idraulico e quindi lo spaccalegna 3 Prima di spostare lo spaccalegna...

Page 15: ...i commando idraulico 1 Se si rilascia soltanto la leva o il pulsante lo spaccalegna si immobiliza Cuando entrambe le mani rilasciano la leva ed il pulsante il cilindro ritorna nella posizione iniziale...

Page 16: ...no in attraverso o nella direzione della larghezza per spaccarla E pericoloso e potrebbe danneggiare lo spaccalegna Non tentare di spaccare 2 ceppi allo stesso tempo Uno di loro pu saltare e colpire l...

Page 17: ...o con le mani Dopo che il cilindro sar ritornato nella posizione iniziale inserire un cuneo in legno sotto il ceppo incastrato Mettere lo spaccalegna in funzione in modo tale che il cuneo in legno ven...

Page 18: ...ulico 2 4 litri usando un imbuto pulito 7 Pulire l asta di livello e la guarnizione Controllare il livello dell olio inserendo l asta di livello nel serbatoio mantenendo lo spaccalegna verticale Rimuo...

Page 19: ...o al posizionamento dei ceppi La dimensione del ceppo o la sua durezza eccedono la capacit del prodotto Ridurre le dimensioni dei ceppi prima di spaccarli Il tagliente del cuneo smussato Riferirse a A...

Page 20: ...benzina perch possono danneggiare le superfici 6 6 Conservazione Conservare il prodotto le istruzioni e gli accessori nella confezione originale Si consiglia di conservare lo spaccalegna in un luogo a...

Page 21: ...tructions for future reference Keep the manual with the product or in a safe place so that you can read it whenever you have a question about its use or servicing Please give the safety instructions b...

Page 22: ...n distance 5m Keep visitors and children away Other people should keep at a safe distance from the work area at least 5m especially when the log splitter is under operation Never ask another person to...

Page 23: ...is in poor mechanical condition Before starting work hydraulic pipes and hoses shall be inspected and stopping devices shall be tested Avoid injury from unexpected accident Cutting and crushing hazard...

Page 24: ...ds of the log you are splitting are cut as square as possible This will prevent the log from sliding out of position while under pressure Branches must be cut of flush with the trunk Protect your hand...

Page 25: ...duct This product is not intended for use by persons including children with reduced physical sensory or mental capabilities or lack of experience and knowledge unless they have been given supervision...

Page 26: ...t its operation 17 Do not abuse the power cable Never carry the tool by the cable or yank it to disconnect it from the socket Keep the cable away from heat oil and sharp edges Inspect tool cable perio...

Page 27: ...gnoring or omitting to follow the safety precautions may result in injury or damage The log splitter may cause injury to hands or fingers whenever the user is careless does not follow the safety instr...

Page 28: ...tions The machine shall not be used by children Perform tests of the machine s safety devices prior to use Before starting work inspect hydraulic pipes and hoses Before starting work inspect and test...

Page 29: ...ts difficult you may use a wooden or rubber hammer to knock them into place Insert the support plate 7 to the main frame The machine is now fully assembled Fig 4 2 4 2 3 Setup Fig 5 Once the log split...

Page 30: ...4 opened during operation Retighten this air bleed valve 14 once you finished Failure to loosen the bleed screw will keep the sealed air in the hydraulic system The air being compressed and then decom...

Page 31: ...al parts e g nails wire etc must be removed from the log wood Do not use the machine for purposes not appropriate e g cutting products containing hazardous materials or for any use not described in th...

Page 32: ...eep the sealed air in the hydraulic system The air being compressed and then decompressed such continuous air compression and decompression will blow out the seals of the hydraulic system and cause pe...

Page 33: ...eration control This log splitter is equipped with ZHB control system that requires to be operated by both hands of the user the right hand controls the pushbutton switch 11 the left hand controls the...

Page 34: ...ications Set and split the log in the direction of its growing grain Do not place the log across the log splitter for splitting It may be dangerous and may seriously damage the machine Do not attempt...

Page 35: ...s completely stopped at its starting position then insert a wedge wood under the jammed log Start the log splitter to push the wedge wood to go completely under the jammed log Repeat above procedure w...

Page 36: ...and the thread of the cylinder head the screw must not be over tightened 10 Regularly check the oil level and refill when necessary Remarks 1 Check oil level regularly with dipstick Low oil levels can...

Page 37: ...set Contact the dealer The log pusher moves jerkily taking unfamiliar noise or vibrating a lot Lack of hydraulic oil and excessive air in the hydraulic system Check oil level for possible oil refillin...

Page 38: ...hildren s reach Cover the splitter properly if you store it in a shelter or in poorly protected room Protect the motor and especially the switch against water and moisture Do not store anything above...

Page 39: ...ons pour pouvoir s y reporter ult rieurement Conserver le manuel avec le produit ou en lieu s r afin de pouvoir vous y reporter chaque fois que vous avez une question sur son utilisation ou son entret...

Page 40: ...ors de la zone risque une distance minimale de 5 m Garder les personnes et enfants loign s Tout autre personne doit rester distance 5m minimum de l aire de travail tout particuli rement lorsque le fen...

Page 41: ...us boulons vis connecteurs hydrauliques et tuyaux etc soient correctement serr s V rifier toujours le niveau d huile dans le r servoir d huile Ne jamais utiliser le fendeur s il doit tre r par ou s il...

Page 42: ...triques pouvant g n rer un risque de choc lectrique Inspecter la b che Assurez vous qu il n y a pas de clous ou tout autre objet dans les b ches fendre Ne jamais tenter de fendre des b ches contenant...

Page 43: ...ient de surveiller les enfants pour s assurer qu ils ne jouent pas avec le produit L utilisation de cet outil est interdite aux enfants et adolescents Seuls des adultes ayant re u des instructions ad...

Page 44: ...cool de m dicaments ou de drogues ou de toute autre substance qui pourrait affecter votre jugement 16 V rifier les pi ces endommag es Avant d utiliser ou de r utiliser l outil il est recommand de le v...

Page 45: ...r servons le droit d apporter toute modification sans information pr alable et sans obligation de modifier les composants fabriqu s pr c demment 25 Risques r siduels M me un emploi conforme l usage pr...

Page 46: ...la formation et les instructions appropri es si n cessaire suivez un formation pratique pour utiliser entretenir la machine en toute s curit L op ration de fendage par la machine est pr vue pour tre...

Page 47: ...ixer le panneau arri re 6d au capot de protection gauche 6a NOTE Si l insertion la main des embouts L s av re difficile utiliser un maillet caoutchouc pour les enfoncer Installez le plateau support 7...

Page 48: ...iduel RCD dont le courant assign r siduel maximum est de 0 03A Les c bles de raccordement lectrique en caoutchouc doivent tre conformes la norme EN60245 et identifi s par le marquage H07RN avec une se...

Page 49: ...ricolage et de l entretien de la maison Les pi ces m talliques clous fil etc doivent imp rativement tre retir es du bois fendre Ne pas utiliser l outil des fins non appropri es p ex coupe des produits...

Page 50: ...fera que l air restera emprisonn dans le circuit hydraulique L air tant comprim puis d comprim une telle compression et d compression continue entra nera la rupture des joints du circuit hydraulique e...

Page 51: ...tilisateur doit se servir de ses deux mains pour mettre en marche la machine la main droite contr le l interrupteur bouton poussoir 11 la main gauche contr le la manette de commande hydraulique 1 Le f...

Page 52: ...pour la fendre Cela est dangereux et risque d endommager le fendeur Ne pas tenter de fendre deux b ches en m me temps L une d entre elle peut tre projet e et venir vous heurter Ranger le bois au fur...

Page 53: ...evier de contr le N enlevez pas les b ches coinc es avec les mains Une fois que le v rin est revenu sa position initiale et s est arr t Ins rer une cale en bois sous la b che coinc e D marrer le fende...

Page 54: ...entonnoir propre Jauge 7 Nettoyez la jauge d huile et le joint d tanch it Contr lez le niveau d huile en ins rant la jauge dans le r servoir tout en maintenant le fendeur la verticale retirez la jaug...

Page 55: ...acit de la machine Le coin est mouss Il y a fuite d huile Des r glages non autoris s ont t effectu s C ble d alimentation incorrect par ex plus de 10m de long ou section trop faible Reportez vous la s...

Page 56: ...produit le mode d emploi et les accessoires dans l emballage d origine Il est recommand de ranger l outil dans un local sec de le placer hors de port e des enfants soit en hauteur soit sous clef Bien...

Page 57: ...Plan de table guide b che 5 Cuneo Wedge Coin 6 Dispositivo di protezione Protective cover Dispositif de protection 7 Piastra di appoggio Support plate Plateau support 8 Impugnatura Handle Poign e 9 G...

Page 58: ...Page 58 59 FIGURE FIGURES FIGURES Fig 4 1 Fig 4 2 Fig 5...

Page 59: ...ce maximale 5t Pressione idraulica Hydraulic pressure Pression du v rin hydraulique 20MPa Capacit del serbatoio dell olio Oil tank capacity Capacit du r servoir d huile 2 4L Spostamento del martinetto...

Reviews: