background image


14

8. ERRORS AND REMEDIAL MEASURES                                   

When an error occurs during counting, the LCD Display will flash the error code. Clear the error 
in accordance with the following procedures. 


Error 

Code 

Cause of Error 

Remedial Measures 

EA 

Hopper Sensor is covered. 

Remove what is covering the Hopper Sensor. 

E1 

1, One or both of Counting Sensors 

are damaged if  E1  appears when 
power on. 

2, Counting Sensors are dirty. 
3, Notes are jammed in the roller. 

1, Replace the damaged Counting Sensor. 
2, Clean the Counting Sensors. (Refer to Chapter 7) 
3,  Take  away  jammed  note(s)  with  hand.  When  there  is  a 

difficulty  in  taking  away  the  jammed  notes,  turn  Drum 
Rollers by hand. 

E2 

1,  Notes  on  Stacker  when  power 

on. 

2, Stacker Sensor is dirty. 
3, Stacker Sensor is damaged. 

1, Remove the notes placed on the Stacker. 
2, Clean the Stacker Sensor with the brush. (Refer to Chapter 7) 
3, Replace the damaged Stacker Sensor. 

E3 

1,  Hopper  Sensor  is  covered  when 

power on

2, Hopper Sensor is dirty. 
3, Hopper Sensor is damaged. 

1, Remove what is covering the Hopper Sensor. 
2, Clean the Hopper Sensor with the brush. (Refer to Chapter 7) 
3, Replace the damaged Hopper Sensor. 

EH 

1, Half-sized note is fed. 
2, A small note passes from the left 

or right side. 

3,  One  of  Counting  Sensors  is 

damaged. 

1, Take away the half-sized note. 
2, Let the note pass in the middle. 
3, Replace the damaged Counting Sensor. 

Ec 

More  than  two  notes  are  fed  in 
chain. 

If this error happens very often, the Feed Gap might be too wide. 
Adjust the size of the gap. (Refer to Chapter 6) 

Ed 

Two  notes  are  fed  at  a  time  or  a 
dirty note is fed. 

If this error happens very often, adjust the DEN Function. (Refer 
to Chapter 6 of the Service Manual) 

CF1 

Suspected 

counterfeit 

note 

is 

detected by UV detection. 

1, Take away the last note from the Stacker and make sure that it 

is the same note as the others. 

2, Press RESTART key. 
3, Recount the last note taken away from the Stacker. 

CF2 

Suspected 

counterfeit 

note 

is 

detected by MG detection. 

1, Take away the last note from the Stacker and make sure that it 

is the same note as the others. 

2, Press RESTART key. 
3, Recount the last note taken away from the Stacker. 


Summary of Contents for JM-90

Page 1: ...Banknote Counter INSTRUCTION MANUAL 2009 Edition V1 2...

Page 2: ...Functions of Parts 3 1 2 Names and Functions of Keys 5 2 FUNCTIONS 6 3 BASIC OPERATION 11 4 DEFAULT SETTINGS IN FACTORY 11 5 SPECIFICATIONS 12 6 ADJUSTMENT OF THE FEED GAP 12 7 DAILY CARE 13 8 ERRORS...

Page 3: ...iew Hopper The counted notes are placed in it Auxiliary Hopper Plates Used for leading the notes to the feeding mechanism Keys Refer to page 5 for description of each key Display The Display shows all...

Page 4: ...h To widen the Feed Gap by turning the Knob towards sign and to narrow the Feed Gap towards sign Carrying Handle Used for carrying the machine Power Switch Used to turn on or off the machine Power Inl...

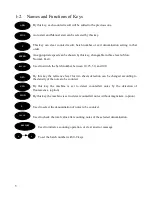
Page 5: ...and 100 By this key the reference level for two sheets detection can be changed according to the density of the notes to be counted By this key the machine is set to detect counterfeit notes by the d...

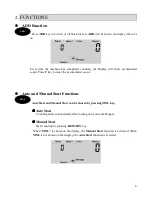
Page 6: ...ey to clear the accumulated count Auto and Manual Start Functions Auto Start and Manual Start can be chosen by pressing MNL key Auto Start Counting starts automatically after loading notes onto the Ho...

Page 7: ...batch function is activated After counting every batch of notes the machine will stop Then continue the counting by taking away the notes from the Stacker or by pressing RESTART key The BATCH key is...

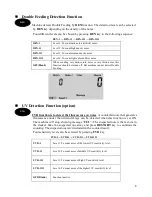
Page 8: ...ding UV Detection Function option UVD function is to detect the fluorescence on notes A counterfeit note that generates fluorescence under the ultraviolet rays can be detected when this function is se...

Page 9: ...T key to countinue the counting The suspected one isn t included in the counted result Four sensitivity levels can be selected by pressing MGD key MGD 1 MGD 11 MGD 111 MGD 1111 Blank MGD 1 Level 1 To...

Page 10: ...check total value after counting notes of the selected denomination Step 1 Switch to the denomination of notes you are going to count by pressing key Step 2 Count notes of the selected denomination S...

Page 11: ...ETTINGS IN FACTORY Turn the Power Switch on the machine will be in the previous setting Turn on the Power Switch while pressing the RESTART key for 2 seconds and the machine will be in the default set...

Page 12: ...he Feed Roller and the Friction Roller may be subject to natural wear Under this condition the Feed Gap may become too wide and as a result Error Codes will be generated and note feeding will become e...

Page 13: ...13 7 DAILY CARE Clean the following Sensors with a brush periodically Hopper Sensor and Stacker Sensor Counting Sensors...

Page 14: ...per Sensor is damaged 1 Remove what is covering the Hopper Sensor 2 Clean the Hopper Sensor with the brush Refer to Chapter 7 3 Replace the damaged Hopper Sensor EH 1 Half sized note is fed 2 A small...

Page 15: ...hen connected to the RS232 interface of the banknote counter 2 NCC Driver and RS232 Serial Cable for connecting the banknote counter to a computer 1 Connect one end of the serial cable to the serial p...

Reviews: