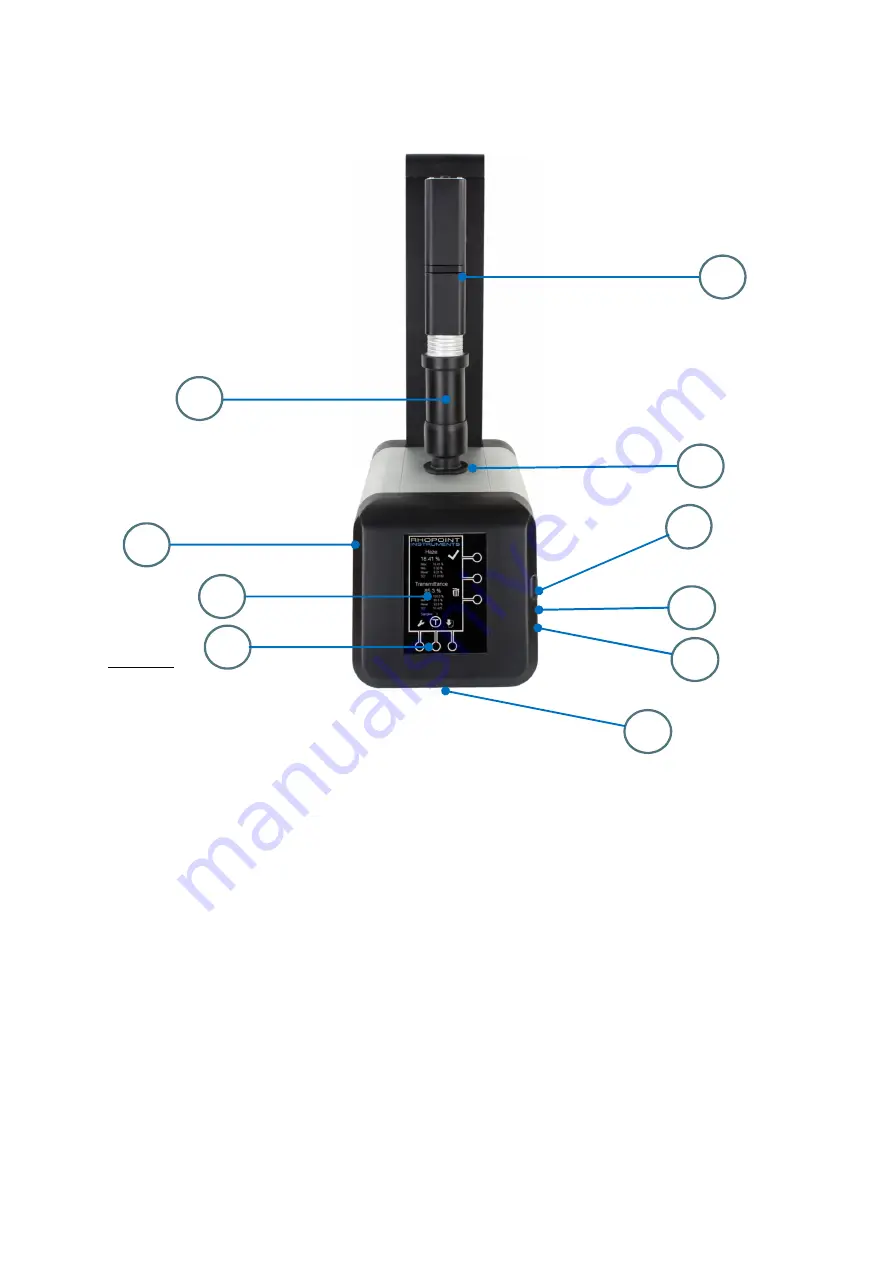
Rhopoint Hanatek Novo-Haze TX Operating Instructions Manual Download Page 7

Functional Overview 


Figure 1 


Label No.  Function 

LED light source   

Light baffle 

Sample platform 

Power in and ON switch 

Display


USB data connector 

Cap sense buttons 

Micro USB printer connection 

Foot switch connector 

10 

Light trap inspection port 


10 

Summary of Contents for Hanatek Novo-Haze TX

Page 1: ...u for purchasing this Rhopoint product Please read these instructions carefully before operating this product and retain them for future reference The images shown in this manual are for illustrative...

Page 2: ...used in their products they reserve the right to change information included in this document without prior notice Copyright 2016 Rhopoint Instruments Ltd All Rights Reserved Rhopoint is a registered...

Page 3: ...Accessories 5 Optional Accessories 5 Functional Overview 6 Icons Used 7 Power 7 Standby Mode 7 Switching the Unit On 7 Making a Measurement 9 Deleting Readings 11 Data Transfer 11 Adjusting the Time...

Page 4: ...ts into the port opening Always lower the baffle when not in use Do not place the instrument near electromagnetic fields or in an environment with excessive vibrations The instrument s metal body and...

Page 5: ...attering characteristics of a material Haze can be due to suspended particles or contaminants within a sample or fine surface texture contamination Haze measurement can be used to quantify optical cha...

Page 6: ...Hazemeter 24v DC power supply and mains cable USB data stick 2 x haze checking standards each one valid for 6 months Optional Accessories Foot switch part number HAN B8041 FOOTSWITCH Label printer par...

Page 7: ...unction 1 LED light source 2 Light baffle 3 Sample platform 4 Power in and ON switch 5 Display 6 USB data connector 7 Cap sense buttons 8 Micro USB printer connection 9 Foot switch connector 10 Light...

Page 8: ...press any button Switching the Unit On With the power supply connected the instrument is switched on using the on switch located next to the power input 4 When turned on the display will show the las...

Page 9: ...flash indicating an essential operation Lower the light baffle then press and hold the tare button until a repetitive beep is heard The unit will operate and set the zero reference The measuring icon...

Page 10: ...9 Making a Measurement Lift the light baffle up and place the sample to be measured over the port opening Lower the light baffle onto the sample...

Page 11: ...delete the readings from the instrument memory see below Continuous reading mode The instrument can be set to continuously take readings every 10 seconds Press and hold the tick button until a second...

Page 12: ...USB data stick standard with all instruments The data stick included with the instrument allows the transfer of measurement data in csv format for analysis using Microsoft Excel Insert a data stick a...

Page 13: ...rammed label printer the results from the hazemeter instrument can be sent directly to a label printer When testing is complete press the data export button The instrument will beep once to indicate a...

Page 14: ...d with a green arrow to start adjusting the time and date This will enable up and down arrows on the right hand side of the screen Pressing the up and down arrows will change the highlighted field Pre...

Page 15: ...cking standards and mark the opening date on the bag Line up the flat edge of the holder to the flat edge of the standard and lower the baffle Take a reading on the checking standard by pressing the t...

Page 16: ...andard being used is not damaged Any dust scratches or other marks will alter the reading taken by the instrument 3 Ensure the light baffle is down when taking a reading 4 Ensure the instrument is tar...

Reviews: