adjustment screw (see Figure 16)
counterclockwise until the pump cuts
out. This will be to confirm the pump cut-
out pressure. The pump should stop at
about 80 psi. Once this is confirmed, turn
the pump pressure adjustment screw
clockwise a couple of turns and re-apply
a heat call to start the pump and furnace
running again.
Continue to adjust the pump until the
mid temperature rise has been reached
and at least 100 psi. is reached. Do not
adjust the pump pressure to over 150
psi.
OIL PUMP/ PUMP
BLEEDING
Before furnace operation can begin, the
fuel line and pump must be bled of air.
To do this, run a clear piece of hose with
a special bleed tool attached from the
bleed port on the pump to a bucket or
can (see Figure 23). First, open the
bleed port by turning it counterclockwise.
Next, turn on the furnace by applying a
heat call or 24 AC volts to the “W”
terminal on the burner. The pump will
begin to force the fuel oil and air through
the clear tube. When no more air can be
seen in the tube, turn off the valve by
turning it clockwise. Finally, turn off or
remove the heat call or 24 AC volts from
the “W” terminal.
An assembly with a key to open the
bleed port can be constructed like that
shown in Figure 16.
CHECKING THE PUMP PRESSURE
The new Beckett burner assembly now
includes a Clean-Cut shutoff pump. This
pump will prevent oil from dripping into
the heat exchanger after the pump has
stopped. This is an improvement from
the older designs. However, this now
means that the new pump no longer has
a spare port from which oil pressure can
be easily taken.
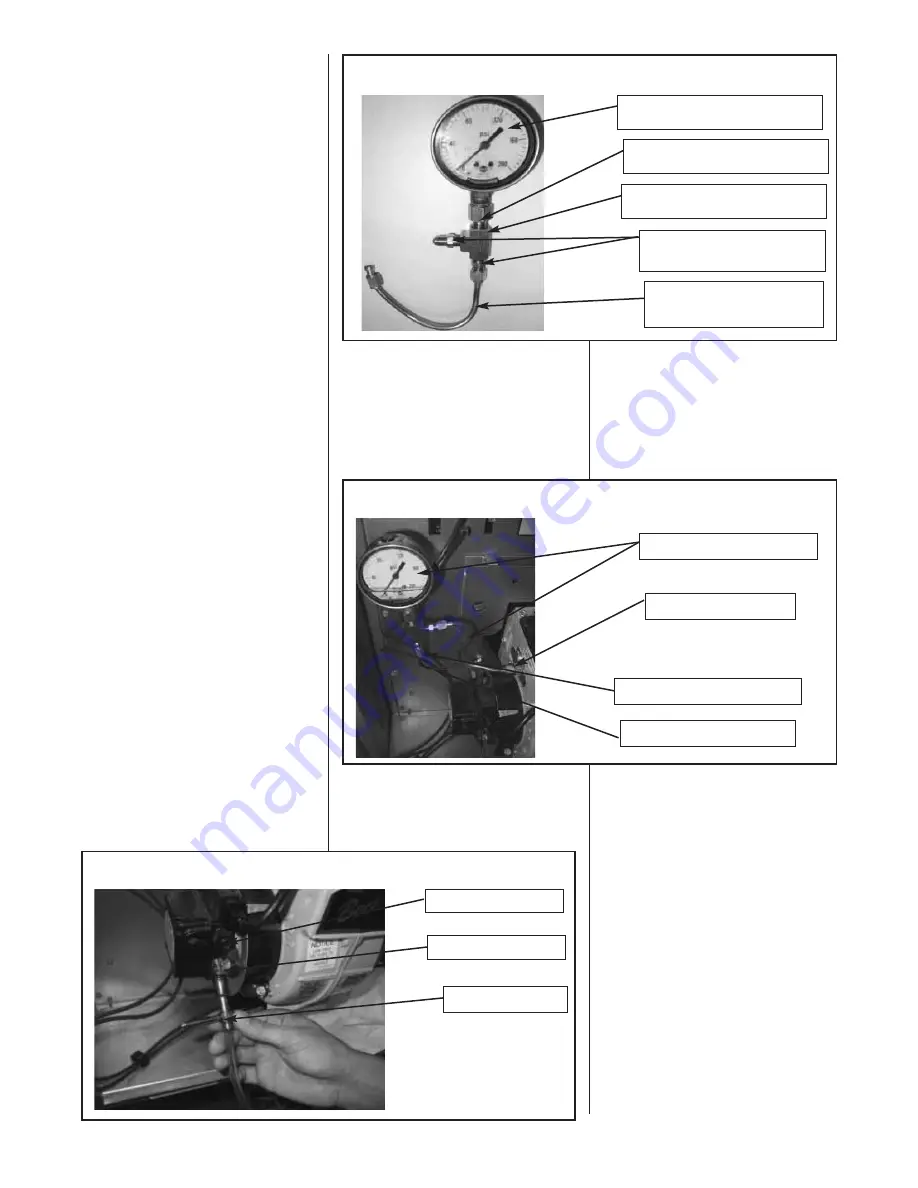
To check the oil pressure on the new
Clean-Cut pumps, an assembly of tube,
pipe fittings and a pressure gage will
need to be constructed as shown in
Figure 17. The figure shows a list of
components necessary to create the
assembly. Other assemblies can be
made, as this is not the only assembly
that will work. This assembly can be
used to check the pressure on other -
OPF and -OBF oil furnaces so that only
one assembly is necessary for a toolbox
used in the field. Construct the assembly
as shown in Figure 17 and install it as
shown in Figure 18.
Once the pressure testing assembly has
been made and installed as shown in
Figure 18, turn on the furnace by
applying a heat call or applying 24 AC
Volts to the “W” terminal on the
thermostat input terminal block. After the
burner starts and flame has been
established, turn the pump pressure
Once the pump pressure has been
properly adjusted, remove the pump
pressure reading assembly and replace
the fittings and tubes to their original
configurations. Next, repeat the bleeding
procedure as above to insure that no air
remains in the oil supply line.
PUMP SELECTION
For all -OBF and -OPF oil furnaces that
use the R7184 primary control, a Clean-
Cut pump with solenoid must be used.
Use of a standard pump without the
necessary solenoid will prevent
operation of the furnace. For this reason,
pumps from -OPC, -OPD, -OBC and -
OBD oil furnaces cannot be
interchanged with or used on the -OBF
or -OPF models.
For long pipe runs and installations
where the oil tank is below the burner, a
separate two-stage pump is available
from the parts replacement division. Be
sure to purchase a two-stage pump with
Clean-Cut solenoid. Use of a pump
without a Clean-Cut solenoid will prevent
furnace operation.
For information on when to use a two-
stage pump, consult the section titled
“OIL BURNER / PRIMARY CONTROL”
of this document.
FIGURE 17
EXAMPLE OF OIL PRESSURE TESTING ASSEMBLY.
16
General Service Pressure Gage 0-200 psi
Range with 1/4” NPT Male Connection
Brass Threaded Pipe Adapter Fitting –
1/4” NPT Male to 1/8” NPT Female
Brass Threaded Pipe Fitting – Tee with
1/8” NPT Female Thread
Compression Tube Fittings – Male
Straight Adapter (Self Aligning)
3/16” OD Tubing to 1/8” NPT Pipe
3/16” Copper Tubing with Standard
3/16” Compresion Tube Fittings on
Both Ends Approx. 4” Long.
FIGURE 18
OIL PRESSURE TESTING ASSEMBLY INSTALLED
FIGURE 16
BLEEDING THE PUMP
Pump Pressure Adjustment
Pump Bleed Access Port
Bleed Tool with Hose
Attached
Oil Pressure Testing Assembly from
Figure 17.
Install Oil Pressure Testing Assembly
to Existing Tube as Shown.
One Fitting to Mount to Burner
Existing Tubing Provided on Burner


