Page 16 of 22
ASHBY CONVERSION CRIB
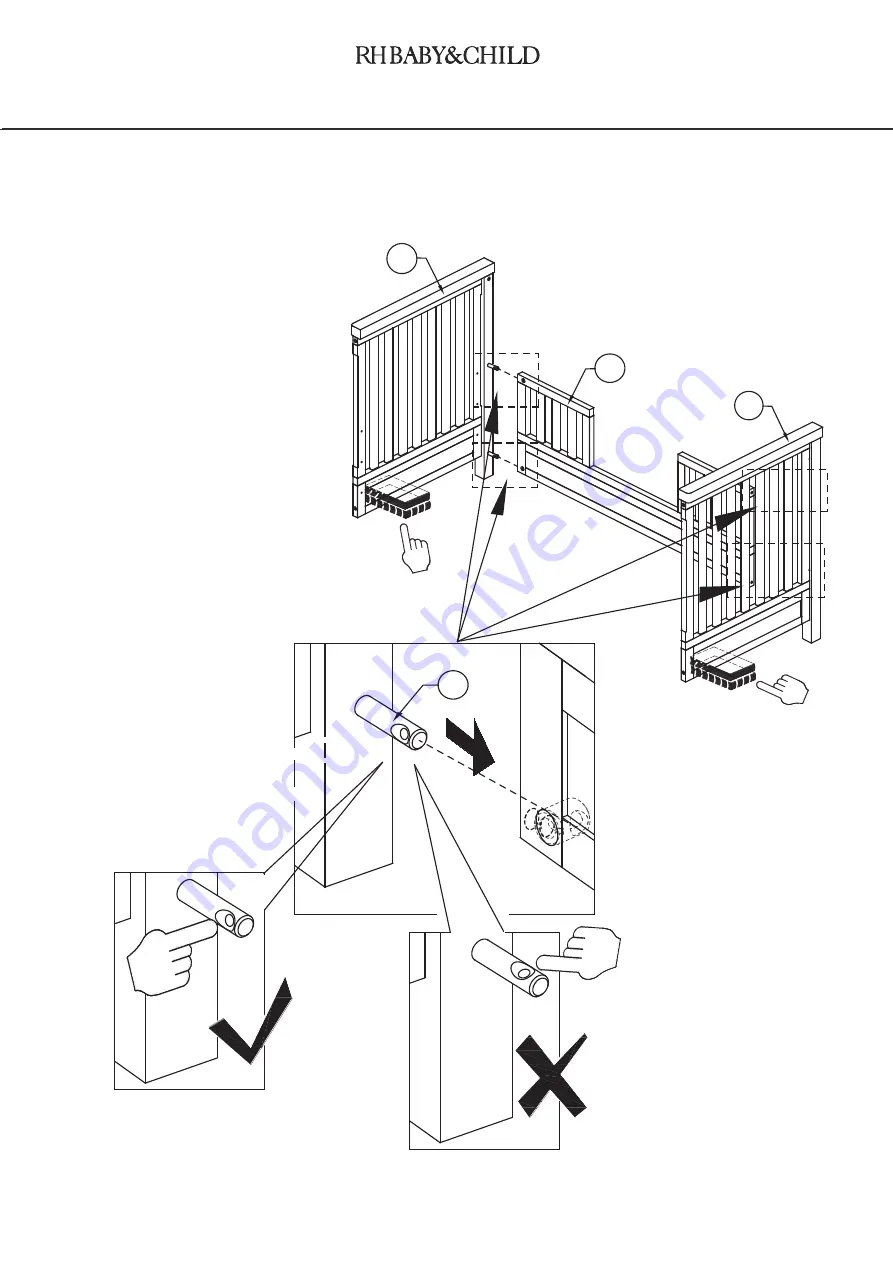
STEP 12:
8
Secure the Left/Right Side Rails (C, D) to the Toddler Rail (F), aligning the Connecting Bolt (8) to the hole of the Toddler Rail (F).
D
C
F
Page 1: ...d all Instructions before assembling this product KEEP INSTRUCTIONS FOR FUTURE USE CUSTOMER SERVICE If you are missing parts or have any questions about this product contact us first You can also orde...
Page 2: ...objects that could serve as steps for climbing out When child is able to climb out or reaches the height of 35 inches 89cm the crib shall no longer be used and the child should be placed in a youth o...
Page 3: ...ms that could become wound around the child s neck in or near this crib Ensure that the sides are properly latched or locked in place when the crib is occupied The mattress used with this crib should...
Page 4: ...mm in length 27 1 4 inches 690mm in width and 4 inches 100mm in thickness not exceeding 6 inches 152mm in thickness If guardrails are used as the mattress containment means the guardrail s provided mu...
Page 5: ...DED 1 1 1 1 1 HEADBOARD FOOTBOARD LEFT SIDE RAIL RIGHT SIDE RAIL MATTRESS SUPPORT A D C B E 1 2 3 4 5 6 Long Bolts 5 16 x 2 3 4 4 pieces 4 pieces 4 pieces 4 pieces 4 pieces 1 piece Insert Head 6mm NO...
Page 6: ...fittings list to identify each component Keep all packing materials until assembly is complete to avoid loss of smaller parts Do not completely tighten all bolts until all steps are finished D 4 C ST...
Page 7: ...Page 7 of 22 STEP 2 ASHBY CONVERSION CRIB 4 Secure the Left Right Side Rails C D to the Footboard B aligning the Connecting Bolt 4 to the hole of the assembling insert on the Footboard B D C B...
Page 8: ...2 Insert L Pin 2 into the holes on the Left Right Side Rails C D Note The Mattress Support E should be at the highest level when the child is born It must be at the lowest level before the child can...
Page 9: ...sition the Mattress Support E between the Left Right Side Rails C D Then align L Pin 2 into the pre drilled holes of the Mattress Support E STEP 6 Top Bottom C D Attach the Mattress Support E with Ins...
Page 10: ...ationary Side Rails C D and align the holes Then tighten using Long Bolt 1 and Allen Key 6 Page 10 of 22 ASHBY CONVERSION CRIB After crib is completely assembled return to each bolt and tighten to snu...
Page 11: ...VERSION CRIB PARTS INCLUDED F 1 TODDLER RAIL F HARDWARE INCLUDED 8 9 10 11 12 NO ITEM DESCRIPTION QTY Connecting Bolt Camlock Wheel Allen Key 5mm Small Bolt 8mm x 3 4 1 piece 1 piece 2 pieces 4 pieces...
Page 12: ...ge 12 of 22 ASHBY CONVERSION CRIB STEP 8 1 12 A D A C Remove Headboard A from the crib by carefully unscrew and remove the 4 Long Bolts 1 with spring washer on back of the Headboard A using Allen Key...
Page 13: ...age 13 of 22 ASHBY CONVERSION CRIB E E STEP 9 Remove Mattress Support E from the crib by carefully unscrewing and remove the 4 Insert Heads 3 on top of the Mattress Support E using Allen Key 12 3 12 E...
Page 14: ...Page 14 of 22 ASHBY CONVERSION CRIB STEP 10 Remove the Footboard B from the crib by carefully unscrew and remove the 4 Camlock Wheels 5 using Allen Key 11 5 4 B 11 D C B 4...
Page 15: ...Page 15 of 22 ASHBY CONVERSION CRIB D 4 C STEP 11 Unscrew the Connecting Bolts 4 from the Left Right Side Rails C D Then insert the new Connecting Bolts 8 to the Left Right Side Rails C D D 8 C...
Page 16: ...Page 16 of 22 ASHBY CONVERSION CRIB STEP 12 8 Secure the Left Right Side Rails C D to the Toddler Rail F aligning the Connecting Bolt 8 to the hole of the Toddler Rail F D C F...
Page 17: ...attress Support E is not in the lowest position move L Pin 2 it to the lowest position NOTE THE MATTRESS SUPPORT E SHOULD BE AT THE HIGHEST LEVEL WHEN THE CHILD IS BORN IT MUST BE AT THE LOWEST LEVEL...
Page 18: ...osition the Masstres Support E between the Left Right Side Rails C D Then align L Pin 2 into the pre drilled holes of the Mattress Support E STEP 16 Top Bottom C D Attach the Mattress Support E with I...
Page 19: ...Page 19 of 22 ASHBY CONVERSION CRIB STEP 17 Position the Headboard A to the Left Right Stationary Side Rails C D and align the holes Then tighten using Long Bolt 1 and Allen Key 12 1 12 A A D C...
Page 20: ...he crib to toddler bed the Small Bolt 10 should be inserted in the upper holes of the Left Right Side Rails C D Tighten with Allen Key 12 After crib is completely assembled return to each bolt and tig...
Page 21: ...frame on side and place mattress in frame before adjusting 4 Slide clamps on overlapped cross rails and tighten thumb screws 5 Insert threaded sockets into legs and screw glides into sockets Clamps S...
Page 22: ...at Washers 2 Spring Washers 3 and Hex Nut 4 Tighten with Allen Wrench 5 and Hex Wrench 6 2 1 1 2 3 4 5 6 Bolt 1 4 x 2 3 4 4 pieces 8 pieces 4 pieces 1 piece 1 piece NO ITEM DESCRIPTION QTY Flat Washer...