background image

UMS4 plus

User Manual

16

3.3 Add Device

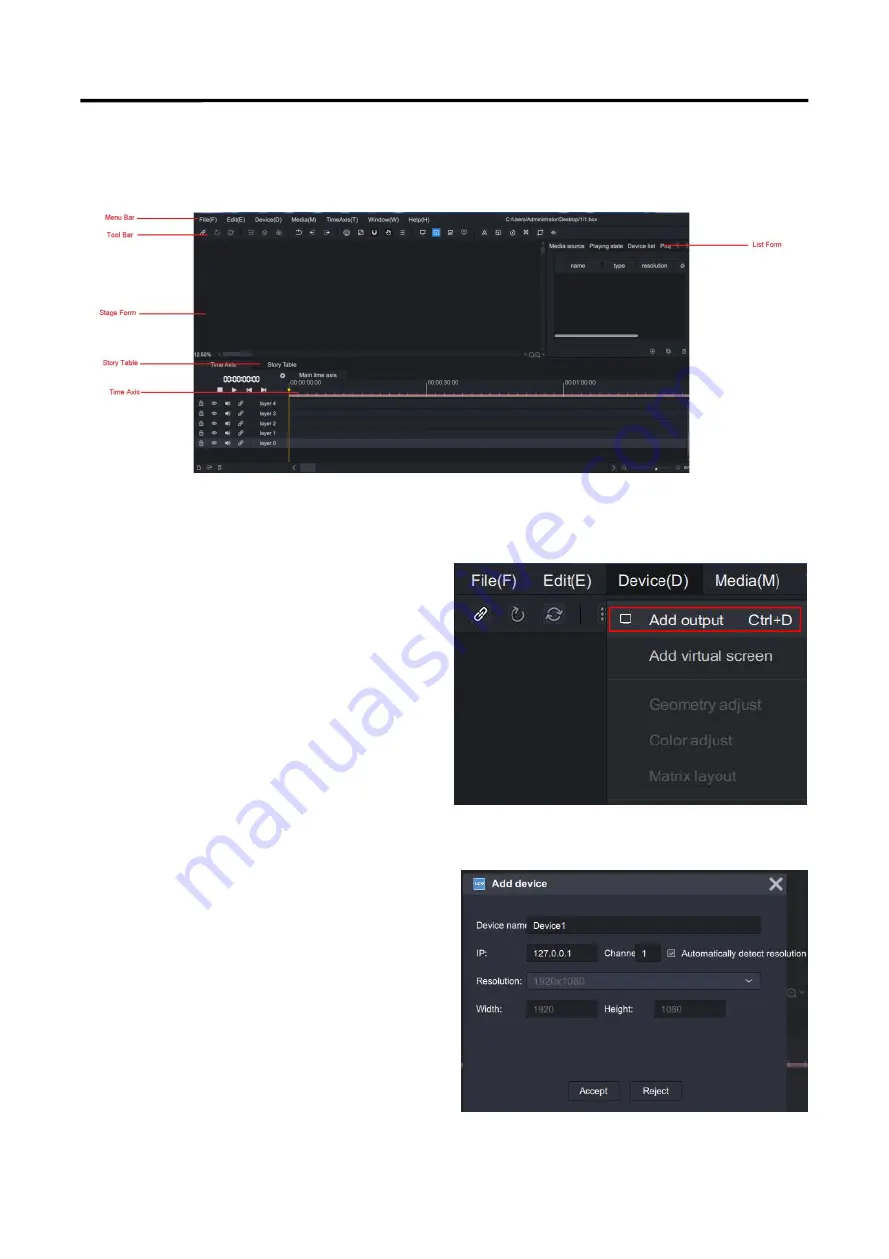
The main interface as shown below

Add Device

There are 2 ways to add device

1. You can click the top menu bar -- 【Device】 -- 【Add
uutput】, and the【Add Device】box will appear.

2. Click 【Add Device】in the toolbar at the bottom of
the Device List.

Device name

: custom

IP :

IP address

Resolution :

Automatically detect resolution or custom

resolution

Width/Height :

fill in width and height of display

After setting,click“Accept”
Add one device every time,and the number of device is
unlimited.

Summary of Contents for UMS4 plus

Page 1: ...1 UMS4 plus User Manual Article No RGB RD UM UMS4 plus E0001 Version V1 1 ...

Page 2: ...Chapter 3 Use Your Product 13 3 1Graphics Card Mosaic Setting 13 3 2 Software Installation 14 3 3 Add Device 16 3 4 Add Media 17 3 4 1 Add Media 17 3 5 Layer Setting 19 3 5 1 Time Axis 19 3 5 2 Add Command 20 3 5 3 Story 22 3 5 4 Media Effect 24 3 5 5 Output Settings 26 3 6 Stage Preview 27 3 6 1 Stage Form 27 3 6 2 Program Preview 28 3 7 Save and Export 29 3 7 1 Save 29 3 7 2 Export 29 3 8 Genera...

Page 3: ...UMS4 plus User Manual 3 5 1 Contact us 35 Chapter 6 Appendix 36 6 1 Terms Definitions 36 6 2 Revision History 42 ...

Page 4: ...ystems and software on the date of commissioning at latest 30 days after the transfer of risks In the event of justified notice of compliant RGBlink can repair the fault or provide a replacement at its own discretion within an appropriate period If this measure proves to be impossible or unsuccessful the purchaser can demand a reduction in the purchase price or cancellation of the contract All oth...

Page 5: ...he product input or output terminals A protective ground connection by way of the grounding conductor in the power cord is essential for safe operation Use the Proper Power Cord Use only the power cord and connector specified for your product Use only a power cord that is in good condition Refer cord and connector changes to qualified service personnel Use the Proper Fuse To avoid fire hazard use ...

Page 6: ... contact your sales representative Once you have removed all the components from their packaging and checked that all the listed components are present visually inspect the system to ensure there was no damage during shipping If there is damage notify the shipping carrier immediately for all claims adjustments Site Preparation The environment in which you install your product should be clean prope...

Page 7: ...UMS4 plus User Manual 7 Chapter 1 Your Product 1 1 In the Box Power Cord Certification Note Power cable are supplied according to the destination market ...

Page 8: ...DMI 2 0 Use RGBlink MPS plus to configure and output multiple video sources as layers windows or PIP allowing outputted media to be tailored the needs of downstream processors and displays directly from the source UMS solutions are ideal companions for video wall processors and similar devices and perfect for integration digital signage and events applications Key Feature Intel high frequency proc...

Page 9: ... 9 1 2 1 Front Panel No Item Description 1 Harddisk Slots Replaceable 2 USB Connect to keyboard and mouse 3 LCD screen Show device status and menu 4 Power Button Press to turn on long press for 3 seconds to turn off 1 2 3 4 ...

Page 10: ...dule is optional and input resolutions up to 4096 2160 60 2 Output slots 6 DP 1 2 2 Type C output resolutions up to 4096 2160 60 6 DP 1 2 is recommended to use 3 Audio 2 Audio in 3 Audio out connect to earphones and speakers 4 Communication 2 RJ45 connect to control computer 5 USB A 1 Type C connect to hard disk ...

Page 11: ...UMS4 plus User Manual 11 1 2 3 Dimension Following is the dimension of UMS4 plus for your reference 484mm 598mm 180mm ...

Page 12: ...ut display to the product before all devices are powered on 2 2 Plug in Power Connect power cable to device and plug into wall socket Turn on power at wall socket 2 3 Turn on Your UMS4 plus Press the power switch and the device will enter boot interface The device will remain the status you have set last time ...

Page 13: ...ard Mosaic Setting 1 Right click your computer desktop to open NVIDIA Control Panel 2 Click Work Station Mosaic Setting Add new 3 Layout Number of monitor 1 4 Layout Row Column select layout according to your needs Direction Horizontal Vertical Click Next to continue ...

Page 14: ... Both can be installed on the same device In most cases the client and server need to be installed respectively so you need to install the client on the controller and the server on the playback server 5 Select the monitor Tick the monitors need splicing Refresh Rate 29 97 30hz Resolution 600 480 720 480 720 576 800 600 1024 768 1176 664 1280 720 1280 1024 1600 1024 1680 1050 1920 1080 3840 2160 C...

Page 15: ...w you will enter MPS plus boot interface Configuration Setting 2 Right click the MPS plus icon open the location of the file 3 Click the icon to enter the configuration menu 1 Adjust the location Left fill in the width of the main monitor for example the width is 3840 Right fill in the total width of monitors for example single monitor width is 3840 and the total width of 4 monitors is 15360 Botto...

Page 16: ...ice Add uutput and the Add Device box will appear 2 Click Add Device in the toolbar at the bottom of the Device List Device name custom IP IP address Resolution Automatically detect resolution or custom resolution Width Height fill in width and height of display After setting click Accept Add one device every time and the number of device is unlimited ...

Page 17: ...en drag it to the stage device At the same time you can edit the time playback duration and playback mode of the audio MPS plus supports various audio formats such as MP3 WAV AAC FLAC APE M4A etc Picture MPS supports a variety of picture format such as JPG PNG JPEG GIF BMP TIF Capture Capture the computer desktop image is a common used function The captured desktop image or the video captured by c...

Page 18: ... time axis as shown in the picture You can check the video you want to display in the local folder and then click Open the video will be imported into the software The added media will be shown in Media source list You can check the media information including name type resolution duration and path Click the icon to delete the media ...

Page 19: ... display The top media will be displayed first in the top layer Start end time on the Time Axis the media on the far left is the start time and the media on the far right is the end time Drag media horizontally to change the start end time of the media Play Time On the Time Axis drag at the end of the media to lengthen or shorten the play time of the media Control Button Aux time axis Add aux time...

Page 20: ...ause CMD Add jump CMD 2 Add play CMD by shortcut Ctrl W add pause CMD by Ctrl E add jump CMD by Ctrl R Click menu bar Time Axis Add aux time axis or add in the Task list Priority of media preview in aux time axis is higher than that in the main time axis That is when media is overlaid on the stage the media on the saux time axis is displayed above that on the main time axis ...

Page 21: ...me customize name Excutiion select the main time axis or aux time axis Time enable start time setting Pause Stop Stop just on aux time axis Click Accept after setting done Jump CMD Name customize name Excutiion select the main time axis or aux time axis Time enable start time setting Jump to set time position and CMD name After jump play pause delay Click Accept after setting done ...

Page 22: ...l display a black screen when switching This playback setting applies to the continuous playback of multiple media on a single device Multiple media play simultaneously If the start time of multiple media is the same it will be played at the same time and the end time will be determined according to the length of media This playback setting applies to one device or multiple devices playing multipl...

Page 23: ...nd select play loop set the media duration to a longer time then the media will continue to loop play until the end of the play 4 In the media properties list click play independently and add a pause command on the time axis During the playback process when the playback timeline is moved to the pause command the media can still play normally and continue to loop after starting pause Program you ca...

Page 24: ... is displayed as a rectangular plan in the stage window Edit the values of position parameters X and Y to change the position of the media Drag the media with the left mouse button can also change the position In the playback state use the shortcut key Alt S to divide the entire timeline into multiple program units At the same time in the Program table an array of program names corresponding to th...

Page 25: ...comes to the time pos you set Transparent Transparent effect take effect when the media switch fade in and fade out When transparent is 0 the media image in the stage form is fully displayed When it is 100 the media turn to be transparent Crop Crop effects are used when only part of the media needs to be displayed on the stage form You can cut off the unnecessary part by sliding the crop bar Volum...

Page 26: ...r the matrix layout setting interface Set arrange direction and overlap width first and then drag the device to the matrix Geometry adjust Geometry adjust is to adjust the shape of display image In the menu you can adjust the geometry to every device You can adjust via point row column all according to your needs The geometric adjustment function can be applied to multi channel projection picture ...

Page 27: ...orm Setting In the stage form the blue rectangle represents the device Medias within the blue rectangle are normally output to the display device so when adding media it is important to note that the parts of the media that need to be displayed must be added to the blue rectangle Color adjust Color adjust needs to be used when the media server is connected to the display device in the real scene ...

Page 28: ...hid the preview image click to mute the media It will return normally when clicking again In the stage form at least one device should be added When the number of added devices reaches more than dozens the arrangement of display devices in the stage may exceed the screen At this time you can scale the display ratio of the stage window Scale 1 Ctrl Alt Mouse Wheel can move the stage up and down Ctr...

Page 29: ... event it is often necessary to migrate the entire project file to another media server to avoid the tedious and unexpected situation of reediting The main function of Export is to export the entire project file to a folder and then copy the entire folder to other servers including all the media materials used can be directly used without editing Steps Click File Export Preview Quality You can set...

Page 30: ...oject file based on previous steps 3 Connect server on Client load project After successful connection to the server the server will show the project file which is in the unplayed state 4 Auto play on connected to server the server will display the project file Media default 30s Time Axis FPS System default 25FPS you can select 30 50 60 75 100 120FPS Arrangement Seriel Parallel Max Media count def...

Page 31: ...ters and underscores and does not support special characters Render rate it supports 30 60FPS and you can customize according to your needs Start Server on boot up The MPS server will boots up automatically when the media server starts Then you can further click Server load project on boot up or Server auto play on load project The effect of the above three options is that the specified project wi...

Page 32: ... to current playing area select items left side of time line select items right side of time line s tage global view fitting all snap mode view mode option device mode media mode template mode position effect scale effect rotation effect opacity effect media clip volume effect Click Main time axis accept time code form audio input Time code format the options as shown in the right picture Time cod...

Page 33: ...ry ctrl F Delete del Device Add device ctrl D Media Add local file ctrl M Stage Device D Media M Tempale T Virtual screen V Time Axis Add aux time axis ctrl T Add layer ctrl I Remove layer ctrl shift I Add program alt S Remove program alt N Add play CMD ctrl W Add pause CMD ctrl E Add jump CMD ctrl R Stop Backspace Play pause Space ...

Page 34: ... 0001 01 0 12G SDI capture card 829 0002 01 0 HDMI 2 0 capture card 829 0011 01 0 3G SDI capture card 829 0012 01 0 HDMI 1 3 capture card 829 0023 01 0 AMD sychron card 829 0026 01 0 NVDIA sychron card 829 0027 01 0 Monitor 2K 829 0028 01 0 Monitor 4K 950 0006 00 0 Power Module 1200W 829 1018 01 0 Media player Software 829 1019 01 0 Project Software ...

Page 35: ...UMS4 plus User Manual 35 Chapter 5 Support 5 1 Contact us ...

Page 36: ...rd offers two different connectors one with 24 pins that handles digital video signals only and one with 29 pins that handles both digital and analog video SDI Serial Digital Interface Standard definition video is carried on this 270 Mbps data transfer rate Video pixels are characterized with a 10 bit depth and 4 2 2 color quantization Ancillary data is included on this interface and typically inc...

Page 37: ... November 28 2017 It adds support for higher resolutions and higher refresh rates Dynamic HDR including 4K 120 Hz and 8K 120 Hz DisplayPort A VESA standard interface primarily for video but also for audio USB and other data DisplayPort orDP is backwards compatible with HDMI DVI and VGA DP 1 1 Was ratified on 2 April 2007 and version 1 1a was ratified on 11 January 2008 DisplayPort 1 1 allow a maxi...

Page 38: ...mall dimensions it is the perfect fit for high density connections XFP SFP and SFP transceivers FC Ferrule Connector is a screw type connector with a 2 5mm ferrule FC is a round shaped threaded fiber optic connector mostly used on Datacom telecom measurement equipment single mode laser ST Straight Tip was invented by AT T and uses a bayonet mount along with a long spring loaded ferrule to support ...

Page 39: ...ndwidth Digital Content Protection HDCP was developed by Intel Corporation an is in wide use for protection of video during transmission betweendevices HDBaseT A video standard for the transmission of uncompressed video HDMI signals and related features using Cat 5e Cat6 cabling infrastructure ST2110 A SMPTE developed standard ST2110 describes how to send digital video over and IP networks Videois...

Page 40: ...edefined function which allows access capabilitiesandfeaturesorroutinesviaasoftware or hardware without accessing source code or understanding the details of inner working mechanism AnAPIcall mayexecute a function and or provide datafeedback report DMX512 The communication standard developed by USITT forentertainment anddigital lighting systems The wide adoption of the Digital Multiplex DMX protoc...

Page 41: ...e image A video frame is made up of two fields or two sets of interlaced lines In a film a frame is one still image of a series that makes up a motion image Genlock Allows synchronisation of otherwise video devices A signal generator provides a signal pulses which connected devices can reference Also see Black Burst and Color Burst Blackburst The video waveform without the video elements It includ...

Page 42: ...nge of luminance to that experienced through the human visual system UHD Standing for Ultra High Definition and comprising 4Kand8Ktelevision standardswith a16 9 ratio UHD follows the 2K HDTV standard A UHD 4K displayhasaphysicalresolution of3840x2160 which is four times the area and twice both the widthandheightofaHDTV FullHD 1920x1080 video signal EDID Extended Display Identification Data EDID is...

Reviews: