background image

42

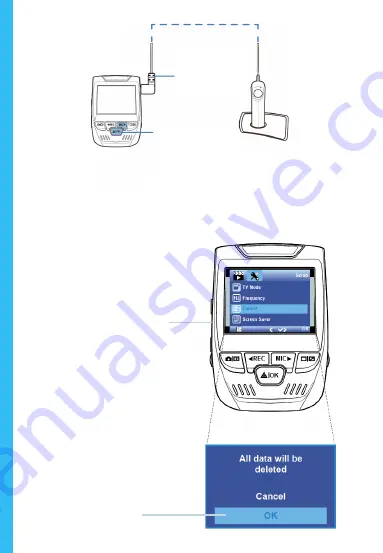
Appuyez deux fois sur 

le bouton Menu

Appuyez sur le bouton 

OK pour confirmer le 

formatage de la carte

Connectez le 

Mini-USB à la 

caméra

Le voyant LED 

bleu indique que 

l’appareil est en 

charge ou sous 

tension

Maintenant vous pouvez vous déconnecter de l’alimentation. 

La caméra s’éteindra après 3 secondes. La caméra devrait 

commencer à enregistrer automatiquement la prochaine 

fois qu’elle sera allumée.

Summary of Contents for V1P

Page 1: ...V1P Quick Start Guide V1P クイックスタートガイド Guide de démarrage rapide de la V1P Guida di avvio rapido V1P Guía de inicio rápido V1P V1P Schnellstartanleitung FR IT DE SP JP ...

Page 2: ...c Operation 日本語 概説 本製品の同梱物 カメラの概説 画面のアイコン 基本操作 Français Aperçu Que contient la Boîte Aperçu de la Caméra Installation Opération de Base Italiano Descrizione Nella Confezione Descrizione Telecamera Installazione Funzionamento Base page 4 5 6 8 13 20 21 22 24 29 36 37 38 40 45 52 53 54 56 61 ...

Page 3: ...pañol Visión General Qué hay en la Caja Resumen de la Cámara Instalación Operación Básica Deutsch Übersicht Verpackungsinhalt Kamera übersicht Installation Grundbedienung 68 69 70 72 77 84 85 86 88 93 page ...

Page 4: ...s to improve it please contact us You can reach us via care rexingusa com or call us at 203 800 4466 Our support team will respond you as soon as possible Always a surprise in Rexing Check us out here https www facebook com rexingusa https www instagram com rexingdashcam https www rexingusa com support registration Facebook Instagram Site ...

Page 5: ...Rexing V1P Dash Cam 2 Car Charger 3 Mount Plate 3M Adhesive 4 Mini USB Cable 5 Rear Camera 6 Cable Management Tool 7 Cable Clips 8 V1P Quick Start Guide 9 Safety Guide 1 6 7 8 9 2 3 4 2 What s in the box 5 ...

Page 6: ...ton 9 Screen Button 10 Mini USB Port 11 GPS Logger Port 12 Rear Camera Port 13 Lens Angle Adjustment The Camera is recording when the LED is flashing red The Camera is recording when the LED is flashing red The device charging or powered on when the LED is solid blue The device is charging or powered on when the LED is solid blue 1 10 11 5 6 8 7 9 2 3 4 12 13 ...

Page 7: ...ding Time Current Clip Video Resolution Parking Mode On G Sensor Sensitivity Level Memory Card Inserted Battery Charging WDR Mode On Recording On Recording Standby Status Loop Recording Time Exposure Value MIC Off MIC On Current Date DD MM YYY Time 24H Plate Number ...

Page 8: ... the windshield Wait at least 20 minutes before mounting the camera Orientation mount as shown Step 2 Insert the Memory Card The Rexing V1P accepts Class 10 UHS 1 or higher Micro SD memory cards up to 256GB You will need to insert a memory card before you can begin recording Before inserting or removing a memory card first ensure you ve powered down the device Gently push the memory card in until ...

Page 9: ...hin the camera using the format function Always backup important data stored on the memory card before formatting To format the memory card make sure you have inserted your memory card then turn on the device by connecting to a power source Press REC to stop recording Then press the MENU button twice to enter the System Setup Menu Use the REC and MIC buttons and go to the Format setting Press the ...

Page 10: ...formatting the card Connect Mini USB to the camera Blue LED lights indicate the device is charging or powered You may now disconnect from power The camera will shut down after 3 seconds The camera should begin recording automatically the next time it is powered on ...

Page 11: ...tep 4 Mount the Rear Camera Mount the rear camera as shown below Use the provided rear camera cable to connect the rear camera to the front camera Plug Rear Camera into the Dash Cam Rear Camera installation ...

Page 12: ...ndscreen and tuck in under the trim Plug the Car Charger Cable into a 12V DC power outlet or the car cigarette lighter Connect car charger to the camera The camera will auto start recording once powered on Plug Mini 5 pin Connector to the Dash Cam Route power cable to the Dash Cam Plug charger into power outlet or cigarette lighter ...

Page 13: ...ssory socket or cigarette lighter and receives a charge i e the vehicle is started To turn the device on manually press and hold the POWER button until the welcome screen appears The camera will automatically start recording when powered on Press an hold the POWER button to turn the device on manually ...

Page 14: ...ress the MODE button and toggle to the desired mode Press the MENU button once to enter the settings menu for a Mode Press the MENU button twice to enter the System Settings System icon Video Mode icon Press the Menu button to select the desired setting Press the Mode button and toggle to the desired Mode ...

Page 15: ...ing Press the REC button to stop recording Playback mode Control playback with these buttons Video Playback Playback of videos can be done on the device or a computer Also if you have purchased a Rexing GPS Logger you may play back the recordings in a specialized application To playback a video on the device toggle to the Playback mode Use the REC and MIC buttons to toggle to the desired video Pre...

Page 16: ... To playback a video using an SD card adapter remove the memory card and insert it into an SD card adapter Place the adapter in the computer To playback a video using USB cable connect the USB Cable to the device and the computer After the device powers up press the OK Button to select Mass Storage On the computer navigate to device drive The videos are stored at CARDV MOVIE Select the video to pl...

Page 17: ... Fi settings on your phone ff ind SSID B50 _ XXXX from the list tap to connect Default password 12345678 3 Open the Rexing Connect App tap Connect to enter realtime video streaming page 4 Once connected the dash cam screen will switch to the camera view and will display Wi Fi Connect message Using the Rexing Connect app you can view a live preview of the dash cam screen start stop recording as wel...

Page 18: ...your recordings using the GPS Video player For Windows and Mac available at rexingusa com Press the MENU button twice and enter the System Settings Toggle to the GPS Speed Unit setting and select your preferred speed unit After a GPS signal is found the screen icon will turn from blue to green Please visit gpsa rexingusa com to watch a video tutorial GPS Signal not connected GPS Signal active ...

Page 19: ...C Buttons to toggle through your photos To delete a photo stop video recording and toggle to the Playback Mode and toggle through the videos and photos to the one you want to delete Press the MENU button once and toggle to the Delete option Press the OK Button and select Delete Current or Delete All Toggle to the Playback mode and select a photo to view Toggle to the Delete option Choose the desir...

Page 20: ...要な場合 または製品を改善するための提案がある場 合は ご連絡ください jpcare rexingusa comに電子メールでする できます 当社のサポートチームは できるだけ早くお客様からのお 問い合わせにお答えいたします REXINGでいつも驚きを こちらから最新情報をチェックください https www facebook com rexingusa https www instagram com rexingdashcam https www rexingusa com support registration Facebook Instagram ホームページ ...

Page 21: ...21 1 Rexing V1Pドライブレコーダー 2 車載充電器 3 ドライブレコーダーマウントプレート 3M接着シール 4 ミニUSBケーブル 5 リアカメラ 6 ケーブルガイドツール 7 ケーブルマウント Cable Clips 8 V1P クイックスタートガイド 9 安全ガイド 2 本製品の同梱物 1 6 7 8 9 2 3 4 5 ...

Page 22: ...ューボタン 5 モードボタン 6 録画ボタン 7 OKボタン 8 マイクボタン 9 画面ボタン 10 ミニUSBポート 11 GPSロガーポート 12 リアカメラポート サポート なし 13 レンズ角度調整 LEDが赤く点滅している時 カメラは録画中です LEDが赤く点滅している時 カメラは録画中です LEDが青く点灯している時 機 器は充電中または電源が入っている状態です LEDが青く点灯している時 機器は充電中または電源が入っている状態です 1 10 11 5 6 8 7 9 2 3 4 12 13 ...

Page 23: ...23 GPS 信号 未接続 GPS シグナル ロック済み 録画時間 現在のク リップ ビデオ解像度 パーキングモード オン Gセンサー感度 レベル メモリーカード 挿入済み 充電中 WDR モード オン 録画中 オン 録画スタンバイス テータス ループ録画時間 露出値 マイク オフ マイク オン 現在の日付 日 月 年 時刻 24時間表示 車両ナンバー 画面アイコン ...

Page 24: ...ださい フロントガラスにしっかりと取り付けます 取り付けてから少なく とも 20分間待ってから カメラを取り付けます マウントを図のように向けて置きます Step 2 メモリカードを挿入する RexingドライブレコーダーV1Pは 最大256GBのマイクロSDメモリ カード Class 10 UHS 1以上 に対応しています 記録を開始する前 に メモリカードを挿入する必要があります メモリカードを挿入また は取り出す場合は 事前にデバイスの電源が切れていることを確認し てください クリック音が聞こえるまでメモリーカードをゆっく りと押し込んでくだ さい メモリーカードをもう一度押し込むと バネでカードが押し出さ れます ...

Page 25: ... 新しいメモリカードの使用を開 始する前に フォーマッ ト機能を使用してカメラ内のカードをフォ ーマッ トする必要があります フォーマッ トする前に メモリカード に保存されている重要なデータを必ずバックアップしておいてく ださい メモリカードを初期化するには メモリカードが挿入されていること を確認してから 電源に接続して機器の電源を入れます 録画を停 止するには REC ボタンを押してください 次に MENU ボタン を 2 回押して システムセッ トアップメニューに入ります REC ボタ ンと MIC ボタンを使って Format メニューを選択します OK ボタンを押して初期化を実行してください 電源ボタンを押して電源 をオフにします ...

Page 26: ...26 メニュー ボタンを2回押します OK を押してメモリカード の初期化を実行します ミニUSB端子に 接続します LED が青く点 灯している場合 機器が充電中か または機器 の電源が入っています これで カメラの電源を切ることができます カメラは3秒後にシャッ ト ダウンします カメラは 次回電源がオンになると自動的に録画を開始 します ...

Page 27: ...27 Step 4 リアカメラの取り付け 図のようにリアカメラを取り付けます リアカメラ拡張ケーブルを使用 して ウォータープルーフリアカメラをフロントカメラに接続します リアカメラをドライ ブレコーダーに接 続する リアカメラの取り付け ...

Page 28: ...カメラをマウントにセッ トし 電源ケーブルをフロントガラスの周囲に 沿って慎重に配線し トリムの下へとしまい込みます 車載充電器を車両の12V DC電源コネクターまたはシガーライター に接続します 車載充電器をカメラに接続します 電源が入ると カメラは録画を自 動的に開始します ミニ5ピンコネクタ をドライブレコー ダーに差し込みま す 電源ケーブルをドラ イブレコーダーに接 続します 車両の電源コネクター またはシガーライ ターに車載充電器を接 続します ...

Page 29: ...29 5 基本操作 機器の電源 機器は12Vアクセサリソケットまたはシガーライターに接続される と 電源が自動的にオンになります つまり 車両が起動すると電源 がオンになります 機器の電源を手動でオンにするには ようこその画面が表示される まで POWER ボタンを押したままにします 電源が入ると カメラは自動的に録画を開始します 電源ボタンを押したままにする と 機器の電源を手動でオンにで きます ...

Page 30: ...電源を入れます カメラが録画中の場合は REC ボタンをタ ップして録画を停止します MODE ボタンを押して 設定したいモードに切り替えてください MENU ボタンを1回押すと モードの設定メニューが表示されま す MENU ボタンを2回押すと システムの設定メニューが表示され ます システムのアイコン ビデオモードのアイコン メニューボタンを押して 希望 の設定を選択します モードボタンを押して 希望のモード に切り替えます ...

Page 31: ...EC ボタンを押すと録画 を停止します 電源がオンになるとカメラは自動的 に録画を開始します 再生モード ボタンを使用してビデオの再生をコントロールしてください ビデオの再生 ビデオの再生は 機器またはコ ンピュータ上で行うことができ ます Rexing GPSロガーを購入 している場合は 特殊なアプリ ケーションでビデオを再生する ことができます 機 器 で ビ デ オ を 再 生 す る に は 再生モードに切り替え ます REC ボタンと MIC ボタ ンを使用して再生したいビデ オに切り替え OK ボタンを押 して再生します ...

Page 32: ...メモリカードを取 り外し SDカードアダプタに挿入し てから SDカードアダプタをコンピ ュータに挿入します USB端子でコ ンピュータと接 続しますます マスストレ ージを選択 します USBケーブルを使用してビデオ を再生する場合は USB ケー ブルで機器をコンピュータと 接続します 機器の電源をオ ンにしてから OK ボタンを押 してマスストレージを選択し ます コンピューターで機器のドラ イブにアクセスします ビデオ は次の場所に保存されます CARDV MOVIE 再生するビ デオを選択して 再生します 駐車場モニター ドライブレコーダーをスマート直接配線コードに接続して 駐車モ ニター機能を有効にします スマート直接配線コードを別途購入 する必要があります PCカメラ マスストレージ ...

Page 33: ... て接続します デフォルトのパス ワード 12345678 3 Rexing Connectアプリを開 き Connect をタップしてリ アルタイムビデオストリーミング画 面を表示させます 4 接続すると ドライブレコーダー のスクリーンがカメラビューに切り 替わり Wi Fi接続済み という メッセージが表示されます Rexing Connectアプリを使用すると ドライブレコーダーのスクリーンのラ イブプレビューを表示したり 録画を開 始 停止したり スマートフォンで録画 の表示 保存ができます Wi Fi接続機能に関する詳細について は 以下のリンクをご覧ください www rexingusa com wifi connect ビデオチュートリアルを見るためには support rexingusa com にア クセスしてください ...

Page 34: ...Video Playerを使用して録画 を再生しながらこれらの情報にア クセスできます Windows と Mac の場合は rexingusa comで入手で きます MENU ボタンを2回押して システ ム設定を表示します GPS Speed Unit の設定に切り替 え 希望の速度単位を選択しま す GPS信号を受信すると 画面のア イコンが青から緑に変わります ビデオチュートリアルを見るに はgpsa rexingusa comにアクセス してください GPS信号 接続 されていない GPS機能 アクティブ ...

Page 35: ...再生モー ドに切り替えます REC および MIC ボタンを 押して 写真を切り替えます 写真を削除するには ビデオ 録画を停止して再生モード に切り替え 削除したい写真 またはビデオに切り替えま す MENU を 1 回押し 削除オプ ションを表示します OK ボタンを押して Delete Current 現在表示している 写真 ビデオを削除 または Delete All すべて削除 を 選択します 再生モード に切り替え て プレビュ ーする写真 を選びます Delete ボ タンを選択 します 削除オプシ ョンを選択 します 全て削除 現在選択しているものを削除 ...

Page 36: ...s avez des suggestions pour l améliorer veuillez nous contacter Vous pouvez nous joindre via care rexingusa com Notre équipe d assistance vous répondra le plus vite possible Toujours une surprise à Rexing Consultez nous ici https www facebook com rexingusa https www instagram com rexingdashcam https www rexingusa com support registration Facebook Instagram Site ...

Page 37: ...argeur de véhicule 3 Plaque de montage de caméra de tableau de bord Adhésif 3M 4 Câble Mini USB 5 Caméra arrière 6 Outil de gestion de câble 7 Serre câble 8 Guide de démarrage rapide V1P 9 Guide de sécurité 2 Que contient la boîte 1 6 7 8 9 2 3 4 5 ...

Page 38: ...ini USB 11 Port pour enregistreur GPS 12 Port pour caméra arrière 13 Réglage de l angle d objectif La caméra enregistre lorsque la LED clignote en rouge La caméra enregistre lorsque la LED clignote en rouge La caméra est en charge ou allumée lorsque le voyant est d un bleu fixe La caméra est en cours de chargement ou sous tension lorsque le voyant est d un bleu fixe 1 10 11 5 6 8 7 9 2 3 4 12 13 ...

Page 39: ... de vidéo Mode Parking activé Niveau de sensitivité de capteur G Carte mémoire insérée Batterie en recharge Mode WDR activé Enregistrement activé Etat de veille pour enregistrement Durée d enregistrement en boucle Valeur d exposition MIC désactivé MIC activé Date actuelle JJ MM AAAA Heure 24H Numéro de plaque ...

Page 40: ...ndez au moins 20 minutes avant de monter la caméra Orientez le support comme indiqué Étape 2 Insérez la carte mémoire La Rexing V1P accepte les cartes mémoire Micro SD Classe 10 UHS 1 ou supérieure jusqu à 256 GB Vous devrez insérer une carte mémoire avant de pouvoir commencer l enregistrement Avant d insérer ou de retirer une carte mémoire assurez vous d abord d avoir éteint l appareil Poussez do...

Page 41: ...rmatage Sauvegardez toujours les données importantes stockées sur la carte mémoire avant de formater Pour formater la carte mémoire assurez vous d avoir inséré votre carte mémoire puis allumez l appareil en connectant à une source d alimentation Appuyez sur REC pour arrêter l enregistrement Ensuite appuyez deux fois sur le bouton MENU pour accéder au menu de configuration du système Utilisez les b...

Page 42: ... carte Connectez le Mini USB à la caméra Le voyant LED bleu indique que l appareil est en charge ou sous tension Maintenantvouspouvezvousdéconnecterdel alimentation La caméra s éteindra après 3 secondes La caméra devrait commencer à enregistrer automatiquement la prochaine fois qu elle sera allumée ...

Page 43: ...Installez la caméra arrière comme indiqué ci dessous Utilisez le câble de caméra arrière fourni pour connecter la caméra arrière à la caméra avant Insérez la caméra arrière dans la caméra de tableau de bord Installation de la caméra arrière ...

Page 44: ...eur du véhicule sur une prise de courant 12 Vcc ou sur l allume cigare du véhicule Connectez le chargeur du véhicule à la caméra La caméra démarrera automatiquement l enregistrement une fois qu elle est allumée Branchez le mini connecteur rotatif à la caméra de tableau de bord Acheminez le câble d alimentation à la caméra de tableau de bord Branchez le chargeur dans une prise de courant ou un allu...

Page 45: ...cigare lorsqu il est mis sous tension c est à dire le véhicule est démarré Pour allumer l appareil manuellement maintenez enfoncé le bouton Alimentation jusqu à ce que l écran d accueil apparaisse La caméra démarre automatiquement l enregistrement lorsqu elle est allumée Appuyez et maintenez le bouton Alimentation pour allumer l appareil manuellement ...

Page 46: ...NU et passez au mode souhaité Appuyez une fois sur le bouton MENU pour accéder au menu de réglage pour un mode Appuyez deux fois sur le bouton MENU pour accéder au Réglage du système Icône du Système Icône de mode Appuyez sur le bouton Menu pour sélectionner la configuration souhaitée Appuyez sur le bouton Mode et passez au mode souhaité ...

Page 47: ...ement lorsque l appareil s allume Mode Lecture Contrôlez la lecture par ces boutons Lecture des vidéos enregistrées La lecture des vidéos enregistrées peut être effectuée sur l appareil ou un ordinateur De plus si vous avez acheté un enregistreur GPS Rexing vous pouvez lire les enregistrements dans une application spécialisée Pour lire une vidéo sur l appareil passez en mode Lecture des vidéos enr...

Page 48: ...teur de carte SD Placez l adaptateur dans l ordinateur Pour lire une vidéo à l aide d un câble USB connectez le câble USB à l appareil et à l ordinateur Après avoir allumé l appareil appuyez sur le bouton OK pour sélectionner Stockage de masse Sur l ordinateur accédez au drive de périphérique Les vidéos sont stockées dans CARDV MOVIE Sélectionnez la vidéo à lire Connectez le connector USB à l ordi...

Page 49: ... flux vidéo en temps réel 4 Une fois connecté l écran de la caméradetableaudebordpassera à la vue de la caméra et affichera le message WiFi connecté En utilisant l application Rexing Connect vous pouvez afficher un aperçu en direct de l écran de la caméra de tableau de bord démarrer arrêter l enregistrement et visualiser et enregistrer vos captures avec votre appareil mobile Pour plus d informatio...

Page 50: ...enregistrements à l aide du lecteur vidéo GPS pour Windows et Mac disponible sur rexingusa com Appuyez deux fois sur le bouton MENU pour passer au Réglage du système Passez au réglage de l Unité de vitesse GPS et sélectionnez votre unité de vitesse préférée Après avoir trouvé un signal GPS l icône de l écran passera du bleu au vert Veuillez visiter gpsa rexingusa com pour regarder un tutoriel vidé...

Page 51: ... et MIC pour parcourir vos photos Pour supprimer une photo arrêtez l enregistrement vidéo et passez en mode Lecture et parcourez entre les vidéos et les photos pour celle que vous souhaitez supprimer Appuyez une fois sur le MENU et passez à l option Supprimer Appuyez sur le bouton OK et sélectionnez Supprimer actuel ou Supprimer tout Passez au mode Lecture et sélectionnez une photo à voir Passez à...

Page 52: ...ggerimenti per migliorarlo ti preghiamo di contattarci Puoi contattarci tramite care rexingusa com Il nostro team di supporto ti risponderà il prima possibile Sempre una sorpresa in Rexing Scoprici qui https www facebook com rexingusa https www instagram com rexingdashcam https www rexingusa com support registration Facebook Instagram Site ...

Page 53: ...ie per Auto 3 Piastra di Montaggio della Dash Cam e Adesivo 3M 4 Cavo Mini USB 5 Telecamera Posteriore 6 Strumento di Gestione dei Cavi 7 Ganci per Cavi 8 Guida di Avvio Rapido V1P 9 Guida alla Sicurezza 2 Nella Confezione 1 6 7 8 9 2 3 4 5 ...

Page 54: ...del Mini USB 11 Porta del Logger CPS 12 Porta della Telecamera Posteriore 13 Regolazione dell angolo dell obiettivo La telecamera sta registrando quando il LED lampeggia in rosso La telecamera sta registrando quando il LED lampeggia in rosso Il dispositivo si ricarica o si accende quando il LED è blu fisso Il dispositivo si sta ricaricando o si accende quando il LED è blu fisso 1 10 11 5 6 8 7 9 2...

Page 55: ... Modalità di Parcheggio accesa Livello di Sensibilità del Sensore G Scheda di Memoria inserita Ricarica della Batteria Modalità WDR accesa Registrazione accesa Registrazione dello Stato di Attesa Tempo di Registrazione del Ciclo Valore di Esposizione MIC spento MIC acceso Data Corrente GG MM AAAA Ora 24 ore Numero di Targa ...

Page 56: ...eno 20 minuti prima di montare la telecamera Orienta il supporto come mostrato Passo 2 Inserire la Scheda di Memoria La Rexing V1P accetta schede di memoria Micro SD Classe 10 UHS 1 o successive fino a 256 GB Sarà necessario inserire una scheda di memoria prima di poter iniziare la registrazione Prima di inserire o rimuovere una scheda di memoria assicurati innanzitutto di aver spento il dispositi...

Page 57: ...usando la funzione di formattazione Esegui sempre il backup dei dati importanti memorizzati sulla scheda di memoria prima della formattazione Per formattare la scheda di memoria assicurati di aver inserito la tua scheda di memoria quindi accendi il dispositivo connettendolo a una fonte di alimentazione Premi REC per interrompere la registrazione Quindi premi due volte il pulsante MENU per accedere...

Page 58: ...ella scheda Connetti Mini USB alla telecamera Le luci LED blu indicano che il dispositivo è in ricarica o acceso Ora puoi disconnetterti dall alimentazione La telecamera si spegnerà dopo 3 secondi La telecamera dovrebbe iniziare a registrare automaticamente la prossima volta che viene accesa ...

Page 59: ...telecamera posteriore come mostrato di seguito Usa il cavo della telecamera posteriore in dotazione per connettere la telecamera posteriore alla telecamera anteriore Collega la Telecamera Posteriore alla Dash Cam Installazione della Telecamera Posteriore ...

Page 60: ...ga il Cavo del Caricabatterie per Auto a una presa di corrente da 12 V CC o all accendisigari dell auto Connetti il caricabatterie per auto alla telecamera La telecamera avvierà automaticamente la registrazione una volta accesa Collega il Mini Connettore di Rotazione alla Dash Cam Instrada il cavo di alimentazione alla Dash Cam Collega il caricabatterie alla presa di corrente o all accendisigari ...

Page 61: ...endisigari e riceve una ricarica ovvero il veicolo viene avviato Per accendere manualmente il dispositivo premi e tieni premuto il pulsante di ACCENSIONE fino a quando appare la schermata di benvenuto La telecamera inizierà automaticamente a registrare quando è accesa Premi e tieni premuto il pulsante di Accensione per accendere manualmente il dispositivo ...

Page 62: ... e passa alla modalità desiderata Premi una volta il pulsante MENU per accedere al menu delle impostazioni per una Modalità Premi due volte il pulsante MENU per accedere alle Impostazioni di Sistema Icona Sistema Icona della modalità Premi il pulsante Menu per selezionare l impostazione desiderata Premi il pulsante Modalità e passa alla Modalità desiderata ...

Page 63: ...la registrazione all accensione Modalità di riproduzione Controlla la riproduzione con questi pulsanti Riproduzione Video La riproduzione di video può essere eseguita sul dispositivo o su un computer Inoltre se hai acquistato un Rexing Logger GPS puoi riprodurre le registrazioni in un applicazione specializzata Per riprodurre un video sul dispositivo passa alla modalità di Riproduzione Usa i pulsa...

Page 64: ...dattatore per scheda SD rimuovi la scheda di memoria e inseriscila in un adattatore per scheda SD Posiziona l adattatore nel computer Per riprodurre un video usando il cavo USB connetti il Cavo USB al dispositivo e al computer Dopo che il dispositivo si accende premi il Pulsante OK per selezionare Memoria di Massa Sul computer passa al driver del dispositivo I video sono memorizzati su CARDV MOVIE...

Page 65: ...ul tuo telefono trova SSID B50_XXXX dall elenco tocca per connetterti Password predefinita 12345678 3 Apri l app Rexing Connect tocca Connect per accedere alla pagina di streaming video in tempo reale 4 Una volta connesso lo schermo della dash cam passerà alla vista della telecamera e visualizzerà il messaggio Wi Fi Connect Usando l app Rexing Connect puoi vedere un anteprima dal vivo dello scherm...

Page 66: ...zioni usando il lettore Video GPS Per Windows e Mac disponibile su rexingusa com PremiduevolteilpulsanteMENU e accedere alle Impostazioni di Sistema Passa all impostazione dell Unità di Velocità GPS e seleziona l unità di velocità preferita Dopo che un segnale GPS viene trovato l icona dello schermo passerà da blu a verde Si prega di visitare gpsa rexingusa com per guardare un video tutorial Segna...

Page 67: ...GIÙ per passare da una foto all altra Per eliminare una foto interrompi la registrazione video e passa alla Modalità di Riproduzione e alterna i video e le foto a quello che desideri eliminare Premi una volta il pulsante MENU e seleziona l opzione Elimina Premi il Pulsante OK e seleziona Elimina Corrente o Elimina Tutto Passa alla modalità di Riproduzione e seleziona una foto da visualizzare Passa...

Page 68: ...alguna sugerencia para mejorarla contáctenos Puede comunicarse con nosotros a través de care rexingusa com Nuestro equipo de soporte le responderá lo antes posible Siempre es una sorpresa en Rexing Visítenos aquí https www facebook com rexingusa https www instagram com rexingdashcam https www rexingusa com support registration Facebook Instagram Site ...

Page 69: ...rgador de coche 3 Grabadora de conducción Placa de montaje y adhesivo 3M 4 Cable mini USB 5 Cámara trasera 6 Herramienta de gestión de cables 7 Clips de cable 8 V1P Guía de inicio rápido 9 Guía de seguridad 2 Qué hay en la caja 1 6 7 8 9 2 3 4 5 ...

Page 70: ...i USB 11 Puerto de registrador de GPS 12 Puerto de cámara trasera no compatible 13 Ajuste de ángulo del lente La cámara está grabando cuando el LED parpadea en rojo La cámara está grabando cuando el LED parpadea en rojo El dispositivo se carga o se enciende cuando el LED es de color azul fijo El dispositivo se está cargando o encendiendo cuando el LED es azul fijo 1 10 11 5 6 8 7 9 2 3 4 12 13 ...

Page 71: ...o de estacionamiento activado Sensor G Nivel de sensibilidad Tarjeta de memoria insertada Cargar batería Modo AMPLIO RANGO DINÁMICO activado Grabación activado Grabación del estado de espera Tiempo de grabación en bucle Valor de exposición Micrófono apagado Micrófono activado Fecha actual DD MM AAAA Hora 24h Número de placa ...

Page 72: ... Espere al menos 20 minutos antes de montar la cámara Oriente la montura como se muestra Paso 2 Inserte la Tarjeta de Memoria El Rexing V1P acepta tarjetas de memoria Micro SD Clase 10 UHS 1 o superior de hasta 256 GB Deberá insertar una tarjeta de memoria antes de comenzar a grabar Antes de insertar o extraer una tarjeta de memoria primero asegurarse de haber apagado el dispositivo Empujar suavem...

Page 73: ...ón de formateo Siempre haga una copia de seguridad de los datos importantes almacenados en la tarjeta de memoria antes de formatear Para formatear la tarjeta de memoria asegúrese de haber insertado su tarjeta de memoria luego encienda el dispositivo conectándose a una fuente de alimentación Presione REC para detener la grabación Luego presione el botón MENÚ dos veces para ingresar al Menú de confi...

Page 74: ...arjeta Conectar el mini usb a la cámara Las luces LED azules indican que el dispositivo está cargando o está encendido Ahora puede desconectarse de fuente de alimentación La cámara se apagará después de 3 segundos La cámara debería comenzar a grabar automáticamente la próxima vez que se encienda ...

Page 75: ... Montar la cámara trasera como se muestra a continuación Usar el cable de la cámara trasera provisto para conectar la cámara trasera a la cámara frontal Conectar la cámara trasera a Grabadora de Conducción Instalación de cámara trasera ...

Page 76: ...stalación de la Cámara en el Parabrisas Colocar la cámara en el soporte y pasar con cuidado el cable de alimentación alrededor del parabrisas y colocarlo debajo de la moldura Conectar el cable del cargador de automóvil a una toma de corriente de 12V DC o al encendedor de cigarrillo del automóvil Conectar el cargador del automóvil a la cámara La cámara iniciará automáticamente la grabación una vez ...

Page 77: ... o encendedor de cigarrillos y recibe una carga es decir el vehículo se enciende Para encender el dispositivo manualmente mantenga presionado el botón de ENCENDIDO hasta que aparezca la pantalla de bienvenida La cámara comenzará a grabar automáticamente cuando se encienda Mantenga presionado el botón de Encendido para encender el dispositivo manualmente ...

Page 78: ...tón MODO y cambie al modo deseado Presione el botón MENÚ una vez para ingresar al menú de configuración de un Modo Presione el botón MENÚ dos veces para ingresar a la Configuración del sistema Icono del sistema Icono de modo Presione el botón Menú para seleccionar la configuración deseada Presione el botón Modo y cambie al Modo deseado ...

Page 79: ...a comienza a grabar automáticamente cuando se enciende Modo de reproducción Controla la reproducción con estos botones Reproducción de vídeo La reproducción de videos se puede hacer en el dispositivo o una computadora Además si se ha comprado un Rexing GPS Logger puede reproducir las grabaciones en una aplicación especializada Para reproducir un vídeo en el dispositivo cambie al modo Reproducción ...

Page 80: ... tarjeta de memoria e insértela en un adaptador de tarjeta SD Coloque el adaptador en la computadora Para reproducir un video con un cable USB conecte el cable USB al dispositivo y la computadora Después de que se encienda el dispositivo presione el botón OK para seleccionar Almacenamiento Masivo En la computadora navegue al controlador del dispositivo Los videos se almacenan en CARDV MOVIE Selecc...

Page 81: ...Wi Fi en su teléfono busque SSID B50 XXXX en la lista toque para conectarse Contraseña predeterminada 12345678 3 Abra la aplicación Rexing Connect toque Conectar para ingresar a la página de transmisión de video en tiempo real 4 Una vez conectada la pantalla de la grabadora de conducción cambiará a la vista de la cámara y mostrará el mensaje Conexión Wi Fi ConlaaplicaciónRexingConnect puedever una...

Page 82: ...izando el reproductor de video GPS para Windows y Mac disponible en rexingusa com Presione el botón MENÚ dos veces y ingrese a la Configuración del sistema Cambie a la configuración de Unidad de velocidad GPS y seleccione su unidad de velocidad preferida Después de encontrar una señal GPS el ícono de la pantalla cambiará de azul a verde Visite gpsa rexingusa com para ver un video tutorial Señal de...

Page 83: ...ara alternar entre sus fotos Para eliminar una foto detenga la grabación de video y cambie al Modo de reproducción y cambie entre los videos y las fotos a la que quiere borrar Presione el botón MENÚ una vez y cambie a la opción Eliminar Presione el botón OK y seleccione Eliminar actual o Eliminar todos Cambie al modo Reproducción y seleccione una foto para ver Cambia a la opción Eliminar Elige la ...

Page 84: ...e zur Verbesserung haben kontaktieren Sie uns bitte Sie können uns erreichen über care rexingusa com Unser Support Team wird Ihnen so schnell wie möglich antworten Immer wieder eine Überraschung in Rexing Schauen Sie hier nach https www facebook com rexingusa https www instagram com rexingdashcam https www rexingusa com support registration Facebook Instagram Site ...

Page 85: ...h Cam 2 Auto Ladegerät 3 Dash Cam Montageplatte 3M Kleber 4 Mini USB Kabel 5 Rückfahrkamera 6 Kabelmanagement Tool 7 Kabelklemmen 8 V1P Schnellstartanleitung für 9 Sicherheitshinweise 2 Verpackungsinhalt 1 6 7 8 9 2 3 4 5 ...

Page 86: ...nschluss 11 CPS Logger Anschluss 12 Rückfahrkamera Anschluss 13 Objektiv Winkelverstellung Die Kamera nimmt auf wenn die LED rot blinkt Die Kamera nimmt auf wenn die LED rot aufblinkt Das Gerät wird aufgeladen oder ist Betriebsmodus wenn die LED in solidem Blau leuchtet Das Gerät wird aufgeladen oder ist Betriebsmodus wenn die LED in solidem Blau leuchtet 1 10 11 5 6 8 7 9 2 3 4 12 13 ...

Page 87: ...hme Zeit current clip Video Auflösung Park Modus ein G Sensor Sensibilitätsstufe Speicherkarte eingesteckt Batterie Laden WDR Modus ein Aufnahme ein Aufnahme Standby Status Schleifenaufnahme Zeit Belichtungswert MIC Aus MIC Aus Aktuelles Datum TT MM JJJJ Zeit 24 Std Plattennummer ...

Page 88: ...eibe Warten Sie mindestens 20 Minuten bevor Sie die Kamera montieren Richten Sie die Halterung so aus Schritt 2 Speicherkarte einstecken Der Rexing VIP akzeptiert Klasse 10 UHS 1 oder höher Micro SD Speicherkarten bis zu 256 GB Sie müssen eine Speicherkarte einstecken bevor Sie mit der Aufnahme beginnen können Bevor Sie eine Speicherkarte einstecken oder entfernen stellen Sie sicher dass das Gerät...

Page 89: ...n formatieren Sichern Sie wichtige Daten die auf der Speicherkarte gespeichert sind immer vor dem Formatieren Um die Speicherkarte zu formatieren vergewissern Sie sich dass Sie Ihre Speicherkarte eingesteckt haben und schalten Sie dann das Gerät ein indem Sie es an eine Stromquelle anschließen Drücken Sie REC um die Aufnahme zu beenden Drücken Sie dann zweimal die MENÜ Taste um das System Setup Me...

Page 90: ...ätigen Mini USB an die Kamera anschließen Blaue LED Leuchten zeigen an dass das Gerät geladen oder eingeschaltet ist Sie können nun die Verbindung zur Stromversorgung trennen Die Kamera schaltet sich nach 3 Sekunden aus Die Kamera sollte beim nächsten Einschalten automatisch mit der Aufnahme beginnen ...

Page 91: ...ontieren Sie die Rückfahrkamera wie unten abgebildet Verwenden Sie das mitgelieferte Rückfahrkamerakabel um die Rückfahrkamera mit der Frontkamera zu verbinden Schließen Sie die Rückfahrkamera an die Dash Cam Installation der Rückfahr kamera ...

Page 92: ...unter die Verkleidung Stecken Sie das Autoladekabel in eine 12 V DC Steckdose oder in den Zigarettenanzünder des Autos Schließen Sie das Autoladegerät an die Kamera an Die Kamera startet die Aufnahme automatisch sobald sie eingeschaltet wird Mini Drehstecker auf das Dash Cam stecken Stromkabel in der Dash Cam verlegen Stecken Sie das Ladegerät in die Steckdose oder in den Zigaretten anzünder ...

Page 93: ...ttenanzünder angeschlossen und geladen wird d h das Fahrzeug wird gestartet Um das Gerät manuell einzuschalten halten Sie die Ein Aus Taste gedrückt bis der Begrüßungsbildschirm erscheint Die Kamera beginnt automatisch mit der Aufnahme wenn sie eingeschaltet wird Halten Sie die Ein Aus Taste gedrückt um das Gerät manuell einzuschalten ...

Page 94: ...ückt und wechseln Sie in den gewünschten Modus Drücken Sie die MENÜ Taste einmal um das Einstellungsmenü für einen Modus aufzurufen Drücken Sie die Menü Taste zweimal um die Systemeinstellungen zu öffnen Systemsymbol Modussymbol Drücken Sie die Menü Taste um die gewünschte Einstellung zu wählen Drücken Sie die Modus Taste und wechseln Sie in den gewünschten Modus ...

Page 95: ...schalten Wiedergabemodus Sie steuern die Wiedergabe mit diesen Tasten Videowiedergabe Die Wiedergabe von Videos kann auf dem Gerät oder einem Computer erfolgen Auch wenn Sie einen Rexing GPS Logger erworben haben können Sie die Aufzeichnungen in einer speziellen Anwendung abspielen Um ein Video auf dem Gerät wiederzugeben wechseln Sie in den Wiedergabemodus Verwenden Sie die Tasten REC und MIC um ...

Page 96: ...tfernen Sie die Speicherkarte und stecken Sie sie in einen SD Kartenadapter ein Stecken Sie den Adapter in den Computer ein Um ein Video über ein USB Kabel w i e d e r z u g e b e n schließen Sie das USB Kabel an das Gerät und den Computer an Nachdem das Gerät eingeschaltet ist drücken Sie die OK Taste um Massenspeicher zu wählen Navigieren Sie auf dem Computer zum Laufwerk des Geräts Die Videos w...

Page 97: ...Telefon suchen Sie SSID B50_ XXXX aus der Liste und tippen Sie auf um eine Verbindung herzustellen Standardkennwort 12345678 3 Öffnen Sie die Rexing Connect App tippen Sie auf Verbinden um die Seite für das Echtzeit Videostreaming aufzurufen 4 Sobald die Verbindung hergestellt ist wechselt der Bildschirm der Dash Cam in die Kameraansicht und zeigt die Meldung Wi Fi Connect an Mit der Rexing Connec...

Page 98: ...r wiedergeben für Windows und Mac verfügbar unter rexingusa com Drücken Sie zweimal die MENÜ Taste und rufen Sie die Systemeinstellungen auf Wechseln Sie zur Einstellung der GPS Geschwindigkeitseinheit und wählen Sie Ihre bevorzugte Geschwindigkeitseinheit aus Nachdem ein GPS Signal gefunden wurde wechselt das Bildschirmsymbol von blau zu grün Bitte besuchen Sie gpsa rexingusa com um sich ein Vide...

Page 99: ...ttern Um ein Foto zu löschen stoppen Sie die Videoaufnahme und wechseln Sie in den Wiedergabemodus und schalten Sie durch die Videos und Fotos zu demjenigen das Sie löschen möchten Drücken Sie die MENÜ Taste einmal und wechseln Sie auf die Option Löschen Drücken Sie die OK Taste und wählen Sie Aktuelle löschen oder Alle löschen Wechseln Sie in den Wiedergabe modus und wählen Sie ein Foto zur Ansic...

Page 100: ...100 ...

Reviews: