background image


Operating the machine


29


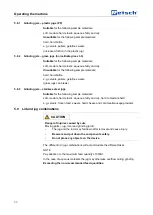
The LED over the button lights up. The set speed is shown in the display if it is not 
larger than 4000 rpm. 

• 

Press the START button. 

Grinding now takes places in the interval mode. 

• 

To end interval grinding press the interval button (

E11

) once again. 

The LED above the interval button goes out and the speed maintains the value of 
4000 rpm. The device is in continuous mode again . 

Pos :  8. 50 /00005 Ü berschrif ten/ 1. 1 Ü bersc hrift en/ 1. 1 Übersc hrift en BD A/ 11 Revers e -  Ver mahl ung  @  3\ mod_1279717723614_9.doc  @  21493 @   @  1 


5.14  Reverse grinding  

Pos :  8. 51 /00010  Bedi enungsanleit ung en Kapitels ammlungen/ GM200 (2010)/ 0015  GM200N  Bedienung/ 1580 GM 200_2010 Mo dul  Revers e -  Ver mahl ung  @  3\ mod_1279722273044_9.doc  @  21676 @   @  1 


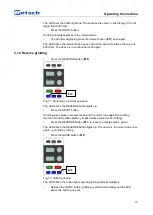
• 

Press the REVERSE button (

E10

). 


Fig. 11: Switching on interval operation  

The LED above the REVERSE button lights up. 

• 

Press the START button. 

Grinding takes place in reverse mode and the motor runs against the cutting 
direction. Grinding takes place by impact unlike normal mode (cutting). 

• 

Press the REVERSE button (

E11

) to leave the reverse mode  again. 

The LED above the REVERSE button lights up. The device is in normal mode once 
again 

– grinding by cutting . 

Pos :  8. 52 /00005 Ü berschrif ten/ 1. 1 Ü bersc hrift en/ 1. 1 Übersc hrift en BD A/ 11 Q uic k  St art - T as tenf unktion  @  1\ mod_1240313233592_9.doc  @  8229 @  2 @  1 


Pos :  8. 53 /00010  Bedi enungsanleit ung en Kapitels ammlungen/ GM200 (2010)/ 0015  GM200N  Bedienung/ 1585 GM 200_2010 Modul  Q uic k  St art - T ast enf unktion  @  3\ mod_1279722273888_9. doc  @  21685  @   @  1 


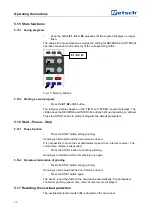
• 

Press the QUICK button (

E12

). 


Fig. 12: QUICK grinding  

The LED above the button lights up and grinding starts immediately. 

• 

Release the QUICK button, grinding is ended immediately and the LED 
above the button goes out. 

Pos :  8. 54 /00005 Ü berschrif ten/ 1. 1 Ü bersc hrift en/ 1. 1 Übersc hrift en BD A/ 11 Speicher 

– F unktionen @ 3\mod_1279718043115_9.doc  @ 21517 @  @ 1 


E12 

E10 

Summary of Contents for GRINDOMIX GM 200

Page 1: ... Retsch GmbH 42781 Haan Retsch Allee 1 5 Germany 21 12 2012 0010 Manual Knife Mill Grindomix GM200 Translation ...

Page 2: ...2 Copyright Copyright by Retsch GmbH Haan Retsch Allee 1 5 D 42781 Haan Federal Republic of Germany ...

Page 3: ...nt 13 4 4 Drive output 13 4 5 Rated power 13 4 6 Motor rotation speed 13 4 7 Rated voltage 13 4 8 Emissions 14 4 8 1 Noise measurement Example 1 14 4 8 2 Noise measurement Example 2 14 4 9 Degree of protection 14 4 10 Dimensions and weight 14 4 11 Required floor space 15 5 Operating the machine 16 5 1 Views of the Instrument 16 5 2 Overview table of the parts of the device 18 5 3 Overview Table of...

Page 4: ... 12 Setting the Speed 28 5 13 Switching on interval or continuous mode 28 5 14 Reverse grinding 29 5 15 Store functions 30 5 15 1 Saving programs 30 5 15 2 Starting a saved program 30 5 16 Start Pause Stop 30 5 16 1 Pause function 30 5 16 2 Premature termination of grinding 30 5 17 Resetting the overload protection 30 6 Cleaning and service 31 6 1 Cleaning the Grinding Tools 32 6 2 Check the seali...

Page 5: ...is operating manual does not contain any repair instructions If faults arise or repairs are necessary please contact your supplier or get in touch with Retsch GmbH directly Application technology information relating to samples to be processed is not included but can be read on the Internet on the respective device s page at www retsch com Pos 1 3 00010 Bedienungsanlei tungen Kapitelsamml ung en C...

Page 6: ...in the instructions on action to be taken WARNING Moderate or mild injury may result from failing to heed these safety warnings We give you the following warnings and corresponding content CAUTION Type of danger personal injury Source of danger Possible consequences if the dangers are not observed Instructions on how the dangers are to be avoided We also use the following signal word box in the te...

Page 7: ...ted with working on the machine have noted and understood all the regulations regarding safety are familiar before starting work with all the operating instructions and specifications for the target group relevant for them have easy access always to the technical documentation for this machine and that new personnel before starting work on the machine are familiarised with the safe handling of the...

Page 8: ...1228722954535_9 doc 4079 1 This operating manual does not contain any repair instructions For your own safety repairs may only be carried out by Retsch GmbH or an authorized representative or by Retsch service engineers In that case please inform The Retsch representative in your country Your supplier Retsch GmbH directly Your Service Address Pos 3 1 00020 BD A Software 20005 PM GC Kapitelsamml un...

Page 9: ...ging operator owner that s he has received sufficient instructions about the operation and maintenance of the system The user has received the operating manual has read and taken note of its contents and consequently has all the information required for safe operation and is sufficiently familiar with the device As the owner managing operator you should for your own protection have your employees ...

Page 10: ... Protect the machine from condensed water Pos 4 9 00005 Überschriften 1 1 Ü berschriften 1 1 Ü berschriften BDA 11 Beding ung en für den Aufstell ort 0 mod_1226497029322_9 doc 3428 2 1 3 4 Conditions for the place of installation Pos 4 10 00003 Standard Kapitel General M odul U mgebungstemper atur 5 C 40 C 0 mod_1228918538881_9 doc 4745 1 Pos 4 11 00004 Warnhinweise H 0021 HIN WEIS U mgebungstempe...

Page 11: ...931092443_9 doc 22278 1 Fig 1 Type plate lettering 1 Device designation 2 Year of production 3 Part number 4 Serial number 5 Manufacturer s address 6 CE marking 7 Disposal label 8 Bar code 9 Power version 10 Mains frequency 11 Capacity 12 Amperage 13 Number of fuses 14 Fuse type and fuse strength In the case of questions please provide the device designation 1 or the part number 3 and the serial n...

Page 12: ...iche Stoffe 1 mod_1236238456269_9 doc 7634 1 CAUTION Danger of personal injury Dangerous nature of the sample Depending on the dangerous nature of your sample take the necessary measures to rule out any danger to persons Observe the safety guidelines and datasheets of your sample material Pos 7 6 00010 Bedienungsanlei tungen Kapitelsamml ung en GM 200 2010 0005 GM200N Technische D aten 0510 GM200_...

Page 13: ...The grinding chamber of this device is interlocked by a resistant protective hood It is only possible to start the device when the protective hood is closed The motor must have come to a standstill to open the device In the event of fault there is also an electric emergency brake which brings the cutters to a standstill in fractions of a second from the highest speed If the achievable current spee...

Page 14: ...ission value LpAeq Operating conditions Jug glass jug with gravitation lid Grind unit cutter made of stainless steel Feed material tomatoes quartered approx 40 x 25mm Feed quantity 100g 4 8 2 Noise measurement Example 2 Intensity of sound LWA Workplace related emission value LpAeq Operating conditions jug glass jug with gravitation lid Grind unit cutter made of stainless steel Feed material cheese...

Page 15: ...Erforderliche Standfl äche 0 mod_1226492678414_9 doc 3364 2 1 4 11 Required floor space Pos 7 27 00010 Bedi enungsanleitung en Kapitelsammlungen GM200 2010 0005 GM200N Technische Daten 0515 GM200_2010 Modul Erfor derliche Standfl äche 3 mod_1279702726470_9 doc 20978 1 200 mm x 400 mm no safety distances required Pos 8 1 00010 Bedienungsanlei tungen Kapitelsamml ung en Seitenumbr uch 0 mod_12223443...

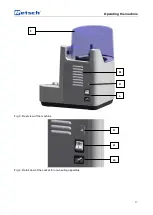
Page 16: ...rschriften 1 1 Ü berschriften 1 1 Ü berschriften BDA 11 Ansichten des Gerätes 0 mod_1228990581782_9 doc 4966 2 1 5 1 Views of the Instrument Pos 8 4 00010 Bedienungsanlei tungen Kapitelsamml ung en GM 200 2010 0015 GM200N Bedienung 1504 GM200_2010 Modul Gr afische Ansichten des Gerätes 3 mod_1279722275778_9 doc 21703 1 Fig 2 Front view of the machine A B C D E F H G J O ...

Page 17: ...chine 17 Fig 3 Rear view of the machine Fig 4 Detail view of the socket for non heating apparatus Pos 8 5 00010 Bedienungsanlei tungen Kapitelsamml ung en Seitenumbr uch 0 mod_1222344373758_0 doc 2386 1 F K L K L1 L3 M ...

Page 18: ...der Holder for the grinding jar E Operating panel with displays Start stop program memory and displays F Grinding chamber hood Protective hood for safe grinding operations G Pin for knife cylinder Drive shaft for knife cylinder H Support for grinding jar Centres the grinding jar and the jar holder J Grinding chamber hood interlock Locks the grinding chamber hood into place K Thermal fuse Protectiv...

Page 19: ... en Kapitelsammlungen GM200 2010 0015 GM200N Bedienung 1503 GM 200_2010 Modul Tabelle Bedienfel dbenennung 3 mod_1281606340030_9 doc 22310 1 Element Description Function E1 Program 1 Memory for program function E2 Program 2 Memory for program function E3 Program 3 Memory for program function E4 Time display Display of the remaining grinding time E5 Time knob Grinding time setting 1 second to 3 min...

Page 20: ...181519795_9 doc 11731 1 CAUTION Damage to hearing The level of noise can be high depending on the type of material the knife used the speed set and the duration of the grinding process Noise that is excessive in terms of level and duration can cause impaired or permanently damaged hearing Ensure suitable sound proofing measures or wear hearing protection Pos 8 17 00005 Ü berschriften 1 1 Ü berschr...

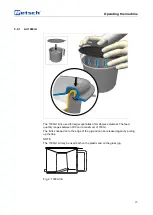
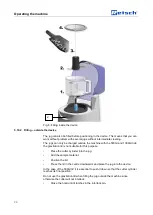
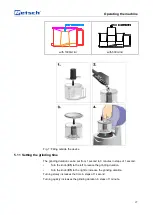
Page 21: ... grinding jar Pos 8 23 00010 Bedi enungsanleitung en Kapitelsammlungen GM200 2010 0015 GM200N Bedienung 1525 GM 200_2010 Modul Mahlbehälter einsetzen 3 mod_1279721702862_9 doc 21568 1 Open the hood Insert the jug Pay attention to the position of the jug when it is inserted N B Ensure the correct position of the O ring O Fig 8 Inserting jug Pos 8 24 00005 Ü berschriften 1 1 Ü berschriften 1 1 Übers...

Page 22: ...0005 Ü berschriften 1 1 Ü berschriften 1 1 Überschriften BD A 11 Deckel und Behälter kombi nationen 3 mod_1279714539556_9 doc 21437 1 5 9 Lid and jug combinations Pos 8 28 00004 Warnhinweise V0028 VOR SICHT Schnittverletzungen Bewegliche Teile Behälter R otor und M ahl becherdeckel 3 mod_1282896982588_9 doc 22908 1 CAUTION 1 V0028 Danger of injuries caused by cuts Moving parts jug rotor and grindi...

Page 23: ...207125_0 doc 37020 1 Pos 8 32 00010 Bedi enungsanleitung en Kapitelsammlungen GM200 2010 0015 GM200N Bedienung 1540 GM 200_2010 Modul Deckel 1000ml 3 mod_1279721704627_9 doc 21595 1 The 1000ml lid is used for larger quantities of small piece material The feed quantity ranges between 300 and a maximum of 700ml The lid is snapped on to the edge of the jug and can be released again by pulling up the ...

Page 24: ... held down by the hood NOTE The 500ml lid can only be used with the plastic jug Fig 3 500ml lid Pos 8 35 00005 Ü berschriften 1 1 1 Ü berschriften 111 Schwer kraftdeckel 3 mod_1279716276921_9 doc 21461 1 5 9 3 Gravitation lid Pos 8 36 00010 Bedi enungsanleitung en Kapitelsammlungen GM200 2010 0015 GM200N Bedienung 1550 GM 200_2010 Modul Schwerkr aftdeckel 3 mod_1279721705752_9 doc 21613 1 The grav...

Page 25: ...ng out the cutter remove as much sample material to safely grip the cutter Pos 8 39 00004 Warnhinweise H 0054 HIN WEIS Haube muss sicher i n den Verriegelungsbolzen ei nrasten 3 mod_1283176291349_9 doc 22962 1 NOTE 3 H0054 The hood must safely latch into the interlock pin so that the motor can start or so that no emergency brake is triggered during grinding Insert the cutter cylinder before adding...

Page 26: ... you can work without problem with several jugs without intermediate cleaning The jugs can only be charged outside the machine with the 500ml and 1000ml lids the gravitation lid is not suitable for this purpose Place the cutter cylinder into the jug Add the sample material Position the lid Press the lid in the centre downwards and place the jug into the device In the case of the 500ml lid it is es...

Page 27: ...en GM200 2010 0015 GM200N Bedienung 1565 GM 200_2010 Modul Mahldauer einstell en 3 mod_1279722271278_9 doc 21649 1 The grinding duration can be set from 1 second to 3 minutes in steps of 1 second Turn the knob E5 to the left to reduce the grinding duration Turn the knob E5 to the right to increase the grinding duration Turning slowly increases the time in steps of 1 second Turning quickly increase...

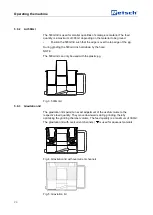
Page 28: ...knob E7 to the left to reduce the speed Turn the knob E7 to the right to increase the speed Slow turning alters the speed in steps of 500 min 1 Fast turning alters the speed in steps of 3000 min 1 Fig 9 Setting the speed Pos 8 48 00005 Ü berschriften 1 1 Ü berschriften 1 1 Überschriften BD A 11 Inter vall oder D auer betri eb 0 mod_1229419427823_9 doc 5094 1 5 13 Switching on interval or continuou...

Page 29: ...SE button lights up Press the START button Grinding takes place in reverse mode and the motor runs against the cutting direction Grinding takes place by impact unlike normal mode cutting Press the REVERSE button E11 to leave the reverse mode again The LED above the REVERSE button lights up The device is in normal mode once again grinding by cutting Pos 8 52 00005 Ü berschriften 1 1 Ü berschriften ...

Page 30: ...eters Pos 8 59 00005 Ü berschriften 1 1 Ü berschriften 1 1 Überschriften BD A 11 Start Pause Stop 3 mod_1279719602650_9 doc 21525 1 5 16 Start Pause Stop Pos 8 60 00010 Bedi enungsanleitung en Kapitelsammlungen GM200 2010 0015 GM200N Bedienung 1596 GM 200_2010 Modul Start Pause Stop 3 mod_1279722525044_9 doc 21721 1 5 16 1 Pause function Press the STOP button during grinding Grinding is interrupte...

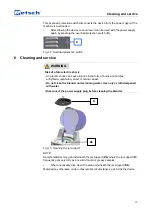
Page 31: ...lectric shock can cause injuries in the form of burns and cardiac arrhythmia respiratory arrest or cardiac arrest Do not clean the blender under running water Use only a cloth dampened with water Disconnect the power supply plug before cleaning the blender Pos 9 3 00010 Bedienungsanlei tungen Kapitelsamml ung en GM 200 2010 0025 GM200N R einigung und Wartung 2505 Modul Becher aufnahme reinig en 4 ...

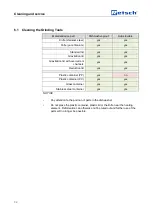
Page 32: ...l device part Dishwasher proof Autoclavable Knife stainless steel yes yes Knife pure titanium yes yes Standard lid yes yes Gravitation lid yes yes Gravitation lid with overcurrent channels yes yes Reduction lid yes yes Plastic container PP yes no Plastic container PC yes yes Glass container yes yes Stainless steel container yes yes NOTICE H0052 Pay attention to the position of parts in the dishwas...

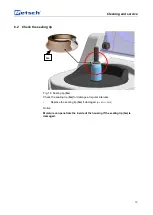
Page 33: ...artung 2510 Modul Dichtlippe tauschen 5 mod_1343820879046_9 doc 32850 2 1 6 2 Check the sealing lip Fig 16 Sealing lip Gs Check the sealing lip Gs for damage at regular intervals Replace the sealing lip Gs if damaged No 05 111 0239 Notice Moisture can penetrate the inside of the housing if the sealing lip Gs is damaged Gs ...

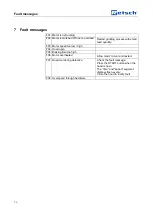
Page 34: ...ng F02 Motor is switched off due to overload Restart grinding process with small feed quantity F03 Motor speed too low high F04 Hood open F05 Braking time too high F06 Motor overheated Allow motor to cool and restart F07 Hood monitoring defective Check the fault message Press the START button when the hood is open The time and speed segment displays flash evenly Close the hood to rectify fault F08...

Page 35: ...munity the disposal of electrically operated devices is regulated by national provisions that are based on the EU Directive 2002 96 EC on Waste Electrical and Electronic Equipment WEEE Accordingly all machines supplied after 13 08 2005 in the business to business area to which this product is classified may no longer be disposed of with municipal or household waste To document this they have the f...

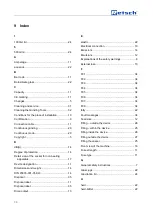
Page 36: ...gnation 11 Dimensions and weight 14 DIN 45635 031 01 KL3 14 Disposal 35 Disposal label 11 Disposal label 35 Drive output 13 E elastic 22 Electrical connection 10 Emissions 14 Emulsions 12 Explanations of the safety warnings 6 External fuse 10 F F01 34 F02 34 F03 34 F04 34 F05 34 F06 34 F07 34 F08 34 fatty 22 Fault messages 34 Feed size 12 Filling outside the device 26 Filling within the device 25 ...

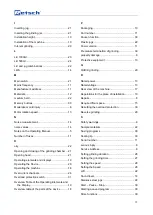
Page 37: ...ion switch 31 Overview Table of the Operating Elements and the Display 19 Overview table of the parts of the device 18 P Packaging 10 Part number 11 Pausen function 30 Plastic jugs 22 Power version 11 Premature termination of grinding 30 property damage 6 Protective equipment 13 Q QUICK grinding 29 R Rated power 13 Rated voltage 13 Rear view of the machine 17 Regulations for the place of installat...

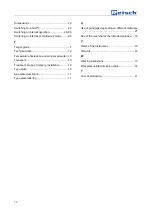
Page 38: ...tion and condensed water 10 Transport 10 Transport scope of delivery installation 10 Type plate 10 type plate description 11 Type plate lettering 11 U Use of grind jegs depending on different materials 21 Use of the machine for the intended purpose 12 V Views of the Instrument 16 Viscosity 12 W Working instructions 13 Workplace related emission value 14 Y Year of production 11 ...

Page 39: ......

Page 40: ......

Page 41: ...s this certificate will lose its validity Retsch GmbH Haan March 2011 Ralf Eisenbach Dipl Ing Retsch GmbH Retsch Allee 1 5 42781 Haan Germany www retsch com Certificate of CE Conformity according to EC Mechanical Engineering Directive 2006 42 EC Applied harmonized standards in particular DIN EN ISO 12100 Security of machines DIN EN ISO 12852 5 1 1 Food processors and blenders DIN EN ISO 13849 1 Sa...

Page 42: ......

Page 43: ......

Page 44: ...Copyright Copyright by Retsch GmbH Haan Retsch Allee 1 5 D 42781 Haan Federal Republic of Germany ...

Reviews: