background image

English 

Operating- & Installation Instruction Cooker Hoods 


6

GB 

11. Installation


Before installation of the appliance 
please pay regard to: 

Installation of the appliance only at a convenient
place

Check the wall / ceiling on sustainability and
resilience

Check the routing of electrical and other
conductions in and on the wall respectively ceiling,
in order to not damage them with the drill

Check the condition and resilience of electric
conduction

We recommend the installation of the appliance by
a professional

On  installation,  the  minimum  distance  between  the 
hob and the hood must be exactly complied with (see 
chapter  11.1  “Installation  data“)  and  follow  the 
numbering  of  the  steps  and  the  additional 
instructions.  Execution  with  air  exhausted  outdoors 
(A- see also the installation data). The vapours are 
extracted  via  an  air  exhaust  hose  fixed  to  the 
connector ring. 
The diameter of the exhaust air hose must conform 
to that of the connector ring. If a smoke non-return 
valve  is  used  or  is  planned,  check  whether  it  can 
open  and  close  freely  after  the  installation  of  the 
exhaust  air  hose.  The  extractor  hood  can  be 
equipped  with  one  (top)  or  two  (top  and  back) 
extractor openings. 
The hood is normally initially fitted out for use of the 
top extractor opening, as an 

extractor hood

Openings not required are fitted with a plastic cover. 
This plastic cover can be easily removed by turning 
counterclockwise  and  optionally  fitted  to  another 
opening which is not required. 

11.1 Installation data 

Minimum distance from the lower edge of the hood 
body: 
to ceramic and cast cooking hobs  

65 cm 

to gas hob  

70 cm 

to hobs with coal/oil/wood firing 

85 cm. 

 Only connect the appliance to the power 

supply once it is properly installed. 


11.2 Using the extractor hood as an exhaust air 
hood (with air extracted to outdoors) 

If the extractor hood has been fitted at the factory with 
a carbon filter, this must be removed. 
It is only practicable to use this when operating your 
hood in circulation mode. 

fi201203 

11.3  Converting  the  extractor  hood  to  a 
circulation hood  

If you wish to use an appropriately fitted hood as a 
circulation hood, you must mount the active carbon 
filter(s) to the fan motor before using the hood. 
The active carbon filter(s) is/are included in the scope 
of supply with some models. 
Otherwise you must obtain the active carbon filter(s) 
from the supplier of your extractor hood. 
You must also change your hood over to the “Filter 
position“ at the device provided (lever or ball 
handle) inside of the hood.


11.4. Electrical connection 

Before  connecting  the  extractor  hood,  check 

that the voltage stated on the rating plate (V) agrees 
with the supply voltage in your home.  


Never install the appliance if the data on the 

rating plate does not agree with your supply voltage. 
You  will  find  the  rating  plate  inside  the  appliance, 
behind the grease filter. 

If  the  extractor  hood  is  fitted  with  a  standard 
connector plug, connect this to an easily accessible 
standard socket. 

11.5 Mounting the carbon filter 

You will find the mounting instructions for the carbon 
filter  in  its  packaging.  To  mount  the  carbon  filter, 
remove  the  grease  filter(s),  fit  the  carbon  filter 
according  to  its  mounting  instructions  and  refit  the 
grease filter(s). 

11.6 Mounting the extractor hood 

See chapter “

General installation instructions”


or 

where applicable the separately supplied mounting 
instructions. 

12. Exhaust air pipeline

(The  exhaust  air  hose  is  not  included  in  the
scope of supply)

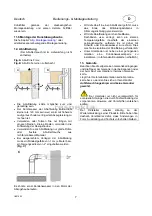
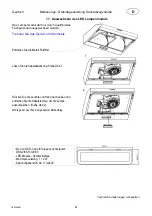
Fig. A 

air outlet to outdoors 

Fig. B 

air outlet via an air shaft 

A

B

Summary of Contents for CH 16060 SGB

Page 1: ...eitung Dunstabzugshaube Operating Installation Instruction Cooker hood CH 16060 SGB SY 6005D2 P1 C98 L21 600 NEG Novex Großhandelsgesellschaft für Elektro und Haustechnik GmbH Chenover Str 5 D 67117 Limburgerhof fi201203atNEG D GB ...

Page 2: ...ngsanleitung beschriebenen Gerät welche mit frischen Lebensmitteln in Kontakt kommen können keine toxischen Substanzen enthalten DECLARATION OF CONFORMITY The manufacturer of the product s described herein to which this description refers declares on its sole responsibility that the product s meet the relevant fundamental safety health and protection requirements of the relevant EU guidelines and ...

Page 3: ...ienung und Wartung viele Jahre dienen wird Unsere Geräte sind nicht für die gewerbliche Nutzung bestimmt Sie sind für den Gebrauch im Haushalt ausgelegt Bei gewerblichem Gebrauch reduzieren sich die Garantie und Gewährleistung um 50 1 Hinweis Symbol Erklärung Dieses Symbol auf dem Produkt oder seiner Verpackung weist darauf hin dass dieses Produkt nicht als normaler Haushaltsabfall zu behandeln is...

Page 4: ...t werden Er darf durch keine andere Schächte oder Kamine verlegt werden Lesen Sie die Bedienungsanleitung Montageanleitung vor der Montage des Geräts gründlich durch Prüfen Sie ob die Technischen Daten V und Hz auf dem Typenschild des Geräts mit denen Ihrer Hausinstallation übereinstimmen Stimmen diese nicht überein bringen Sie das Gerät an die Verkaufsstelle zurück Bei diesbezüglicher Unklarheite...

Page 5: ...gen der Abzugsleitungen muss unter Beachtung der Herstellervorschriften und unter fi201203 Einhaltung der örtlichen Vorschriften von einer ausgewiesenen Fachkraft ausgeführt werden 6 Benutzung der Dunstabzugshaube 6 1 Sicherheitshinweise zum Gebrauch Während des Betriebes der Dunstabzugshaube müssen die Fettfilter immer eingesetzt sein ansonsten kann sich Fettdunst in der Haube und im Abluftsystem...

Page 6: ...rät vorhandenen Fettfilter sind regelmässig zu reinigen bzw zu ersetzen Fettgesättigte Filter können schnell Feuer fangen und verbreiten zudem unangenehme Gerüche Mit Schmutzpartikeln zugesetzte Fettfilter können die Funktion des Geräts stark beeinträchtigt Im Bereich der Bedienelemente nicht zu feucht reinigen um ein Eindringen von Nässe in die Elektronik zu vermeiden Besondere Hinweise für Gerät...

Page 7: ...isungen für die Reinigung der Abzugshaube und für den Austausch oder die Reinigung der Filter besteht Brandgefahr 8 Auswechseln der Lampen Achten Sie beim Auswechseln einer Lampe darauf dass die neue Lampe keine höhere Wattleistung als die Originallampe Ihres Geräts hat 8 1Auswechseln der LED Lampen Falls der Gerätedokumentation keine Anleitung zum Auswechseln von LED Lampen beiliegt müssen Sie di...

Page 8: ... zum Einsatz als Ablufthaube vorgerüstet Die nicht benötigten Abzugöffnungen sind mit einem Kunststoffdeckel versehen Dieser Kunststoffdeckel kann durch Drehen im Gegenuhrzeigersinn einfach fi201203 entfernt und wahlweise auf einer anderen nicht benötigten Abzugöffnung montiert werden 11 1 Installationsangaben Mindestabstand Unterkante Haubenkörper zu Glaskeramik und Gusskochplatten 65 cm zu Gasko...

Page 9: ...den Motor der Abzugshaube laufen fi201203 Wird die Abluft in einen Abluftkanal geführt muss das Ende des Einführungsstutzens in Strömungsrichtung gelenkt werden Wird die Abluftleitung durch kühle Räume Dachböden usw verlegt kann ein starkes Temperaturgefälle innerhalb der einzelnen Leitungsbereiche auftreten Es ist daher mit Schwitz oder Kondenswasser zu rechnen Dies macht eine Isolation der Abluf...

Page 10: ...2 Abluftabdeckung B montieren 3 Regler A auf Position Umluft stellen 4 Abbildungen dienen nur zu Illustrationszwecken Deutsch UMSCHALTUNG AUF UMLUFT BETRIEB Bedienungs Montageanleitung 14 GERÄTEKOMPONENTEN STANDARD ABZUGSHAUBE ABLUFTBETRIEB zum Entfernen die Bügelenden nach unten drücken und aus der Verankerung nehmen Positionierung Flansch 10 und Blind deckel 12 bei Bedarf tauschen Abluftöffnung ...

Page 11: ...ken Sie die Taste C Der Motor läuft mit mittlerer Leistungsstufe 5 Drücken Sie die Taste D Der Motor läuft mit höchsterr Leistungsstufe 6 Drücken Sie die Tasta A um den Moror auszuschalten Technische Änderungen vorbehalten Deutsch Bedienungs Montageanleitung Tasten und Schalterfunktionen 15 GERÄTEBEDIENUNG STANDARD DUNSTABZUGSHAUBE 2 Drücken Sie dieTaste E Beleuchtung geht an Drücken Sie die Taste...

Page 12: ...ung funktioniert nicht Motor läuft nicht Nebst obigen Ursachen sind folgende möglich Ölspuren 16 Problembehandlung Lampen defekt Kein Strom Gerätekabel nicht richtig angeschlossen Einwegventil undicht mögliche Ursache Beleuchtung ist an aber Motor läuft nicht Lüftungsklappe blockiert Kondensator defekt Motorlager defekt klemmt Gerät ist instabil Befestigungsschrauben nicht fest angezogen Gerät vib...

Page 13: ... Kabelklemme um die Lampe auszutauschen Siehe Abb 2 Das Lampenmodul darf nur durch qualifiuiertes Fachpersonal ausgewechselt werden Deutsch Bedienungs Montageanleitung Dunstabzugshaube 17 Auswechseln des LED Lampenmoduls Lösen Sie die Kabelabdeckung Siehe Abb 1 D Der ILCOS D Code für diese Leuchte lautet DBS 2 65 H 120 33 LED Module Rechtecklampe Maximale Leistung 1 2 W Spannungsbereich AC 110 240...

Page 14: ...arianten für Kernbohrungen und die dabei zu beachtenden Masse in mm d Ansauggitter Abb 3a bzw Fettfilter Abb 3b für späteren Zugang zum Inneren der Haube entfernen e Den Flansch Abb 1 A an der Öffnung anbringen durch welche die Abluft geleitet werden soll Position der Plastikkappe Abb 1 B allenfalls mit der Position des Flansches A tauschen 3 Montage an einen Oberschrank soweit dafür vorgesehen Mi...

Page 15: ... zu ersetzen oder das Gerät umzutauschen Nur wenn Nachbesserung en oder Umtausch des Gerätes die herstellerseitig vorgesehene Nutzung endgültig nicht zu erreichen sein sollte Kann der Käuferaus Gewährleistung innerhalb von sechs Monaten gerechnet vom Tag des Kaufes Herabsetzung des Kaufpreises oder Aufhebung des Kaufvertrages verlangen Schadenersatzansprüche auch hinsichtlich Folgeschäden soweit s...

Page 16: ...s of excellent service if properly operated and maintained Our appliances are not intended for commercial usage They are designed only for domestic use The warranty and its provisions are reduced by 50 in the case of commercial usage 1 Explanation of information symbols This symbol on the product or its packaging indicates that this product is not to be treated as normal domestic waste but must be...

Page 17: ...avoid a hazard There shall be adequate ventilation of the room when the range hood is used at the same time as appliances burning gas or other fuels not applicable to appliances that only discharge the air back into the room Any installation work must be carried out by a qualified electrician or competent person The cooker hood and its filter mesh should be cleaned regularly in order to keep in go...

Page 18: ... with other non electrically operated appliances the room partial vacuum must not exceed 4 Pa 4 x 10 5 bar g Make sure that the room is adequately ventilated h Regularly clean encrusted food from appliance surfaces i Regularly clean or replace the filter The exhaust air hose must not be made from or contain flammable materials 5 Before using the hood Ensure that the hood has not suffered damage du...

Page 19: ...o discolouring Non compliance with the maintenance and cleaning instructions can result in a fire hazard due to grease deposits The grease filters on your appliance are to be cleaned or replaced at regular intervals Filters saturated with grease can quickly catch fire and also distribute unpleasant odours Grease filters obstructed by dirt particles seriously impair the appliance function When clea...

Page 20: ...e a higher wattage than that of the original 8 1 Changing LED lamp If the documentation of the cooker hood does not include an instruction for replacing lamps the lamp must be replaced by a Specialist for safety fi201203 reasons 9 Fault what to do if The motor fails to function Is the plug properly inserted in the socket Is there a power supply failure Has a fuse blown The hood capacity is insuffi...

Page 21: ...e appliance to the power supply once it is properly installed 11 2 Using the extractor hood as an exhaust air hood with air extracted to outdoors If the extractor hood has been fitted at the factory with a carbon filter this must be removed It is only practicable to use this when operating your hood in circulation mode fi201203 11 3 Converting the extractor hood to a circulation hood If you wish t...

Page 22: ... flow If the exhaust air pipeline is routed though cool rooms lofts etc there can be a large temperature drop within the individual parts of the pipeline resulting in sweating or condensation water production This renders outlet pipeline insulation necessary In some cases a condensation water barrier must be installed in addition to adequate insulation these are available from leading building mat...

Page 23: ...nstall the outlet cover B 3 Turn the adjuster A to indoor position 4 Drawings Pictures are for illustration purposes only CHANGEOVER TO CIRCULATION AIR MODE Mount the carbon filter C clockwise on the motor Carbon Filters are not supplied English Operating and Installation Instruction 14 COMPONENTS OF STANDARD COOKER HOODS EXHAUS AIR MODE to remove press ends of brackets down and remove them from t...

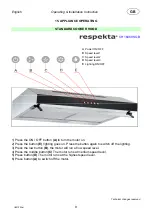
Page 24: ... speed level 4 Press the middle button C The motor runs at medium speed level 5 Press button D The motor runs at the highest speed level 6 Press button A to switch off the motor Technical changes reserved 2 Press the button E lighting goes on Press the button again to switch off the lighting English Operating Installation Instruction 15 APPLIANCE OPERATING STANDARD COOKER HOOD GB fi201203at 9 ...

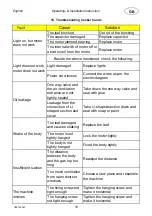
Page 25: ...eaf blocked The capacitor damaged The motor jammed bearing The internal with of motor off or a bad smell from the motor Beside the above mentioned check the following Replace lights Connect the wires as per the electric diagram Choose a new place and resemble the machine Take down the one way valve and seal with glue Take U shaped section down and seal with soap or paint Shake of the body Replace ...

Page 26: ...ation Instruction 17 Replacing the LED Light module Use a screwdriver to remove the wire cover See pc 1 Put the lamp outwards by hand remove the wire terminal to replace the lamp See pic 2 Apply the reverse procedure to reinstall the light GB ILCOS D code for this lamp is DBS 2 65 H 120 33 LED modules rectangle lamp Max wattage 1 2 W Voltage range AC 110 240V 1 2 fi201203at 11 ...

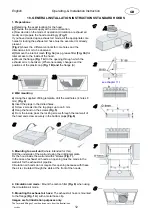
Page 27: ...e dimensions in mm to be observed d Remove the inlet air mesh Fig 3a resp grease filter Fig 3b for later access to the inside of the hood e Mount the flange Fig 1 A to the opening through which the exhaust air is to be taken Where necessary change over the positions of the plastic cap Fig 1 B and the flange A 3 Mounting to a wall unit where intended for this Drill the underside of the wall unit us...

Page 28: ... exchange the device in case of complaints Only if repair s or replacement of the device the intended use by the manufacturer should not be finally achieved the buyer can demand warranty within six months calculated from the date of purchase reduction of the purchase price or cancellation of the purchase contract Claims for damages including consequential damages unless they are based on intent or...

Reviews: