24
19
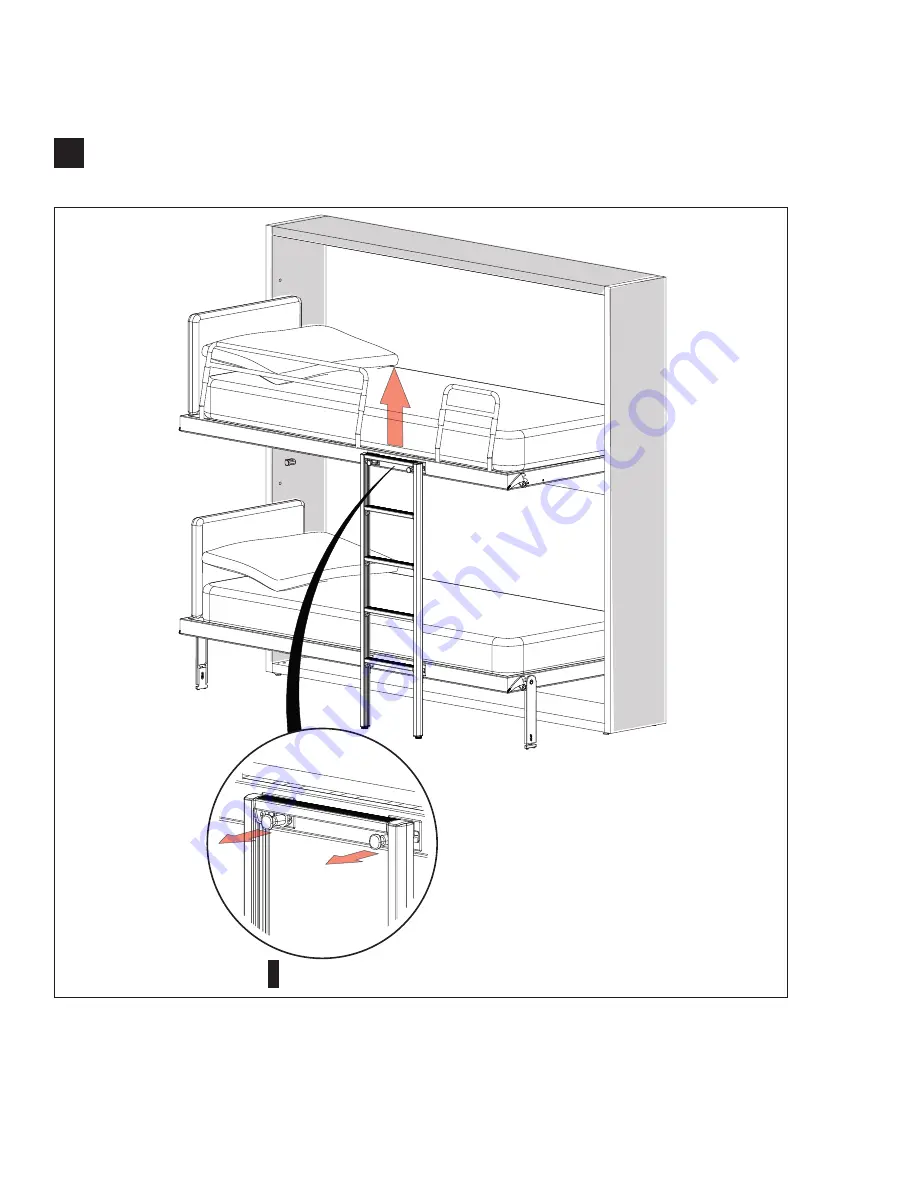
REMOVABLE
LADDER
dett.17a
To remove the ladder from the structure, pull the two pins at the top of the ladder (det. 17a) to
unlock the mechanism, while simultaneously pulling the ladder hooks up and away from the slots.
Page 1: ...Kali Duo Board Assembly Instructions...
Page 2: ...ast 2 people Improper installation may result in permanent damage to the bed Improper installation of this product can cause serious or fatal injury No anchor can be used twice If the product is remov...
Page 3: ...RD MATTRESS SPECIFICATIONS Recommended weight 31 35 lbs Recommended dimensions W 31 1 2 X D 77 1 2 X H 7 1 KALI DUO BOARD OVERVIEW 76 1 2 194 3cm OR Model Shown at 86 5 8 220cm 1 2 4 3cm OR del Shown...
Page 4: ...10 V 12 5 15 13 2 6 18 V H D D I L A B C 7 14 11 9 8 1 4 3 2 KALI DUO BOARD OVERVIEW...
Page 5: ...m horizontal panel 5 1 Lower bed frame 6 1 Upper bed frame 7 2 Back panels 8 1 Upper back panel IN only 9 1 Structural shelf IN only 10 1 Upper storage cabinet door IN only 11 2 Metal bars for mattres...
Page 6: ...id concrete walls only WB 4 Wall brackets WC 18 Bracket screws KALI DUO BOARD TOOLS QTY DESCRIPTION 1 Allen wrench 4 MM 1 Allen wrench 6 MM Note The installer must determine the composition of the wal...
Page 7: ...taching bed frame to structure E 4 Flanged screws for attaching desk to desk mechanism F 2 Conical Washers for attaching desk mechanism to side panels G 2 Flanged screws for attaching desk mechanism t...
Page 8: ...ght vertical and 2 left vertical panels Attach the 4 horizontal bottom panel 3 horizontal top panel and 9 structural shelf to the vertical panels by inserting and tightening 12 B cams Attach the 7 bac...
Page 9: ...inside and 1 1 2 in from the side Drill 1 2 hole at 69 1 8 measured from the bottom of the structure from inside and 1 1 2 in from the side 2 OPTIONAL WAND LIGHTING Drill 1 2 hole at 37 7 8 measured...
Page 10: ...4 After the unit is level and plumb it should be securely attached to the wall using the metal angle mounting brackets as shown in the images below A proper wall anchor suitable for the wall s constru...
Page 11: ...LLATION det 7a Mattress bar must be installed before the bed base is inserted into the structure Fasten the 11 mattress support bars to the 5 lower and 6 upper bed frames using the 5MA x 20 screws att...
Page 12: ...10 5 LOWER BED BASE INSTALLATION det 8a det 8a Position and insert the 5 bed frame within the structure as shown in det 8a...
Page 13: ...11 LOWER BED BASE INSTALLATION dett 9a 6 Close the lower bed and fasten 2 D hex screws into the mechanisms on both vertical panels as shown in det 9a...
Page 14: ...12 UPPER BED BASE INSTALLATION det 10a det 10a 7 Position and insert the 6 upper bed frame within the structure as shown in det 10a...
Page 15: ...13 UPPER BED BASE INSTALLATION dett 11a 8 Close the upper bed and fasten 2 D hex screws into the mechanisms on both vertical panels as shown in det 11a...
Page 16: ...LLATION 9 IN 2200 MODEL WITH UPPER STORAGE ONLY ASSEMBLY OF UPPER STORAGE Assemble the upper storage with the 9 structural shelf which will become the base of the cabinet the 8 back panel and secure w...
Page 17: ...SEMBLY OF UPPER STORAGE A Open the upper storage cabinet fully and attach the 4 hinges to the metal plates on the top panel B Attach the 2 V metal brackets to each side of the cabinet C Using an allen...
Page 18: ...bed frame by pressing down on one of the two locking levers 13a Align the 16 long and 17 short padded barriers with the appropriate holes on the bed frame 13b Lift the barrier fabric as shown and fas...
Page 19: ...irst fold down the barriers Close the barriers at the head and the foot of the bed by pushing the button as shown to disengage the lock and safely fold the barriers down on to the mattress Starting wi...
Page 20: ...the lower bed frame by pressing down on one of the two locking levers Position the 18 desk brackets so that they face towards the structure as shown below Fasten the brackets to the bed frame with 4...
Page 21: ...e F conical washer between each panel and L shaped bracket as shown in det 16a the conical washer s smallest diameter should face away from the panel so that it can fit within the L shaped bracket Sec...
Page 22: ...20 15 DESK INSTALLATION Close the lower bed frame Position the 19 desk against the front of the structure so that it rests on top of the 18 brackets The rounded corners should face outwards...
Page 23: ...sure that they pass through both the desk and the bracket arms det 18a Once the bolts have been inserted attach 4 I nuts as shown in det 18b Tighten the hardware so that the nut head sits within the h...
Page 24: ...OTTOM HEADBOARD INSTALLATION 19a Remove the 2 caps from the end of the lower bed frame on which you wish to place the headboard Fasten the headboard to the frame using the screws included with the hea...
Page 25: ...nserting the lower hooks into the slots on the lower bed frame det 16a Straighten the ladder upright and insert the upper hooks into the slots on the upper bed frame det 16b Pull the ladder down ensur...
Page 26: ...VABLE LADDER dett 17a To remove the ladder from the structure pull the two pins at the top of the ladder det 17a to unlock the mechanism while simultaneously pulling the ladder hooks up and away from...
Page 27: ...ilt downwards so that it is easy to make the bed When the upper bunk is in its horizontal position press down on one of the two locking levers and gently pull the bed downwards To bring the bed back t...
Page 28: ...and lower beds are open and locked in horizontal position Position the ladder at the metal slots on each bed frame Gently tilt the ladder away from the structure inserting the lower hooks into the sl...
Page 29: ...the mattress Latch both mattress straps over the bedding Release the latch on either side of the bed with one hand and lift the bed up into its upright position with the other hand Remove bed pillows...
Page 30: ...ResourceFurniture com New York Los Angeles San Francisco Washington D C Toronto Calgary Vancouver Mexico City...