RE926X_Flexible Bus WiFi Communicator
Page
5
of
8
10-Mar-15
24-hour Tech Support: (715)808-0164
www.ResolutionProducts.com
Operation
Event Reporting:
Events are reported to both the monitoring receiver and the interactive server. All
events use Contact ID reporting codes. The following events are reported by
default:
Alarms
System Low Battery
Alarm cancels
System Low Battery Restoral
Openings
AC Power Fail (0-4 hour random delay)
Closings
AC Power Restoral (0-4 hour random delay)
Vista Only:
Additional events can be enabled for reporting if desired, by enabling
the desired event reports in system programming.
Interactive Control:
The system may be controlled remotely through the interactive platform.
The arm/disarm control and status applies to partition 1 only.
Z-Wave
Z-Wave devices can be controlled via the Interactive function.
Siren (Future capability)
Resolution Wireless Siren will be useable to indicate alarm and statuses.
WiFi Protected Setup Connection to Router:
A)
Connection to Backup router:
•
This Backup router is optional. If no Backup is required, skip to step B.
•
Press & hold Communicator’s WPS button, until WiFi LED blinks rapidly.
•
Press & release Backup Router’s WPS button.
•
WiFi LED is steady when fully connected to Backup Router.
B)
Connection to Primary router:
•
Press & release Communicator’s WPS button, until WiFi LED blinks slowly.
•
Press & release Primary Router’s WPS button.
•
WiFi LED is steady when fully connected to Backup Router.
C)
Manually Setting WiFi Parameters
1. Download the mobile app from
http://esmarthome.protection1.com/downloads/
(Note: this app will only work on Android handsets, running versions 4.2 or later)
2. Reset the communicator to factory defaults.
3. Put the communicator into Access Point mode. (see Factory Default button and
WPS button section)
4. Start the mobile app, and connect the mobile device to the Communicator’s
Access Point WiFi network – the last 6 digits of the Mac address.
(Ex – ResProdF0009A then press back to continue.)
5. Select the customers SSID from the list
6. Enter the WiFi password and click the submit button.
7. You should see a prompt confirming the settings were successfully pushed to the
communicator. If not, wait ten seconds; settings may have been pushed anyway.
8. Confirm successful connection by seeing the WiFi LED on, followed by the CS,
and Platform LED turning on. This may take up to 30 seconds.
RE926X_Flexible Bus WiFi Communicator
Page
6
of
8
10-Mar-15
24-hour Tech Support: (715)808-0164
www.ResolutionProducts.com
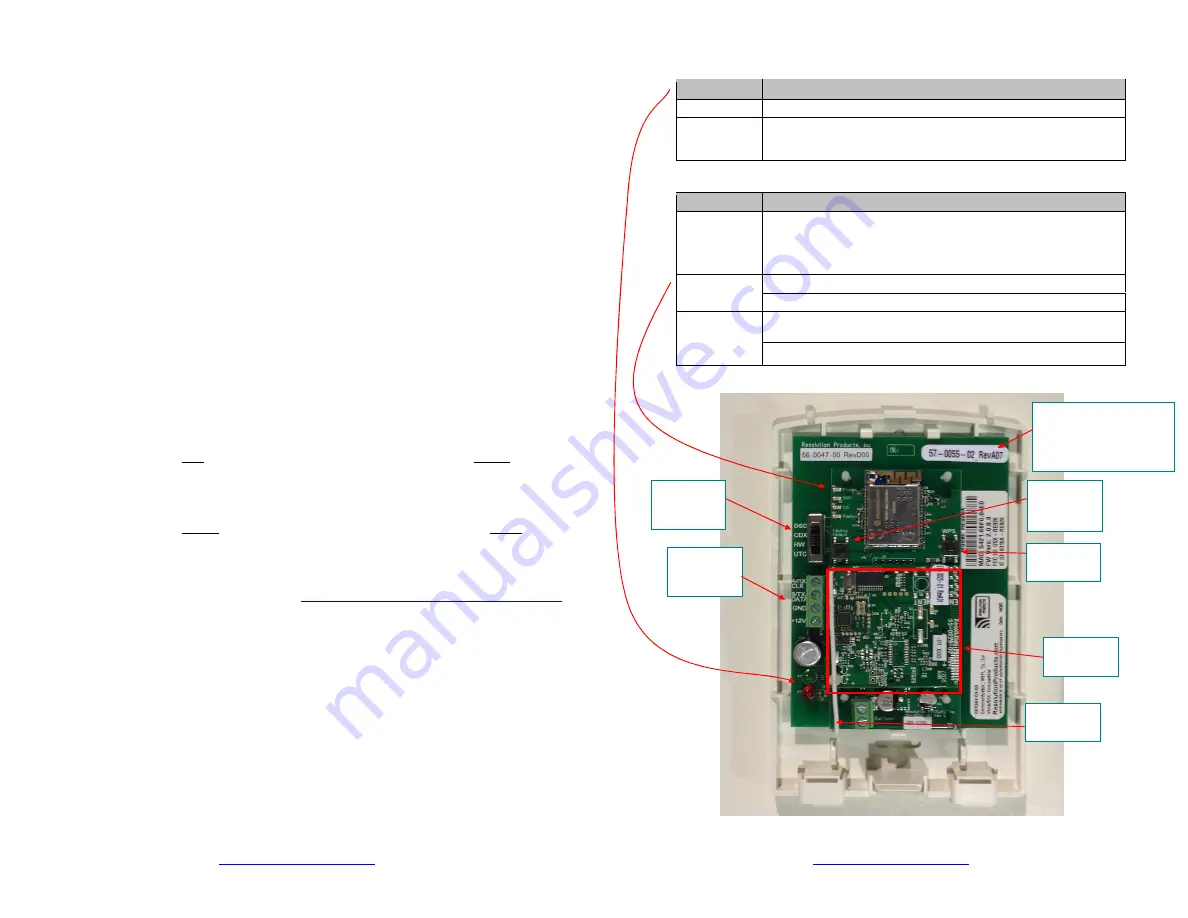
LEDs
Bus Board LEDs Indication
Green
On when the board is powered and running
Red
Vista: Flickers occasionally when module talks to the panel
DSC: Flickers continuously to indicate communication with the DSC panel
WiFi Card LEDs
Indication
Power
(Green)
ON and Flashing once per second when the board is powered and running
WiFi
(Red)
ON when the unit is registered with the local WiFi router
CS
(Red)
ON when the connection to the central station is established
Flashes when there is a problem detecting the Panel type
Platform
(Amber)
ON when the connection to the Panel and connection to the interactive
server is established
Flashes when there is a problem communicating with the panel
Picture
Z-Wave
Module
Panel
Selector
Switch
Data Bus
Connector
Board Revision
see
Revision Functionality
Table
Z-Wave
Antenna
WPS
Button
Factory
Default
Button


