background image

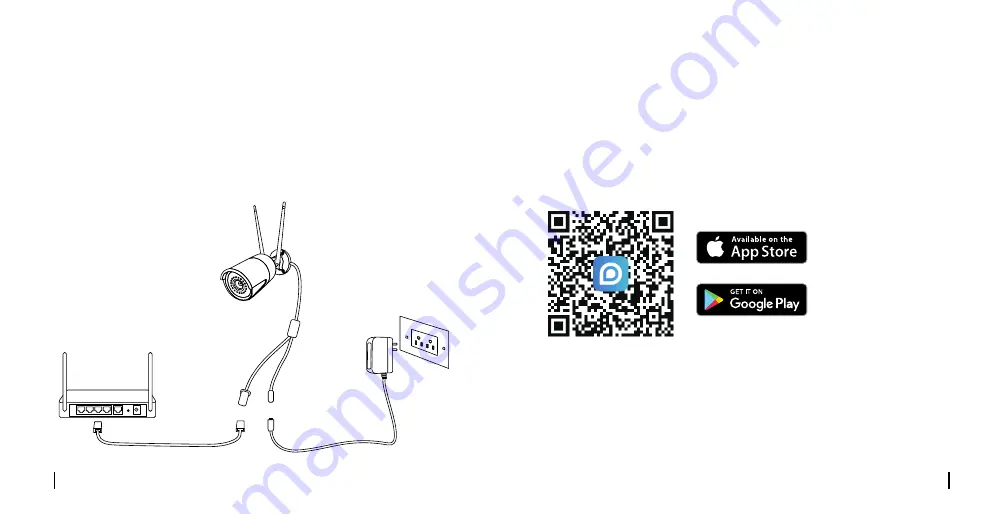
Connection Diagram

Before initial setup, follow the steps below to connect your camera.  

1. Connect the camera to a LAN port on your router with an Ethernet cable. 

2. Power on the camera with a power adapter.

6

English

5

English

• 

On Smartphone

Download and launch the Reolink App or Client software, and follow the 

onscreen instructions to finish initial setup.

Scan to download the Reolink App.

Set up the Camera

• On PC

Download path of the Reolink Client: Go to 

https://reolink.com

 > 

Support > App & Client.

Power Adapter

Router

WiFi IP Camera

Power Cable

Network Cable

Summary of Contents for RLC-410W

Page 1: ...art des questions peuvent être répondues via notre centre de support en ligne à l adresse https support reolink com Assistenza Tecnica Se avete bisogno di aiuto le chiediamo gentilmente di contattare Reolink prima di restituire il prodotto La maggior parte delle domande può essere risolta tramite il nostro centro di assistenza online all indirizzo https support reolink com Soporte técnico Si neces...

Page 2: ...Camera Troubleshooting Specifications Notification of Compliance 2 3 5 6 7 11 12 12 What s in the Box Camera Antenna 1m Network Cable Power Adapter 4 5m Power Extension Cable Quick Start Guide Surveillance Sign Mounting Template Pack of Screws NOTE Camera and accessories vary with different camera models that you purchase ...

Page 3: ... the package and check out the details from the correpsonding introduction above The actual appearance and components may vary with different model of product NOTE Different types of cameras are introduced in this section Please check out the camera included in the package and check out the details from the correpsonding introduction above The actual appearance and components may vary with differe...

Page 4: ... camera with a power adapter 6 English 5 English On Smartphone Download and launch the Reolink App or Client software and follow the onscreen instructions to finish initial setup Scan to download the Reolink App Set up the Camera On PC Download path of the Reolink Client Go to https reolink com Support App Client Power Adapter Router WiFi IP Camera Power Cable Network Cable ...

Page 5: ...posed to water or moisture or blocked by dirt or other elements Do not install the camera at places where rain and snow may hit the lens directly The camera may work in extreme cold conditions as low as 25 C Because when it is powered on the camera will produce heat You may power on the camera indoors for a few minutes before installing it outdoors 8 English 7 English Drill holes in accordance wit...

Page 6: ...h 9 English NOTE If your camera has another mount without the adjusting knob please loosen the adjusting screw with the provided hex key and turn the camera as shown below to adjust the angle Stiffen the adjustment knob to lock the camera To get the best field of view loosen the adjustment knob on security mount and turn the camera 360 90 1 2 3 4 ...

Page 7: ...e them Please go to Live View and check the Day Night mode Set the mode to Auto to activate the IR lights Upgrade your camera s firmware to the latest version Restore the camera to the factory settings and check the IR light settings again If these won t work please contact Reolink Support https support reolink com Specifications Operating Temperature 10 C to 55 C 14 F to 131 F Operating Humidity 10...

Page 8: ... limited warranty that is valid only if purchased from Reolink Official Store or or Reolink authorized resellers Learn more https reolink com warranty and return NOTE We hope that you enjoy the new purchase But if you are not satisfied with the product and plan to return we strongly suggest that you reset the camera to factory default settings and take out the inserted SD card before returning This...

Page 9: ... Fehlerbehebung Spezifikationen Konformitätserklärung 16 17 19 20 21 25 26 26 Lieferumfang HINWEIS Kamera und Zubehör variieren je nach dem Kameramodell Ihrer Bestellung Kamera Antenne Netzwerkkabel 1 Meter Netzadapter Verlängerungskabel Netzkabel 4 5 Meter Kurzanleitung Schild Videoüberwachung Lochschablone zur Montage Päckchen mit Schrauben ...

Page 10: ...en auf die Werkseinstellungen ca 10 Sekunden lang drücken HINWEIS Bitte überprüfen Sie die im Paket enthaltene Kamera und deren Details gemäß der oben gegebenen entsprechenden Einführung Das Aussehen und der Lieferumfang der Kamera können je nach dem Produktmodell variieren Antenne Halterung Aluminiumgehäuse Infrarot LEDs Tageslichtsensor Hochauflösendes Objektiv Scheinwerfer Lautsprecher Eingebaut...

Page 11: ...era mit einem Netzteil ein Netzadapter Router WLAN IP Kamera Stromanschluss Ethernet Kabel 20 Deutsch 19 Deutsch Smartphone Installieren und starten Sie die Reolink App oder Client Software und dann befolgen Sie die Anweisungen auf dem Bildschirm um die Ersteinrichtung abzuschließen Scannen zur Installation der Reolink App Kamera Einrichtung PC Download Pfad des Reolink Clients Gehen Sie auf https...

Page 12: ...nschlüsse nicht direkt dem Wasser oder der Feuchtigkeit ausgesetzt sind und sie nicht von Schmutz oder anderen Elementen blockiert werden Montieren Sie die Kamera nicht an Orten an denen Regen und Schnee direkt das Objektiv treffen könnten Die Kamera kann unter extrem kalten Bedingungen bis zu 25 C arbeiten da sie bei der Stromverbindung Wärme erzeugt So können Sie die Kamera einige Minuten lang i...

Page 13: ... Kamera Lösen Sie mit Schlüssel die Schraube um Kamera Richtung zu regulieren Nach der Regulierung schrauben Sie die Halterung an und befestigen Sie die Kamera HINWEIS Wenn Ihre Kamera eine andere Halterung ohne Einstellknopf hat lösen Sie bitte die Einstellschraube mit dem mitgelieferten Sechskantschlüssel und drehen Sie die Kamera wie unten gezeigt um den Winkel einzustellen 360 90 1 2 3 4 ...

Page 14: ...n Lösungen Gehen Sie zur Geräteeinstellungen und prüfen SIe ob die Infrarot LEDs aktiviert sind Wenn nicht bitte aktivieren Sie sie Gehen Sie zur Live Ansicht Seite und checken Sie den Tag Nacht Modus Stellen Sie den Modus auf Auto um Infrarot LEDs zu aktivieren Aktualisieren Sie die Firmware Ihrer Kamera auf die neueste Version Setzen Sie die Kamera auf Werkseinstellungen zurück und überprüfen Si...

Page 15: ...SS 102 die für eine unkontrollierte Umgebung festgelegt wurden Bei der Installation und Verwendung dieses Gerätes sollte ein Abstand von mindestens 20 cm zwischen der Strahlungsquelle und Ihrem Körper eingehalten werden Erklärung zur Strahlenexposition nach ISED Um mögliche Umwelt oder menschliche Gesundheitsschäden durch unkontrollierte Entsorgung von Abfällen zu vermeiden bitte recyceln Sie die ...

Page 16: ...5180 MHz 5320 MHz 18dBm 5745 MHz 5825 MHz 18dBm 30 Français 29 Deutsch Contenu FR Contenu de la boîte Introduction de caméra Diagramme de connexion Configurer la caméra Guide d installation Dépannage Caracteristiques techniques Avis de conformité 31 32 34 35 36 40 41 41 ...

Page 17: ... Objectif de haute définition Support Boîtier métallique en aluminium Antenne Capteur de lumière du jour Micro integre Bouton de réinitialisation Câble d alimentation Appuyez pendant 10 s pour restaurer les paramètres d usine Caméra Antenne Câble Ethernet 1m Adaptateur secteur Rallonge d alimentation 4 5m Guide de démarrage rapide Signe de surveillance Gabarit de Montage Paquet de vis ...

Page 18: ...érents produits Antenne Support Boîtier métallique en aluminium LED infrarouge Capteur de lumière du jour Objectif de haute définition Projecteur Haut parleur Micro intégré Diagramme de connexion Avant l installation initiale suivez les étapes suivantes pour connecter votre caméra 1 Connectez la caméra à un port LAN de votre routeur à l aide d un câble Ethernet 2 Allumez la caméra avec un adaptateu...

Page 19: ...as la caméra dans une zone ombragée et orientez la vers une zone bien éclairée Sinon cela pourrait entraîner une mauvaise qualité d image Pour garantir une qualité d image optimale les conditions d éclairage de la caméra et de l objet à capturer doivent être identiques Pour garantir une meilleure qualité d image il est recommandé de nettoyer l objectif avec un chiffon doux de temps en temps Assure...

Page 20: ...ec les vis de montage incluses dans le paquet Monter la caméra REMARQUE Il existe deux types de supports différents pour les caméras bullet Veuillez consulter le support inclus dans le paquet et suivre les instructions correspondantes pour installer correctement l appareil Serrez le bouton de réglage pour fixer la caméra Pour régler l angle de la caméra desserrez le bouton de réglage sur le support...

Page 21: ...l appareil dans une autre prise et voyez si elle fonctionne Veuillez vérifier si l adaptateur CC fonctionne ou pas Si vous avez un autre adaptateur secteur 12V CC qui fonctionne veuillez l utiliser et voir s il fonctionne Si cela ne fonctionne pas veuillez contacter le support Reolink https support reolink com Dépannage Les LED IR ne fonctionnent pas Si les LED infrarouges de votre caméra ne foncti...

Page 22: ...Reolink ou chez un revendeur agréé par Reolink En savoir plus https reolink com fr warranty and return Garantie limitée Mettez à jour le micrologiciel de votre caméra vers la dernière version Restaurez la caméra aux paramètres d usine et vérifiez à nouveau les paramètres de la lumière infrarouge Si cela ne fonctionne pas veuillez contacter le support Reolink https support reolink com Caracteristiqu...

Page 23: ...une distance minimale de 20cm entre le radiateur et votre corps L utilisation du produit est soumise à votre accord sur les conditions d utilisation et la politique de confidentialité de reolink com Tenez le hors de la portée des enfants En utilisant le logiciel qui est intégré au produitReolink vous acceptez les termes de ce Contrat de Licence Utilisateur Final CLUF entre vous et Reolink Pour en s...

Page 24: ...blemi Specifiche Notifica di Conformità 46 47 49 50 51 55 56 56 Cosa c è nella Scatola AVVISO La telecamera e gli accessori si variano a seconda del modello di prodotto acquistato Telecamera Antenna Cavo di Ethernet da 1 m Adattatore di Alimentazione Cavo di Estensione di Alimentazione da 4 5m Guida Rapida Cartello di Avviso di Sorveglianza Dima per Fori di Montaggio Confezione di Viti ...

Page 25: ...e impostazioni di fabbrica 48 Italiano 47 Italiano AVVISO Ci sono vari tipi di telecamera bullet e se ne presenta soltanto due Il modello del prodotto acquistato potrebbe essere diverso dalle due telecamere presentate sopra L aspetto reale e i componenti possono variare a seconda dei diversi modelli di prodotti Antenna Staffa di Montaggio Alloggiamento Metallico in Alluminio Luci a Infrarossi Sens...

Page 26: ...un adattatore di alimentazione Adattatore d Alimentazione Router Telecamera IP WiFi Cavo di Alimentazione Cavo di Rete 50 Italiano 49 Italiano Sullo Smartphone Scaricare ed avviare l App Reolink o software Client e seguire l istruzione per finire la configurazione iniziale Scansionare per scaricare l App Reolink Configurare la Telecamera Sul PC Per scaricare Client Reolink Andare su https reolink com...

Page 27: ...porte di alimentazione non siano direttamente esposti all acqua o all umidità e non siano schermati dallo sporco o dagli altri elementi Non esporre la telecamera dove pioggia e neve colpiscono direttamente l obiettivo La fotocamera è in grado di funzionare in condizioni estreme fino a 25 C visto che la telecamera produce calore quando viene avviata Si consiglia di accenderla qualche minuto prima di...

Page 28: ...53 Italiano Serrare poi la manopola per allacciare la telecamera Allentare la manopola della regolazione sulla staffa per puntare la telecamera ad ottenere un migliore campo di visione AVVISO Allentare la vite di regolazione con la chiave nella confezione e puntare la telecamera in una direzione adatta per ottenere una migliore campo di visione 360 90 1 2 3 4 ...

Page 29: ...e la modalità Giorno Notte è attivata e configurare le luci a infrarossi automatici per attivarle sulla pagina della visualizzazione Aggiornare il firmware della tua telecamera alla versione più recente Ripristinare la telecamera alle impostazioni di fabbrica e controllare un altra volta le impostazioni di LED a infrarossi Se tutte le soluzioni non risolvono i tuoi problemi contattare il gruppo di a...

Page 30: ...ps reolink com warranty and return Garanzia Limitata AVVISO Speriamo che sia una buona esperienza di acquisto Nel caso non fossi soddisfatto del prodotto acquistato e avessi intenzione di restituirlo ti suggeriamo gentilmente di ripristinare la telecamera alle impostazioni di fabbrica predefinite ed estrarre la scheda SD inserita prima della restituzione Questa attrezzatura è conforme ai limiti di ...

Page 31: ...ón Configurar la Cámara Guías de Instalación Solución de Problemas Especificaciones Notificación de Cumplimiento 61 62 64 65 66 70 71 71 60 Español 59 Italiano FREQUENZA OPERATIVA la potenza massima trasmessa 2412 MHz 2472 MHz 19dBm 5180 MHz 5320 MHz 18dBm 5745 MHz 5825 MHz 18dBm ...

Page 32: ...finición Soporte Caja Metálica de Aluminio Antena Sensor de Luz Solar Botón de Reinicio Cable de Alimentación Micrófono lncorporado Presione durante unos 10 segundos para restaurar a la configuración de fábrica Cámara Antena Cable de Ethernet de 1m Adaptador de Corriente Cable de Alimentación de Extensión de 4 5m Guía de Inicio Rápido Señal de Vigilancia Plantilla de Montaje Paquete de Tornillos ...

Page 33: ...roductos Antena Soporte Caja Metálica de Aluminio Luces Infrarrojas Sensor de Luz Solar Objetivo de Alta Definición Foco Altavoz Micrófono Incorporado Diagrama de Conexión Antes de la configuración inicial siga los pasos a continuación para conectar su cámara 1 Conecte la cámara a un puerto LAN de su enrutador con un cable de Ethernet 2 Alimente la cámara con un adaptador de corriente Adaptador de C...

Page 34: ...jetivo con un paño suave de vez en cuando Asegúrese de que los puertos de alimentación no estén expuestos directamente al agua o la humedad y que no estén bloqueados por suciedad u otros elementos No instale la cámara en lugares donde la lluvia y la nieve puedan golpear el objetivo directamente La cámara puede funcionar en condiciones de frío extremo de hasta 25 C porque cuando está encendida la c...

Page 35: ...e la base de montaje con los tornillos de montaje incluidos en el paquete Montar la Cámara NOTA Existen dos tipos diferentes de soportes para cámaras Bullet Verifique el soporte incluido en el paquete y siga las instrucciones correspondientes para instalar la cámara correctamente Apriete la perilla de ajuste para bloquear la cámara Para obtener el mejor campo de visión afloje la perilla de ajuste en...

Page 36: ...uebe si funciona Si no funcionan comuníquese con Soporte de Reolink https support reolink com Solución de Problemas Los LED infrarrojos dejan de funcionar Si los LED infrarrojos de su cámara dejan de funcionar intente las siguientes soluciones Vaya a Configuración del Dispositivo y verifique si ha activado los LED infrarrojos Si los LED están desactivados actívelos Vaya a Vista en Vivo y verifique el...

Page 37: ...ucto se compra en las tiendas oficiales de Reolink o en un revendedor autorizado por Reolink Descubra más https reolink com warranty and return Garantía Limitada Restaure la cámara a la configuración de fábrica y vuelva a comprobar la configuración de la luz infrarroja Si no funcionan comuníquese con Soporte de Reolink https support reolink com Especificaciones Temperatura de Funcionamiento 10 C a 55 ...

Page 38: ...l radiador y su cuerpo El uso del producto está sujeto a su aceptación de los Términos de Servicio y la Política de Privacidad en reolink com Manténgalo fuera del alcance de los niños Al utilizar el Software del producto que está integrado en el producto Reolink usted acepte los términos de este Contrato de Licencia de Usuario Final EULA entre usted y Reolink Obtenga más información https reolink ...

Reviews: