


c) Persons and product
•
Never pour any liquids over electrical devices or place objects filled with liquid next to the
product. If liquid or an object does enter the interior of the device, power down the respective
socket (e.g. switch off the circuit breaker), and then remove the mains plug from the mains
socket. Discontinue use and take the product to a specialist repair centre.
• Never use the product immediately after it has been brought from a cold room into a warm
one. The condensation generated may destroy the product. Allow the product to reach room
temperature before connecting it and putting it to use. This may take several hours.
• When setting up the product, make sure that the cables are not pinched, kinked or damaged
by sharp edges.
• Always lay the cables so that nobody can trip over or become entangled in them. This may
cause an injury.
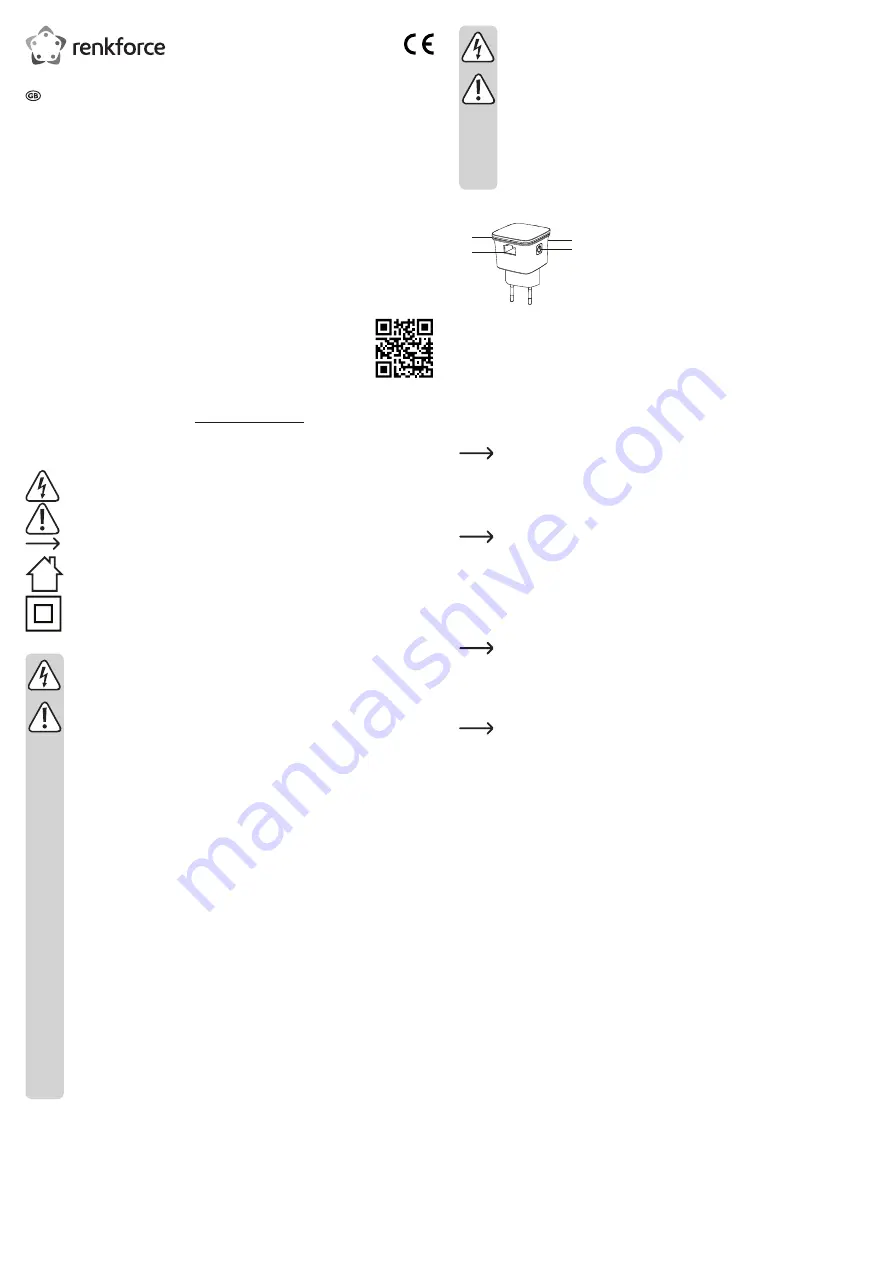
Product overview
1
2
4
3
1 LAN cable connection
2 LED indicator
3 WPS button
4 On/Off button
Operation
• Plug the Wi-Fi receiver into a mains socket.
•
Press the on/off button (4) to turn the product on. The LED indicator (2) will flash slowly when the product
is powering on (indicating no Wi-Fi connection). Wait until the LED indicator is constant. This indicates that
the receiver is ready to use.
•
The LED indicator (2) flashes quickly when the receiver is connecting to a Wi-Fi router via WPS, or when
the receiver is searching for a Wi-Fi router.
• Press the on/off button (4) to turn the receiver off.
To avoid damaging the product in the event of a power surge, use a mains socket with surge
protection.
The product has two basic functions:
• To create a wireless access point from a wired network (LAN).
• To extend the range of an existing Wi-Fi network (Wi-Fi repeater).
If you encounter problems or want to switch functions, reset the device to the factory settings.
All settings will be reset to the factory defaults. To restore factory settings, press and hold the
WPS button (3) for 6 seconds until the LED starts to flash in blue.
a)
Creating a wireless access point
• Insert an Ethernet cable that is connected to your computer network (LAN) into the LAN cable
connection (1) on the device.
• The device will create a Wi-Fi network with the SSID "wireless-N".
"Wireless-N" is the default network name (SSID). You can change the network name at any time.
• Search for the "wireless-N" network on a Wi-Fi device (e.g. computer, tablet or smartphone). Refer to your
device's instructions for details.
• Connect your device to the "wireless-N"network. The wireless access point is now connected to your
Ethernet network, and you can use all corresponding features (e.g. Internet access).
Disconnect all Ethernet cables before connecting your computer to the wireless network. Mobile
devices must support iOS 5 / Android 4.0 or above.
•
You can configure the Wi-Fi network from your external device. You are recommended to set a password
to prevent unauthorized access. Refer to section c) "Firmware settings" for details.
b)
Using the device as a Wi-Fi repeater
• You can use the device to extend the range of an existing Wi-Fi network.
• Plug the device into a socket that is within range of your Wi-Fi router. If necessary, test the signal strength
using a mobile device in order to find a suitable location. The signal strength should be at least two bars.
WPS configuration
Use the WPS feature to automatically configure the Wi-Fi repeater. This feature is designed for users without
professional knowledge of network configurations. It automatically establishes a connection between the
Wi-Fi repeater and your home router. Your home router must support WPA or WPA2 encryption. For more
information, refer to the instructions that came with your router. Follow the steps below to connect the Wi-Fi
repeater to your router:
•
Press the WPS button (3) on the Wi-Fi repeater for approx. 1 second. The LED will flash for 2 minutes. The
device is now ready for automatic configuration.
• Press the WPS button on your router within this two-minute period. For more information, refer to the WPS
setup instructions for your router.
• The Wi-Fi repeater will connect to your router and automatically sync the Wi-Fi settings (including the SSID
and password). After rebooting, the Wi-Fi repeater will create a wireless network with the suffix "_EXT".
• To connect to the Wi-Fi repeater, enter the original password for your router (network name: [Original
SSID]_
EXT
).
Using the web interface to configure the network settings
•
If your router does not support WPS, you can use the web interface to configure the settings. Refer to
section c) "Firmware settings" for details.
Operating instructions
Wi-Fi Repeater N300 RF-WR-N300Mini
Item no. 1574526
Intended use
This product is designed to create a wireless access point or extend the coverage of an existing Wi-Fi
network (Wi-Fi repeater). Both features can be configured to suit your needs. The product is powered by a
standard mains socket.
This product is intended for indoor use only. Do not use it outdoors. Contact with moisture (e.g. in bathrooms)
must be avoided under all circumstances.
For safety and approval purposes, you must not rebuild and/or modify this product. Using the product for
purposes other than those described above may damage the product. In addition, improper use can cause
hazards such as a short circuit, fire or electric shock. Read the instructions carefully and store them in a safe
place. Make this product available to third parties only together with its operating instructions.
This product complies with statutory national and European regulations. All company and product names are
trademarks of their respective owners. All rights reserved.
Delivery content
• Wi-Fi repeater
• Operating instructions
Up-to-date operating instructions
Download the latest operating instructions at www.conrad.com/downloads or scan the QR code on this page.
Follow the instructions on the website.
Explanation of symbols
The symbol with the lightning in the triangle indicates that there is a risk to your health, e.g. due
to an electric shock.
This symbol is used to highlight important information in these operating instructions. Always
read this information carefully.
This symbol indicates special information and advice on how to use the product.
This product must only be used in dry, enclosed indoor areas. It must not become damp or wet,
as this may cause a fatal electric shock!
This symbol indicates that this product is built according to protection class II. It is equipped with
reinforced or dual insulation between the mains circuit and the output voltage.
Safety information
Read the operating instructions and safety information carefully. If you do not follow the
safety instructions and information on proper handling in this manual, we will assume no
liability for any resulting personal injury or damage to property. Such cases will invalidate
the warranty/guarantee.
a)
General information
• This product is not a toy. Keep it out of the reach of children and pets.
• Do not leave packaging material lying around carelessly, as it may become dangerous playing
material for children.
• Protect the product from extreme temperatures, direct sunlight, strong jolts, high humidity,
moisture, flammable gases, vapours and solvents.
• Do not place the product under any mechanical stress.
• If it is no longer possible to operate the product safely, stop using it and prevent unauthorized
use. Safe operation can no longer be guaranteed if the product:
- is visibly damaged,
- is no longer working properly,
- has been stored for extended periods in poor ambient conditions or
- has been subjected to any serious transport-related stress.
• Always handle the product carefully. Jolts, impacts or a fall even from a low height may
damage the product.
• Always observe the safety and operating instructions of any other devices which are
connected to the product.
• Consult a technician if you are not sure how to use or connect the product.
•
Maintenance, modifications and repairs must be done by a technician or an authorized repair
centre.
• If you have questions which remain unanswered by these operating instructions, contact our
technical support service or other technical personnel.
b)
Electrical safety
• The product must only be powered by a standard mains socket connected to the public grid.
• Never connect or disconnect the product when your hands are wet.
• For safety reasons, disconnect the product from the mains socket during storms.