57
a) Vooraanzicht
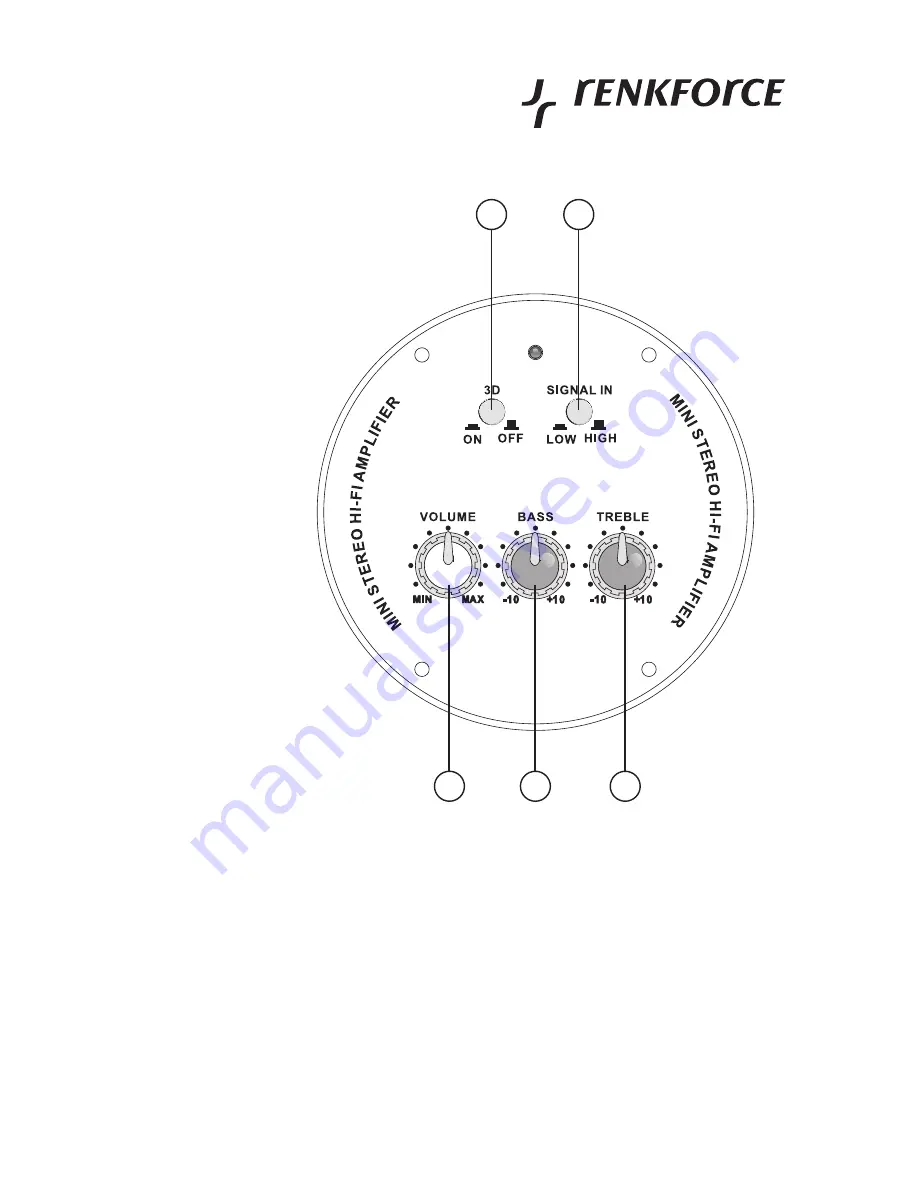
1
Toets “3D”
2
Toets “SIGNAL IN”
3
Draairegelaar
“VOLUME”
4
“BASS”
5
“TREBLE”
Weergave- en bedieningselementen
Page 1: ...sanleitung Seite 2 17 Mini Stereo Amplifier DA 2300 Operating Instructions Page 18 33 Mini amplificateur st r o DA 2300 Notice d Emploi Seite 34 50 Mini stereoversterker DA 2300 Gebruiksaanwijzimg Pag...
Page 2: ...und Bedienelemente 8 a Vorderansicht 8 b R ckansicht 9 Aufstellen desProdukts 9 Inbetriebnahme 10 a Cinchein und Ausg nge verbinden 10 b Lautsprecherausg nge verbinden 11 c Basisbreitenvergr erung ak...
Page 3: ...triebnahme und Handhabung Achten Sie hierauf auch wenn Sie dieses Produkt an Dritte weitergeben Heben Sie deshalb diese Bedienungsanleitung zum Nachlesen auf Alle enthaltenen Firmennamen und Produktbe...
Page 4: ...Verwendung als zuvor beschrieben f hrt zur Besch digung des Produkts dar ber hinaus ist dies mit Gefahren wie z B Kurzschluss Brand oder elektrischer Schlag verbunden Das gesamte Produkt darf nicht ve...
Page 5: ...hmen wir keine Haftung Bei Sach oder Personensch den die durch unsachgem e Handhabung oder Nichtbeachten der Sicherheitshinweise verursacht werden bernehmen wir keine Haf tung In solchen F llen erlisc...
Page 6: ...erkstatt durchgef hrt werden Lassen Sie das Verpackungsmaterial nicht achtlos liegen dieses k nnte f r Kinder zu einem gef hrlichen Spielzeug werden Elektrische Produkte geh ren nicht in Kinderh nde L...
Page 7: ...arf nur vom Fachmann ersetzt werden Stellen Sie keine Beh lter z B Blument pfe auf das Produkt Gie en Sie nie Fl ssigkeiten ber dem Produkt aus Es besteht h chste Gefahr eines Brandes oder lebensgef h...
Page 8: ...nst nden ein Stellen Sie keine offenen Brandquellen wie brennende Kerzen auf oder direkt neben dem Ger t ab Benutzen Sie das Ger t nicht in tropischem sondern nur in gem igtem Klima Beachten Sie auch...
Page 9: ...bei der Wahl des Aufstellortes die Raumgegebenheiten wie z B die Lage der n chsten Steckdose etc Achten Sie bei der Auswahl des Aufstellortes auch darauf dass direktes Sonnenlicht Vibrationen Staub H...
Page 10: ...en Sie sicher dass vor dem Anschluss des Produkts der Netzstecker ausgesteckt und der Lautst rkeregler 3 auf Minimum gedreht ist Linksan schlag Schalten Sie vor dem Anschluss des Produkts alle anderen...
Page 11: ...ll sollten Sie mit einem Fachmann R cksprache halten Achten Sie darauf dass alle Lautsprecher richtig gepolt sind also die Plus und Minus Kennzeichen bereinstimmen Das Produkt wurde f r den Betrieb an...
Page 12: ...kts alle Anschl sse auf Ihre Richtigkeit Drehen Sie den Lautst rkeregler 3 ganz nach links auf die Stellung MIN Schalten Sie die Ansteuerquellen wie z B Ihren CD Player ein Schalten Sie nun das Produk...
Page 13: ...hriften vertraut ist Beim ffnen von Abdeckungen oder Entfernen von Teilen k nnen span nungsf hrende Teile freigelegt werden Vor einer Wartung oder Instandset zung m ssen alle angeschlossenen Ger te vo...
Page 14: ...mit dem nebenstehenden Symbol gekennzeichnet sind d rfen nicht mit dem Hausm ll entsorgt werden Sie sind verp ichtet solche Elektro und Elektronik Altger te separat zu entsorgen Informieren Sie sich b...
Page 15: ...Lautsprecherkabel hat sich aus den Lautsprecherklemmen gel st Lautsprecherkabel richtig einstecken Es tritt ein Brummen auf Ein Cinchkabel ist defekt Cinchkabel ersetzen Es sind Verzerrungen zu h ren...
Page 16: ...tsprecher Geeignete Lautpsrecher anschlie en Die Wiedergabe erfolgt ohne Bassanteil Ein Lautsprecher ist verpolt an geschlo en Lautsprecher korrekt an schlie en Der Bassregler 4 am Produkt steht auf M...
Page 17: ...requenzgang 7 22 400 Hz 1 dB Klirrfaktor 0 1 THD 1 W 1 kHz 4 0 02 Kanaltrennung 38 3 dB Eingangsemp ndlichkeit HIGH 130 mV 1 KHz Eingangsemp ndlichkeit LOW 430 mV 1 Khz Eingangsscheinwiderstand 12 7 k...
Page 18: ...24 elements 24 a Front view 24 b Rear view 25 Setting up the product 26 Commissioning 26 a Connecting cinch inputs and outputs 26 b Connecting the loudspeaker outputs 27 c Activating the basic range e...
Page 19: ...these operating instructions Please read the operating instructions completely and observe the safety and operating notices before using the product All company names and product names are trademarks...
Page 20: ...than the one described above damages the product Moreover this involves dangers such as e g short circuit re electric shock etc The product must not be changed or modi ed in any way Do not open the h...
Page 21: ...ly protect the device but also and in particular your health Please read through the operating in structions carefully before using the product Keep them in a safe place for future reference For reaso...
Page 22: ...ensure that it is not used unintentionally It can be assumed that safe operation is no longer possible if the product exhibits visible damage the appliance ceases to function the device has been stor...
Page 23: ...ns socket Do not continue to use the product and take it to a specialised workshop Make sure the device is suf ciently ventilated when in operation Do not cover the vents with magazines blankets curta...
Page 24: ...24 Operating manual English a Front view 1 3D button 2 SIGNAL IN button 3 VOLUME control 4 BASS control 5 TREBLE control 3 4 5 1 2 Display and operating elements...
Page 25: ...25 b Rear view 6 Power switch 7 Cinch inputs and 8 outputs 9 Fuse 10 Mains cable 11 Loudspeaker outputs 6 7 8 9 10...
Page 26: ...issioning a Connecting cinch inputs and outputs Make sure that the mains plug is removed before connecting the product and that the volume control 3 is set to minimum left stop Before con necting the...
Page 27: ...er to each output Push the red or black plastic button on the loudspeaker outputs 10 to open the terminals Connect the red cable of the left loudspeaker to the red speaker terminal L Connect the black...
Page 28: ...n the volume control 3 to the right until you reach the desired volume You can change the sound with the bass and treble controls 4 and 5 In case of high volumes and or highly turned up sound controls...
Page 29: ...overs are opened or components are removed All attached appliances must be disconnected from the mains be fore servicing or repairs The device is maintenance free and must therefore never be opened If...
Page 30: ...or recycling or other forms of reuse This helps prevent harmful substances from in ltrating the environment Troubleshooting Status Possible cause Remedy There is no sound Adevice in the playback chain...
Page 31: ...uce the volume on the product The sound controls for bass 4 and treble 5 are set too high Turn down the sound con trols Load capacity impedance of the connected loudspeaker too low Connect suitable lo...
Page 32: ...79 3 dB A Frequency response 7 22 400 Hz 1 dB Total harmonic distortion 0 1 THD 1 W 1 kHz 4 0 02 Channel separation 38 3 dB Input sensitivity HIGH 130 mV 1 KHz Input sensitivity LOW 430 mV 1 Khz Input...
Page 33: ...33...
Page 34: ...ommande 40 a Vue de face 40 b Vue arri re 41 Installation du produit 42 Mise en service 42 a Raccorder les entr es et sorties cinch 42 b Raccorder les sorties des haut parleurs 43 c Activer l ampli ca...
Page 35: ...oi avant la mise en ser vice du produit et respectez toutes les consignes d utilisation et de s curit Tous les noms d entreprises et appellations de produits contenus dans ce mode d emploi sont des ma...
Page 36: ...le s accompagne de dangers tels que court circuit incendie ou lectrocution Le produit ne doit tre ni transform ni modi et le bo tier ne doit pas tre ouvert D finition des pictogrammes Les notes relati...
Page 37: ...37 Ampli cateur HIFI Ampli cateur large bande de base Adaptation de la sensibilit d entr e R gulateur de tonalit graves aigu s Entr es et sorties cinch Caract ristiques et fonctions...
Page 38: ...eures Pour des raisons de s curit et d homologation CE les transformations et ou modi cations de l appareil r alis es titre individuel sont interdites Adressez vous galement un technicien sp cialis en...
Page 39: ...produit ne fonctionne plus et le produit a t stock durant une p riode prolong e dans des conditions d favorables ou il a subi de s v res sollicitations li es au transport Assurez vous que toutes les l...
Page 40: ...che de la prise de courant N utilisez plus le produit et amenez le dans un atelier sp cialis Veillez une ventilation suf sante de l appareil durant l utilisation Ne couvrez pas les ori ces d a ration...
Page 41: ...41 a Vue de face 1 Touche 3D 2 Touche SIGNAL IN 3 Bouton de r glage VOLUME 4 Bouton de r glage BASS 5 Bouton de r glage TREBLE 3 4 5 1 2 l ments d affichage et de commande...
Page 42: ...42 Mode d emploi fran ais b Vue arri re 6 Bloc d alimentation 7 Entr es et sorties cinch 8 Fusible 9 C ble de raccorde ment au r seau 10 Sorties pour haut parleurs 6 7 8 9 10...
Page 43: ...de peintures et d encaustiques utilis es il n est pas exclu que les pieds du produit laissent des traces sur les meubles en raison d une r action chimique Pour cette raison il est recommand de prot g...
Page 44: ...ble de courant et d une imp dance suffisante voir les Caract ristiques tech niques Reliez les haut parleurs directement au produit N utilisez aucun adaptateur de casque d coute ou de bo tier de r part...
Page 45: ...che du produit contr lez le bon branchement de tous les raccordements Tournez le bouton du volume 3 compl tement vers la gauche en position MIN Allumez les sources de commande telles que votre lecteur...
Page 46: ...chement et un amp rage identique uniquement lorsque la fiche est d branch e Il est interdit d utiliser des fusibles d fectueux ou bricol s r par s ou de ponter le porte fusible teignez l ampli cateur...
Page 47: ...appareils raccord s par ex en vue d une d t rioration du c ble de raccordement et du bo tier Lorsque le bon fonctionnement de l appareil n est plus garanti il convient de mettre celui ci hors service...
Page 48: ...des mati res polluantes soient ventuellement d pos es dans l environnement Recherche de pannes tat Cause possible Rem de Absence de son Un appareil dans la cha ne de lecture n est pas activ Allumer le...
Page 49: ...s de r glage de la tonalit pour les graves 4 et les aigu s 5 sont r gl s un niveau trop lev R duisez le r glage de la tonalit Intensit admissible de courant imp dance des haut parleurs raccord s trop...
Page 50: ...dB A R ponse fr quentielle 7 22 400 Hz 1 dB Facteur de distorsion harmonique 0 1 THD 1 W 1 kHz 4 0 02 S paration des canaux 38 3 dB Sensibilit d entr e HIGH 130 mV 1 KHz Sensibilit d entr e LOW 430 mV...
Page 51: ...nten 40 a Vooraanzicht 40 b Achteraanzicht 41 Opstelling van 42 het product 42 Ingebruikname 42 a Cinch in en uitgangen koppelen 42 b Luidsprekeruitgangen verbinden 43 c Basisbreedte vergroting active...
Page 52: ...en en een ongevaar lijke werking te garanderen Lees voor de ingebruikstelling van het product de volledige gebruiksaanwij zing en neem alle bedienings en veiligheidsvoorschriften in acht Alle voorkome...
Page 53: ...beschadiging van het product en brengt het risico van bijv kort sluiting brand of elektrische schokken met zich mee Het volledige product mag niet worden aangepast of omgebouwd en de behuizing mag nie...
Page 54: ...heids en bedieningsvoorschriften van deze gebruiksaanwijzing moeten steeds in acht genomen worden Ze hebben niet alleen de bescher ming van het apparaat maar vooral ook van uw gezondheid tot doel Geli...
Page 55: ...Haal de stekker uit de contactdoos als u het product gedurende langere tijd niet gebruikt Trek altijd de stekker uit het stopcontact voor u het toestel gaat reinigen Neem bij onweer de netstekker alt...
Page 56: ...ruiksaanwijzing worden beantwoord Wanneer de versterker of het netsnoer beschadigingen vertonen mag u het niet aanraken Schakel eerst de betreffende wandcontactdoos stroomloos bijv via de bijbehorende...
Page 57: ...57 a Vooraanzicht 1 Toets 3D 2 Toets SIGNAL IN 3 Draairegelaar VOLUME 4 Draairegelaar BASS 5 Draairegelaar TREBLE 3 4 5 1 2 Weergave en bedieningselementen...
Page 58: ...58 Gebruiksaanwijzing Nederlands b Achteraanzicht 6 Netschakelaar 7 Cinch in en uitgangen 8 Zekering 9 Netsnoer 10 Luidsprekeruit gangen 6 7 8 9 10...
Page 59: ...niet wor den uitgesloten dat de pootjes van het product veroorzaakt door een chemi sche reactie zichtbare sporen op de meubels kunnen achterlaten Het apparaat dient daarom niet zonder geschikte besch...
Page 60: ...luitend luidsprekers met voldoende belastingscapaciteit en impedantie zie de technische gegevens Verbind de luidsprekers recht streeks met het product Gebruik geen adapters voor koptelefoons of ver de...
Page 61: ...oomvoorziening Controleer voor het inschakelen van het product of alle aansluitingen juist zijn aangesloten Draai de volumeregelaar 3 geheel naar links op positie MIN Schakel de aanstuurbronnen zoals...
Page 62: ...door zekeringen van het zelfde type met dezelfde nominale stroomsterkte en dezelfde technische kenmerken zie de technische gegevens Het gebruik van gerepareerde zekeringen of het overbruggen van de ze...
Page 63: ...oeld gebruik U mag ervan uitgaan dat een veilig gebruik niet meer mogelijk is indien het apparaat of de netkabel zichtbaar beschadigd is het apparaat niet meer functioneert het codeslot lang is opgesl...
Page 64: ...m Volume goed instellen De zekering van het product is defect Vervangen van de zekering Een kanaal werkt niet Een cinch kabel is van het bron apparaat bijv CD speler of het product losgeraakt Cinch ka...
Page 65: ...t product be perken De toonregelaars voor Bas 4 en hoge tonen 5 zijn te ver opengedraaid Toonregelaar terugdraaien Te geringe belasting impedantie van de aangesloten luidspre kers Geschikte luidspreke...
Page 66: ...tio 79 3 dB A Frequentiebereik 7 22 400 Hz 1 dB Vervormingsfactor 0 1 THD 1 W 1 kHz 4 0 02 Kanaalscheiding 38 3 dB Inganggevoeligheid HIGH 130 mV 1 KHz Inganggevoeligheid LOW 430 mV 1 Khz Ingangschijn...
Page 67: ...67...
Page 68: ...hnology and equipment reserved Copyright 2010 by Conrad Electronic SE Information l gales Ce mode d emploi est une publication de la soci t Conrad Electronic SE Klaus Conrad Str 1 D 92240 Hirschau www...