


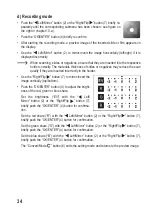
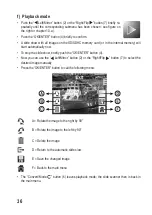


d) Recording mode
• Push the “ Left/Mirror” button (2) or the “Right/Flip ” button (7) briefly re-
peatedly until the corresponding submenu has been chosen; see figure on
the right or chapter 10. a).
• Push the “OK/ENTER” button (4) briefly to confirm.
• After starting the recording mode, a preview image of the inserted slide or film appears on
the display.
• Use the “ Left/Mirror” button (2) to mirror-invert the image horizontally (left/right) if it is
displayed incorrectly.
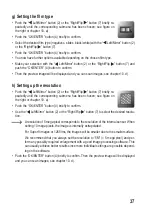
When scanning, slides or negatives, ensure that they are inserted into the respective
holder correctly. The materials thickness of slides or negatives may reduce the scan
quality if they are inserted incorrectly in the holder.
• Use the “Right/Flip ” button (7) to mirror-invert the
image vertically (top/bottom).
• Push the “OK/ENTER” button (4) to adjust the bright-
ness of the red, green or blue share.
Set the brightness (“EV”) with the “ Left/
Mirror” button (2) or the “Right/Flip ” button (7),
briefly push the “OK/ENTER” (4) button for confirma-
tion.
Set the red share (“R”) with the “ Left/Mirror” button (2) or the “Right/Flip ” button (7),
briefly push the “OK/ENTER” (4) button for confirmation.
Set the green share (“G”) with the “ Left/Mirror” button (2) or the “Right/Flip ” button (7),
briefly push the “OK/ENTER” (4) button for confirmation.
Set the blue share (“B”) with the “ Left/Mirror” button (2) or the “Right/Flip ” button (7),
briefly push the “OK/ENTER” (4) button for confirmation.
The “Convert/Mode ” button (6) ends the setting mode and returns to the preview image.
34


