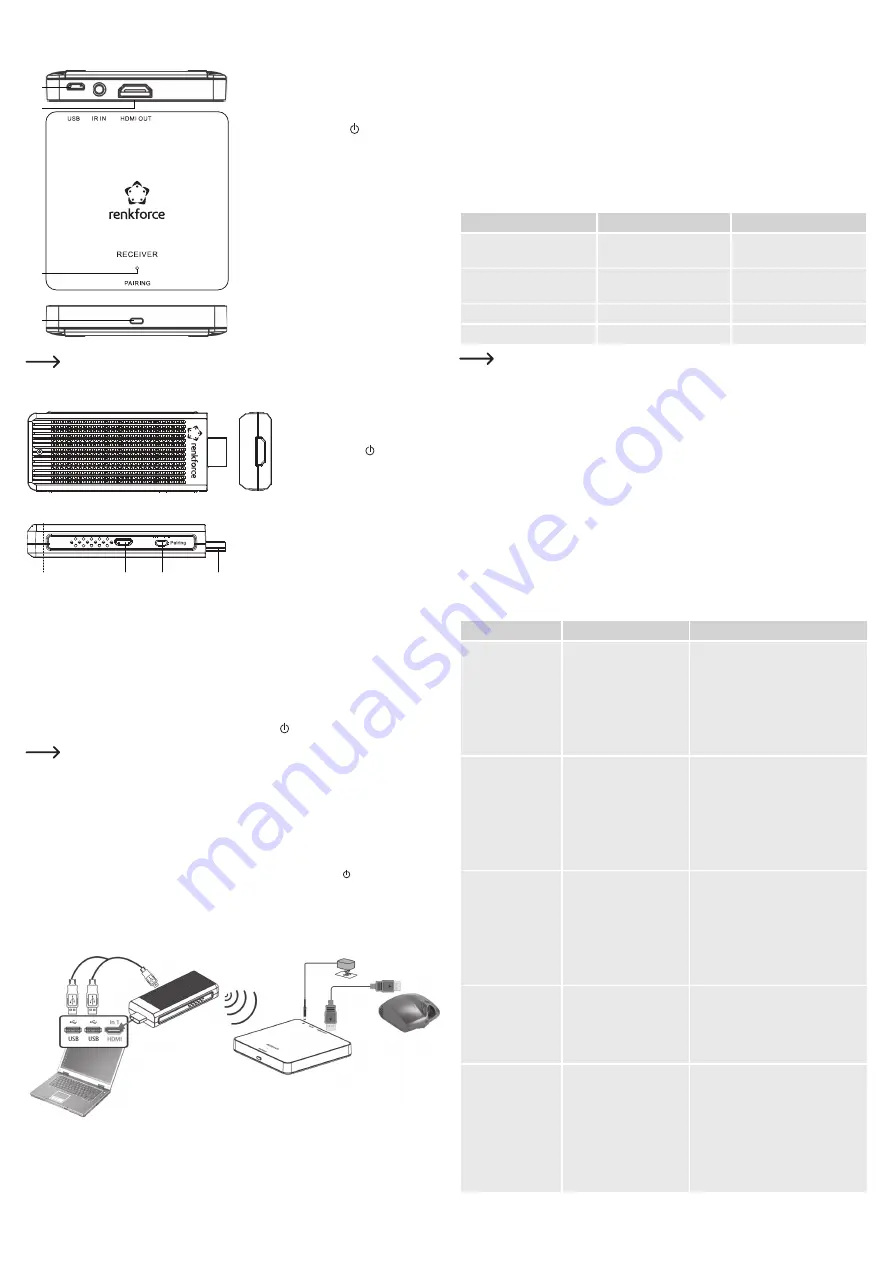
Operating elements
a) Receiver box
4
3
1
2
1 Pairing button
2
PAIRING
LED
3
HDMI OUT
(output)
4 Micro USB port
The transmitter does not support infrared, therefore it cannot be used with the
IR IN
socket.
b) Transmitter stick
A
B
C
D
USB
A HDMI port
B
Pairing
button
C Micro USB port
D LED indicator
Setup and connection
• Place the receiver on a level surface near the video output device. If necessary, use a cloth
to protect the surface of your furniture.
• Switch off all devices that you want to connect to the wireless set.
• Connect the transmitter stick to an HDMI port on your video output device (e.g. the HDMI port
on a computer or a DVD/Blu-Ray player). The transmitter is powered via the USB-Y cable.
Insert each USB-A connector on the USB-Y cable into a USB port on a computer, and then
connect the micro USB connector to the micro USB port (C).
Each USB port must provide a current of 500 mA. If necessary, connect the USB-Y
cable to the USB ports on the back of your computer. The transmitter stick must be
connected to two USB ports to ensure that there is sufficient power. If you wish to
use a USB hub to power the transmitter stick, ensure that the hub is connected to an
external power supply, otherwise the USB ports may not provide a sufficient current
(see "Technical data").
• Insert the HDMI cable into the
HDMI OUT
socket (3), and then connect the other end of the
cable to an HDMI port on your display device (e.g. monitor, TV or projector).
• Insert the USB connector on the power adapter into the micro USB port (4) on the receiver.
Connect the power adapter to a suitable mains socket.
Connection diagram
USB-Y power cable
Power adapter
HDMI port
HDMI cable
HD projector
Laptop
• Connect the HDMI port (A) to the output socket on your video output device, such as a
computer, Blu-Ray player, or games console (e.g. PS4 or Xbox). If necessary, use the 15 cm
HDMI cable supplied.
• The distance between the transmitter and receiver should not exceed 30 m.
• Insert the micro USB connector into the micro USB port (C) on the transmitter stick.
• Connect the video output device and the display device to a power source and turn them on.
Setup and operation
• The red LED indicator (D) on the transmitter will turn on when the transmitter is connected
to a USB power source.
• The
PAIRING
LED (2) on the receiver indicates that the receiver is connected to the mains.
a) Pairing the transmitter with the receiver
• Press the pairing button (1) on the receiver.
• A message will be displayed on your display device.
• Press the pairing button (B) on the transmitter.
• A wireless connection will be established automatically.
b) LED indicator status
Status
Transmitter (TX)
Receiver (RX)
Connected to a power
supply
Red
Red
PAIRING
button (1 and B)
pressed
Flashing red
Blue
Not paired
Flashing blue
Blue
Paired
Blue
Blue
Follow the onscreen prompts on your display device during the pairing process.
c) Wireless range
The maximum transmission range is 30 m. The range may be reduced by the following:
• Walls and reinforced concrete ceilings
• Double glazed windows
• Proximity to metal and conducting objects (e.g. radiators)
• Proximity to people
• Devices working on the same frequency (e.g. wireless video systems and Wi-Fi devices)
• Proximity to electrical devices, motors, transformers, power adapters,
• and computers
• Proximity to computers or other electrical devices with exposed components.
The range can vary significantly depending on the surroundings. If reception is poor, try moving
the receiver to another location. Do not place the receiver behind a TV.
Troubleshooting
Problem
Possible cause
Suggested solution
There is no image
on the display
device.
The cables are not
connected correctly.
Check that all cables are connected
correctly.
For best results, use a high-speed
HDMI cable.
Disconnect the transmitter and
receiver from the power supply to
restart the system.
There is no sound.
HDCP compatibility
issues.
Adjust the volume on your display
device.
Check that all cables are intact and
connected correctly.
Disconnect the transmitter and
receiver from the power supply to
restart the system.
There is no 3D
effect on the display
device.
3D mode is disabled.
Incompatible 3D shutter
glasses
Enable 3D mode on your monitor,
DLP projector and signal source
(AUTO or 3D ON).
Check that the shutter glasses have
sufficient battery power remaining.
Ensure that you are using the correct
shutter glasses for your 3D system.
The image quality
is poor.
Other wireless
devices (e.g. routers
or microwaves)
are interfering with
transmission.
Remove any sources of interference.
Place the receiver and transmitter in
an area without interference.
The transmitter
and receiver do
not connect, or
the connection
terminates.
The video output device is
not switched on.
System error
Connect the video output device to
the mains and switch it on.
Disconnect the transmitter and
receiver from the power supply to
restart the system.
Pair the transmitter and receiver
again (see "Pairing the transmitter
with the receiver").


