- 2 -
EN
Information for Operators
Using these operating instructions as a
starting point, instruct all operators of the
unit with regard to the area of application,
the possible hazards during operation,
and the proper operation of the preheating
oven.
Please have these operating instructions readily
available for the operators.
Additional information can be found in the Section,
“Information for Operators”
,
at the end of these instructions.
1.3 Adjusting the Unit’s Feet
The height of the feet on the rear of the oven can be
adjusted to compensate for uneven or sloping surfac-
es.
To adjust the feet:
• Loosen the locknuts (SW 13 mm spanner);
• Manually adjust the feet;
• Retighten the locknuts.
Adjust the unit’s feet so that the oven
slopes slightly to the rear, thus allowing
any wax spills to flow to the back and burn
rather than flowing out of the front of the
oven.
1.4 Power Connection
The oven is connected to the power supply via the
permanently attached power cord, equipped with a
grounded plug.
Before starting the oven, make sure the wall outlet to
which it is connected is protected by a 16A fuse.
Before connecting the unit to the wall out-
let, make sure the voltage information on
the nameplate corresponds to your local
power supply!
• Unroll the power cord.
• Plug the power cord into the wall outlet.
• Switch the oven on at the main power switch (Fig-
ure 2).
-
When the oven is first switched on the display
asking you to set the system time will flash (refer
to Sec. 2.3.1).
- Display of the unit of temperature to be indicat-
ed, °C / °F. (Refer to Sec. 2.3.2 for instructions
on how to modify the displayed units.)
Make sure no parts of the power cord are in
contact with hot areas of the housing! Do
not lay the power cord on top of the oven!
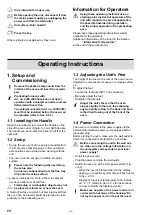
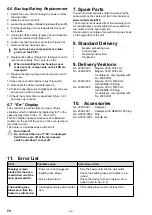
Operating Instructions
1. Setup and
Commissioning
Remove the packed components from the
interior of the oven and insert the ceramic
pad.
Preheating furnaces with
Art. no. 2300.x500 have been set up for
operation with a catalyst converter and are
delivered without a flue.
The catalyst converter (Art. no. 2300.0001)
must first be installed before the oven can
be operated (refer to Sec. 5.6.1).
1.1 Installing the Handle
Using the included screw, mount the handle on the
side of the oven door (Figure 1), 4mm SW Allen key.
The handle can be mounted on either the left or the
right side.
1.2 Setup
• Set up the oven so that it is easily accessible from
the front and so that stooping or other uncomfort-
able positions are avoided when working with the
unit.
•
The oven must be set up on a stable, fireproof
surface.
Please note the following when selecting
the setup area:
Corrosive condensation from the flue may
drip onto the setup surface.
• A space of at least 10 cm (4 inches) to adjacent
ovens or walls must be left free.
Flammable or combustible objects may not
be placed or stored on or near the oven.
A fireproof surface on which hot items removed from
the oven can be placed should be provided in close
proximity to the preheating oven.
Only intended for indoor use.
Before opening the unit, disconnect it from
the mains power supply by unplugging the
power cord from the wall outlet.
Hot surface. Burn hazard!
Press the key.
Other symbols are explained as they occur.
Summary of Contents for Magma 2300-0000
Page 2: ......
Page 3: ...1 3 2 4 5 6 7 8 ...
Page 4: ...9 11 10 12 13 14 15 16 ...
Page 5: ...17 19 18 20 21 22 23 24 ...
Page 6: ...25 27 26 28 29 30 31 ...
Page 24: ... 18 DE ...
Page 110: ... 18 PT ...
Page 144: ... 16 FI ...
Page 160: ... 16 CS ...
Page 192: ... 18 AR ...
Page 195: ......

