17
1.800.627.4499
Premium Commercial Controls
ERV
CONTROLLER OVERVIEW
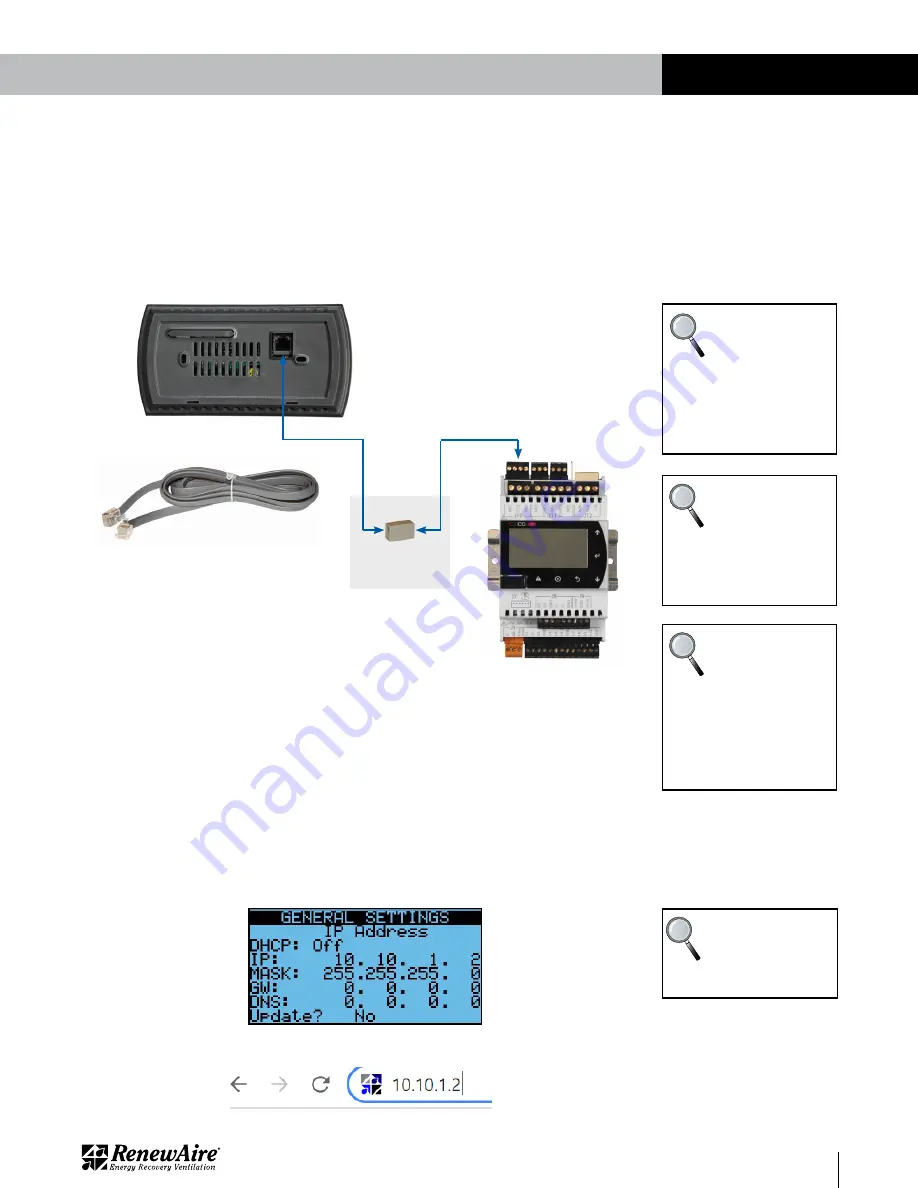
The RUT (optional accessory, field-installed) plugs into the controller by means of a six wire
cable with RJ12 jacks on each end. The six-wire cable is inserted in the RJ12 jack on the back
of the RUT and the other end of the cable is inserted into the RJ12 adapter, found in the low
voltage electrical compartment. The controller uses a pre-configured cable that plugs into the
J3 jack on the controller and the other end is plugged into the RJ12 adapter. The cable looks
similar to a standard phone cable but has a different pin out. The cable from the controller to
the low voltage electrical box is factory-installed.
FIGURE 2.1.1 CONNECTING A RUT
BACK OF RUT
LOW VOLTAGE
ELECTRICAL
COMPARTMENT
NOTE: Common
telephone wiring
is 4 conductor and
uses RJ11 termi-
nals. It is different from
the six-wire cable with
RJ12 terminals needed for
this accessory.
NOTE: If the con-
troller was ordered
for use with a
serial BMS and an
RUT is also desired,
contact the factory for
further information.
2.1.2 Connecting Using Internal Web Pages
The controller has embedded web pages and when they are accessed, an interactive screen
appears that allows the user to move through all the controller menus. The IP address of the
controller is factory-set at 10.10.1.2. The subnet address (needed for setting up a LAN) is set at
255.255.255.0. These can be changed in the
General Settings
menu.
In order to connect to the controller with your pc you will need:
u
An ethernet cable between the PC and the controller
u
The PC connection must be on the same subnet as the controller. For example, if using the
defaults, you would set the IP address of the PC connection to 10.10.1.xx where xx is not
equal to 2, and the subnet to 255.255.255.0. (See directions for setting the PC IP address if
you are not familiar with this.)
NOTE: The controller
will only support
private IP addresses
which start with
192, 172, or 10.
u
Using a browser such as Chrome, put the controller IP address into the address bar.
NOTE: For direct
connection from
RUT to J3 Terminal,
use the following
wiring:
Green & Black = +Vterm
Brown & Blue = GND
Red = Negative (-)
White = Positive (+)


