Chapter 4
360
Plus
Option
38
A
TTACHMENT
I
NSTRUCTIONS
Use the steps below to attach your camera and OneShot360
optics to the 360
Plus
bracket and the bracket to the mount and
tripod. Be sure to remove the original bracket that you received
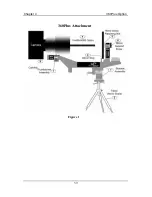
with your OneShot360 system. Use figure one for a detailed
picture of the attachment.
Note:
Before you start, remove the original OneShot360 tripod bracket from
your optics.
1. Attach the 360
Plus
bracket assembly (1) to the tripod
(2).
2. The 360
Plus
bracket assembly has two holes in which
the Mirror Support Screw (6) is used. If the serial
number (found on the lens barrel of the OneShot360
optics (4)) begins with a number 1, use the lower hole.
If the serial number begins with 9, 2, or CV use the
upper hole. Position the Mirror Screw Retaining Nut
(5) so that it leaves about 1/8” to 1/4” of thread at the
end of the screw.
3. Place the OneShot360 optics (4) onto the 360
Plus
bracket as show in Figure 1. Use the mirror support
screw (6) to attach to the mirror end of the optics to the
360
Plus
bracket. Place the mirror in the slot behind the
Mirror Stop (8) and tighten the screw. Loosely attach
the Thumbscrew Assembly (7) to the threaded hole in
the lens barrel of the OneShot360 optics. If the
Thumbscrew does not slide, turn the screw until it can
be slid easily. Slide the optics assembly until the mirror
meets the Mirror Stop (8). Tighten the Thumbscrew
Assembly (7) at the lens barrel.
4. Mount the camera (9) to the OneShot360. If you have
optics that have a serial number beginning with a
number 1 followed by 5 more digits, use the
thumbscrew on the lens barrel to position the camera,
then tighten the thumbscrew. If you have any other
serial number optics, use the slip ring to position your
camera.
Summary of Contents for OneShot360
Page 2: ......
Page 45: ...Chapter 4 360Plus Option 39 360Plus Attachment Figure 1 ...
Page 60: ......


