8
Option A
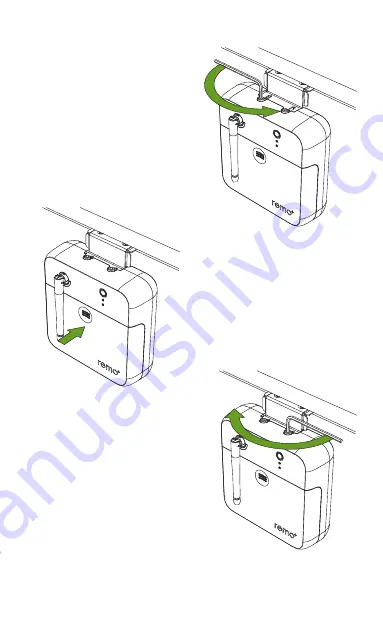
1. Use the Hex Wrench to
loosen the Body’s Bracket
Adjustment Screws.
2. Push the body inward
until the inside of the
body touches the door.
3. Use the Hex Wrench to
tighten the Body’s Bracket
Page 1: ...Quick Start Guide DoorCam 2...
Page 2: ...2 WHAT S IN THE BOX 3 D CELL BATTERIES BATTERY COVER SCREW PROTECTED BY REMO STICKER MOUNTING SCREWS Optional HEX WRENCH DOORCAM 2...
Page 3: ...for mounting 9 10 11 12 13 14 15 Camera s Bracket Adjustment Screw Mounting Holes Body s Bracket Adjustment Screws Status Button Status LED Wi Fi Antenna Battery Cover 1 2 3 4 5 6 7 8 PIR Sensor IR LE...
Page 4: ...i 5GHz not supported 2 Download and launch the Remo app 3 Press Sign Up at the bottom of the login page 4 Enter your email and create a password Then press Sign Up For Help press the at the top right...
Page 5: ...logging into the Remo app press on the home screen to add your device and select your time zone 4 Switch to your phone s Wi Fi settings leaving the Remo app open Please DO NOT CLOSE THE APP 5 Connect...
Page 6: ...or as shown below Remove the protective film from the Adhesive Pad on the back of DoorCam 2 body Use the Hex Wrench to loosen the Camera s Bracket Adjustment Screw and fully extend the bracket Tighten...
Page 7: ...upports both push to enter and pull to enter doors If your door pushes to enter follow Option A on page 8 If your door pulls to enter follow Option B on page 9 INSIDE OUTSIDE PUSH TO ENTER DOORS INSID...
Page 8: ...A 1 Use the Hex Wrench to loosen the Body s Bracket Adjustment Screws 2 Push the body inward until the inside of the body touches the door 3 Use the Hex Wrench to tighten the Body s Bracket Adjustmen...
Page 9: ...1 Use the Hex Wrench to loosen the Camera s Bracket Adjustment Screw 2 Push the camera inward until the back of the camera touches the door 3 Use the Hex Wrench to tighten the Camera s Bracket Adjust...
Page 10: ...if placed too close to the edge of the door without being mounted We recommend placing DoorCam 2 at the center of your door You can further secure the device by using the included Mounting Screws PUS...
Page 11: ...ower Adapter sold separately POWER SOURCE IF USING BATTERIES 3 Close the Battery Cover Optional You can further secure the Battery Cover by using the Battery Cover Screw 1 Remove the Battery Cover 2 I...
Page 12: ...separately 1 Hang DoorCam 2 over the door and adjust the Bracket to fit the door s thickness See ADJUST DOORCAM 2 PAGE 7 2 Remove the Battery cover and connect DoorCam 2 to a power outlet using the US...
Page 13: ...lect Cellular Turn OFF Wi Fi Assist 3 Forget the DoorCam 2 network from your phone s Wi Fi settings 4 Close the Remo app and reset DoorCam 2 see page 14 5 Restart the registration process see page 5 O...
Page 14: ...s or family by clicking on the share button on the bottom right side of the screen How to reset your DoorCam 2 1 Open the battery cover and press the Reset button for 5 seconds 2 Wait until the status...
Page 15: ...app they will no longer be available Forgot your password 1 Press Forgot Password on the login page 2 Enter your account email and click SEND 3 Check your email including the spam folder for the tempo...
Page 16: ...e user this will show in the Viewers list Menu Viewers Click on Viewer XXXX 4 Type in your preferred viewer name Alluserswillhavethesameaccesstothedeviceanddevicerecordings How many Remo devices can I...
Page 17: ...NSED PRODUCT IS PROVIDED AS IS WITHOUT WARRANTY OF ANY KIND EITHER EXPRESS OR IMPLIED INCLUDING BUT NOT LIMITED TO IMPLIED WARRANTIES OF MERCHANTABILITY AND FITNESS FOR A PARTICULAR PURPOSE THE ENTIRE...
Page 18: ...ul interference to radio or television reception which can be determined by turning the equipment off and on the user is encouraged to correct the interference by one of the following measures Reorien...