Black (Down)
Blue (Neutral)
Red (Live)
Brown (Up)
1
3
L2
Mechanical
Switch
Down
UP
Live
3-Cores
AC Cable
4-Cores
AC Cable
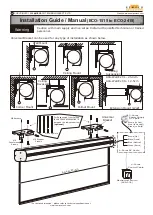
E) Terminate AC cable as shown in figure.
Screen Casing
Power Supply
X Not in use
27
Power Drill
Pin Punch
Hammer
M6 Anchor
B) Drill Diameter 8mm Holes to a depth 27mm.
C) Insert M6 Anchor into the hole.
D) Use pin punch to expand the anchor.
STEP 2
8mm Drill
STEP 3
STEP 4
End
Important Note
The upper limit and lower limit of the screen had been preset in factory. Any adjustment to these 2 limit
switches may cause damages to the screen fabric. If adjusted, it will cause the following problems:
a) The screen will roll into the frame and stop by force and not by the Upper Limit switch.
This will cause overheating of motor which unable the screen to operate properly.
b) The depression of the bottom bar onto the fabric will cause horizontal mark on screen surface.
c) Adjusting the Lower Limit of the screen any lower than beyond the STOP sticker may cause the fabric
to drop off
Disclaimer
Any adjustment to these 2 limit switches will void the warranty for the screen and Remaco will hold
no responsibility for any damages to it. Please consult us if it is necessary to do any adjustment to the
limit switch.
Screen Frame
Universal Bracket
A) Mark the bracket position with the help of universal bracket.
STEP 1
Hook on (NOT slide in)
E) To set screen to your desired “up” and “down” positions.
Bottom View
Lower Limit
Adjust “
-
” : screen roll away from frame
Adjust “
+
” : screen roll into the frame
Screen Frame
STOP
+
-
+
-
Red Knob
Upper Limit
White Knob
Allen Key (# 4mm) to set
limit switch know
Upper Limit
Lower Limit
Adjust “
-
” : less screen drop
Adjust “
+
” : more screen drop


